Assignment 1: Sockets, Mininet, & Performance
Iperf is a common tool used to measure network bandwidth. You will write your own version of this tool in Java using sockets. You will then use your tools to measure the performance of virtual networks in Mininet and explain how link characteristics and multiplexing impact performance.
Part 3: Measurements in Mininet
Appendix A: Testing Iperfer in Mininet
After completing this programming assignment, students should be able to:
For the first part of the assignment you will write your own version of iperf to measure network bandwidth. Your tool, called Iperfer, will send and receive TCP packets between a pair of hosts using sockets.
Note: A good resource and a starting point to learn about Java socket programs is the Java sockets tutorial.
When operating in client mode, Iperfer will send TCP packets to a specific host for a specified time window and track how much data was sent during that time frame; it will calculate and display the bandwidth based on how much data was sent in the elapsed time. When operating in server mode, Iperfer will receive TCP packets and track how much data was received during the lifetime of a connection; it will calculate and display the bandwidth based on how much data was received and how much time elapsed between the received first and last byte of data.
To operate Iperfer in client mode, it should be invoked as follows:
java Iperfer -c -h <server hostname> -p <server port> -t <time>
You can use the presence of the -c option to determine Iperfer should operate in client mode.
If any arguments are missing or additional arguments are given or arguments are given in wrong order, you should print the following and exit:
Error: invalid arguments
If the server port argument is less than 1024 or greater than 65535, you should print the following and exit:
Error: port number must be in the range 1024 to 65535
On the time and hostname input values, provide input validations that you think are reasonable. As always, state your assumptions through comments in code.
When running as a client, Iperfer must establish a TCP connection with the server and send data as quickly as possible for time seconds. Data should be sent in chunks of 1000 bytes and the data should be all zeros. Keep a running total of the number of bytes sent.
After time seconds have passed, Iperfer must stop sending data and close the connection. Iperfer must print a one line summary that includes:
For example:
sent=6543 KB rate=5.234 Mbps
You should assume 1 kilobyte (KB) = 1000 bytes (B) and 1 megabyte (MB) = 1000 KB. As always, 1 byte (B) = 8 bits (b).
To operate Iperfer in server mode, it should be invoked as follows:
java Iperfer -s -p <listen port>
You can use the presence of the -s option to determine Iperfer should operate in server mode.
If arguments are missing or additional arguments are provided or arguments are given in wrong order, you should print the following and exit:
Error: invalid arguments
If the listen port argument is less than 1024 or greater than 65535, you should print the following and exit:
Error: port number must be in the range 1024 to 65535
When running as a server, Iperfer must listen for TCP connections from a client and receive data as quickly as possible until the client closes the connection. Data should be read in chunks of 1000 bytes. Keep a running total of the number of bytes received.
After the client has closed the connection, Iperfer must print a one line summary that includes:
For example:
received=6543 KB rate=4.758 Mbps
The Iperfer server should shut down after it handles one connection from a client.
We would like you to test the IPerfer tool on two environments - a Wired environment and a Wireless Environment
You can test Iperfer on any machines you have access to. However, be aware that certain ports may be blocked by firewalls on end hosts or in the network, so you may not be able to test your program on all hosts or in all networks. You should be able to use two machines in the CS labs without any problems.
Take a screenshot of the measurements (both client and server) when running the tool on the terminal and insert them in a file called answers.pdf under the heading Part 1 - Iperfer on Wired Environment. Be sure to mark your screenshots with appropriate labels.
Now that you have tested Ipefer in a wired environment, think about what would happen in a wireless environment. Under which environment - wired or wireless, would you expect greater throughput? Note your answer along with the reasoning in answers.pdf under the heading Part 1 - Wireless Environment.
To measure the throughput in a wireless environment, you would first need to setup a wireless environment and then connect two machines - one that would act as a client and the other that would act as the server, in order to measure the throughput.
There are many ways to setup wireless environments. The most common ways are listed below:
Take a screenshot of the measurements (both client and server) when running the tool on the wireless environment and insert them into answers.pdf. Be sure to mark your screenshots with appropriate labels.
Now compare the throughputs between the wired and wireless environments you had obtained. Did it match the prediction you made at the start of this section? In either case, explain your results. Put your answers into answers.pdf
You can also test your tool using Mininet. Instructions are provided in Appendix A. You should complete Part 2 of this assignment before following the instructions in Appendix A.
You should receive the same number of bytes on the server as you sent from the client. However, the timing on the server may not perfectly match the timing on the client. Hence, the bandwidth reported by client and server may be slightly different; in general, they should not differ by more than 2 Mbps. Note, this behavior mirrors the behavior of the actual iperf tool.
For the third part of the assignment, you will learn how to use Mininet to create virtual networks and run simple experiments. According to the Mininet website, Mininet creates a realistic virtual network, running real kernel, switch and application code, on a single machine (VM or native), in seconds, with a single command. We will use Mininet in programming assignments throughout the semester.
To run Mininet, you will need a virtual machine (VM) in the Instructional Virtual Lab. To be assigned a VM, visit http://sdn.cs.wisc.edu/mininet and login with your CS username and password. You must provide the CS username of your partner when you request a VM for your group.
You should use SSH, not the VMware remote console, to access your VM. When you connect via SSH, you should include the -X option to tunnel X11 (i.e., graphics) over SSH. For example:
ssh -X mininet@mininet-99.cs.wisc.edu
You can only access your VM via SSH from within the CS network—i.e., from a machine in one of the instructional labs, an office machine (for grad students), a personal machine connected to the CS wireless network, or a personal machine with a VPN connection to the CS network. Also, you will need to have X11 installed on the machine from which you are connecting. X11 is installed by default on Linux machines in the CS department; on a personal machine, you can install Xming (Windows), Quartz (Mac OS), or a graphical environment (Linux) to get X11.
You should only need X11 to run xterms in Mininet. For editing files now is the opportune time to learn a text editor that doesn’t require a GUI! Vim and emacs are the most popular.
To transfer files to/from your VM you should use the scp (secure copy) command. See the scp man page, or find a tutorial online, for instructions on how to use scp. You could also use a revision control system, such as Git or Subversion, and checkout a copy of the repository in your VM.
Once you have a Mininet VM, you should complete the following sections of the standard Mininet walkthrough:
At some points, the walkthrough will talk about software-defined networking (SDN) and OpenFlow. We will discuss these during the second half of the semester, so you do not need to understand what they mean right now; you just need to know how to run and interact with Mininet.
To change the colors of xterm windows (black font on white background) to make them more readable, run the following command in your Mininet VM (in a regular shell, not while Mininet is running):
echo XTerm*Foreground: black > ~mininet/XTerm
echo XTerm*Background: white >> ~mininet/XTerm
You do not need to submit anything for this part of the assignment.
For the last part of the assignment you will use the tool you wrote (Iperfer) and the standard latency measurement tool ping (ping measures RTT) , to measure the bandwidth and latency in a virtual network in Mininet. You must include the output from some of your experiments and the answers to the questions below in your submission. Your answers to the questions should be put in the file answers.pdf.
Read the ping man page to learn how to use ping.
You must install Java in your Mininet VM before you can run Iperfer. You can install Java by running the following commands:
sudo apt-get update
sudo apt-get install openjdk-7-jdk
A python script to run Mininet with the topology described below is located at: http://pages.cs.wisc.edu/~akella/CS640/F19/assignment1/assign1.tgz. To download the script in your Mininet VM, run:
wget http://pages.cs.wisc.edu/~akella/CS640/F19/assignment1/assign1.tgz
tar xzvf assign1.tgz
To run Mininet with the provided topology, run the Python script assign1_topo.py using sudo:
sudo python assign1_topo.py
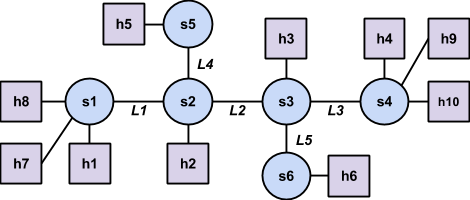
This will create a network with the following topology:
Hosts (h1 - h10) are represented by squares and switches (s1 - s6) are represented by circles; the names in the diagram match the names of hosts and switches in Mininet. The hosts are assigned IP addresses 10.0.0.1 through 10.0.0.10; the last number in the IP address matches the host number. When running ping and Iperfer in Mininet, you must use IP addresses, not hostnames.
First, you should measure the RTT and bandwidth of each of the five individual links between switches (L1 - L5). You should run ping with 30 packets and store the output of the measurement on each link in a file called latency_L#.txt, replacing # with the link number from the topology diagram above. You should run Iperfer for 30 seconds and store the output of the measurement on each link in a file called throughput_L#.txt, replacing # with the link number from the topology diagram above.
Now, assume h1 wants to communicate with h4. What is the expected latency and throughput of the path between the hosts? Put your prediction in your answers.pdf file.
Measure the latency and throughput between h1 and h4 using ping and Iperfer. It does not matter which host is the client and which is the server. Use the same parameters as above (30 packets / 30 seconds) and store the output in files called latency_Q2.txt and throughput_Q2.txt. Put the average RTT and measured throughput in your answers.pdf file and explain the results. If your prediction was wrong, explain why.
Next, assume multiple hosts connected to s1 want to simultaneously talk to hosts connected to s4. What is the expected latency and throughput when two pairs of hosts are communicating simultaneously? Three pairs? Put your predictions in your answers.pdf file.
Use ping and Iperfer to measure the latency and throughput when there are two pairs of hosts communicating simultaneously; it does not matter which pairs of hosts are communicating as long as one is connected to s1 and one is connected to s4 . Use the same parameters as above. You do not need to submit the raw output, but you should put the average RTT and measured throughput for each pair in your answers.pdf file and explain the results. If your prediction was wrong, explain why.
Repeat for three pairs of hosts communicating simultaneously.
Lastly, assume h1 wants to communicate with h4 at the same time h5 wants to communicate with h6. What is the expected latency and throughput for each pair? Put your prediction in your answers.pdf file.
Use ping and Iperfer to conduct measurements, storing the output in files called latency_h1-h4.txt, latency_h5-h6.txt, throughput_h1-h4.txt, and throughput h5-h6.txt. Put the average RTT and measured throughput in your answers.pdf file and explain the results. If your prediction was wrong, explain why.
You must submit:
You must submit a single tar file containing the above. To create the tar file, run the following command, replacing username1 and username2 with the CS username of each group member:
tar czvf username1_username2.tgz iperfer measurement README
Upload the tar file on the Assignment 1 tab on course's Canvas page. Please submit only one tar file per group.
You must install Java in your Mininet VM before you can run Iperfer. You can install Java by running the following commands:
sudo apt-get update
sudo apt-get install openjdk-7-jdk
You can test Iperfer in Mininet using the sample topology shown below.
A python scripts to run Mininet with this topology described below is located at: http://pages.cs.wisc.edu/~akella/CS640/F19/assignment1/assign1.tgz. To download the scripts in your Mininet VM, run:
wget http://pages.cs.wisc.edu/~akella/CS640/F19/assignment1/assign1.tgz
tar xzvf assign1.tgz
To run Mininet with the provided topology, run the Python script assign1_test.py using sudo:
sudo python assign1_test.py