Assignment 1
Due Thursday, September 28 Sunday, October 1
Overview
This assignment is designed to support your in-class understanding of how data analytics stacks work and the factors influencing their performance. You will deploy Hadoop, a widely used data analytics framework. You will run SQL queries "jobs" atop Hive using two different types of underlying execution frameworks, namely MapReduce and Tez. You will develop two simple applications in MapReduce and Spark. And you will produce a short report detailing your performance observations and takeaways.
Learning Outcomes
After completing this assignment, you should:
- Have gotten a hands-on experience in deploying a big data analytics stack.
- Be able to estimate the performance of a Hadoop-style data analytics stack under specific operating parameters.
- Be able to write simple MapReduce/Spark applications.
Clarifications
- You should always operate using ubuntu user by default. Use root permissions only when needed(e.g. to modify /etc/hosts, /etc/mysql/my.cnf).
- You should empty the buffers cache before any of your experiment run. You can run: sudo sh -c "sync; echo 3 > /proc/sys/vm/drop_caches" on each slave VM.
- You should never format the namenode multiple times or generate the database multiple times. It needs to be done just once.
- The steps under the Setup section need to be done only once. On starting your cluster, you just need to load the environment variables by running the command source run.sh and start the daemons by running the command start_all.
Setup
VMs configuration
For this assignment, we have already setup a cluster for each group on Cloudlab. Once the groups are formed, we will send each group their private key and IP (to one of the VMs) to access the nodes on the cluster. The cluster consists of a set of 5 VMs. All VMs have a private IP and are reachable from each other. Also, one of the VMs has a public IP associated with it and can be accessed from the external world. In your setup, you should designate a VM to act as a master/slave (say vm1) while the others are assigned as slaves only. In the following, when we refer to a master, we refer to either the VM designated as the master, or to a process running on the master VM.
To prepare your VMs for the big data analytics stack deployment, you need to perform the following steps:
- Hosts information update and passwordless connections between the master and slaves
- copy private key to master vm, which will be used to access other vms:
scp -i group<group_number>.pem group<group_number>.pem ubuntu@<public_ip>:/home/ubuntu. Replace <group_number> with your group number and make sure that your private key has the permission set to 600.
- login to your master VM: ssh -i group<group_number>.pem ubuntu@<public_ip>.
- update /etc/hosts with information about all VM Private IPs and their hostnames, which is to map IP addresses and host names. Update it on master at this time. (For private IP address for each vm, please check the attachment of the cluster assignment email)
- 10.254.0.1 vm-<group_number>-1
- 10.254.0.2 vm-<group_number>-2
- 10.254.0.3 vm-<group_number>-3
- 10.254.0.4 vm-<group_number>-4
- 10.254.0.5 vm-<group_number>-5
- on the master, generate a private/public key pair: ssh-keygen -t rsa (this path is stored in /home/ubuntu/.ssh/).
- copy the generated public key into the slaves: cat
/home/ubuntu/.ssh/id_rsa.pub | ssh -i group<group_number>.pem ubuntu@vm-<group_number>-<vm_number> 'cat >> .ssh/authorized_keys'. Replace <group_number> and <vm_number> with your group number and the slave VM numbers.
- test that you can connect from the master to any slave VM without a password: ssh vm-<group_number>-<vm_number>.
- do step 3 on all vms.
- Install various packages on every VM
- sudo apt-get update --fix-missing.
- sudo apt-get install openjdk-7-jdk.
- sudo apt-get install pdsh (parallel distributed shell).
- Create a hierarchy of directories required during the software deployment step. This hierarchy should exists on all the VMs and it is required by various framework specific configurations. For example, /home/ubuntu/storage/hdfs/hdfs_dn_dirs is required by dfs.datanode.data.dir property in hdfs-site.xml and it determines where on the local filesystem an HDFS data node should store its blocks. /home/ubuntu/logs/apps is required by yarn.nodemanager.log-dirs to store container logs. /home/ubuntu/storage/data/spark/rdds_shuffle is required to store shuffle data and RDDs that get spilled to disk. Spark applications run in /home/ubuntu/storage/data/spark/worker. Other structures such as /home/ubuntu/conf, logs, software, storage, workload are mainly designed for convenience and easier debugging in case you face issues that require further investigation.
- /home/ubuntu/conf, logs, software, storage, workload.
- /home/ubuntu/logs/apps, hadoop.
- /home/ubuntu/storage/data/local/nm, tmp.
- /home/ubuntu/storage/hdfs/hdfs_dn_dirs, hdfs_nn_dir.
- /home/ubuntu/workload.
- /home/ubuntu/storage/data/spark/rdds_shuffle.
- /home/ubuntu/logs/spark.
- /home/ubuntu/storage/data/spark/worker.
Software deployment
The following will help you deploy all the software needed and set the proper configurations
required for this assignment. You need to download the following configuration archive on
every VM, and place the uncompressed files in /home/ubuntu/conf. In addition,
download and deploy the run.sh script in your home
directory (/home/ubuntu) on every VM. The script enables you to start and stop Hadoop services and configure various environment variables. To function properly, it requires an machines file which contains the IP addresses of all the slave VMs where you plan to deploy your big data software stack, one per line, and put this file to your home directory/home/ubuntu. For example, if you plan to deploy slave processes on VMs with IPs 10.0.0.5, 10.0.0.6, 10.0.0.7, 10.0.0.8, your machines file will look like:
10.0.0.5
10.0.0.6
10.0.0.7
10.0.0.8
We recommend students to setup their cluster such that one VM acts both as master/slave and the others act as slaves.
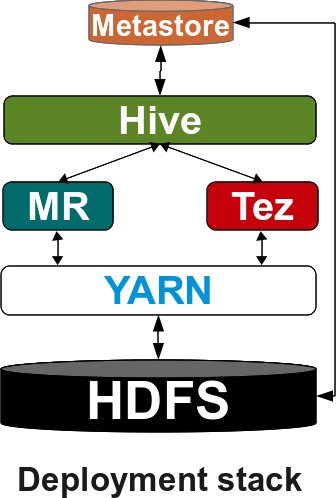
Next, we will go through building this stack. The following figure describes the software stack you will deploy for Hadoop, Tez and Hive:
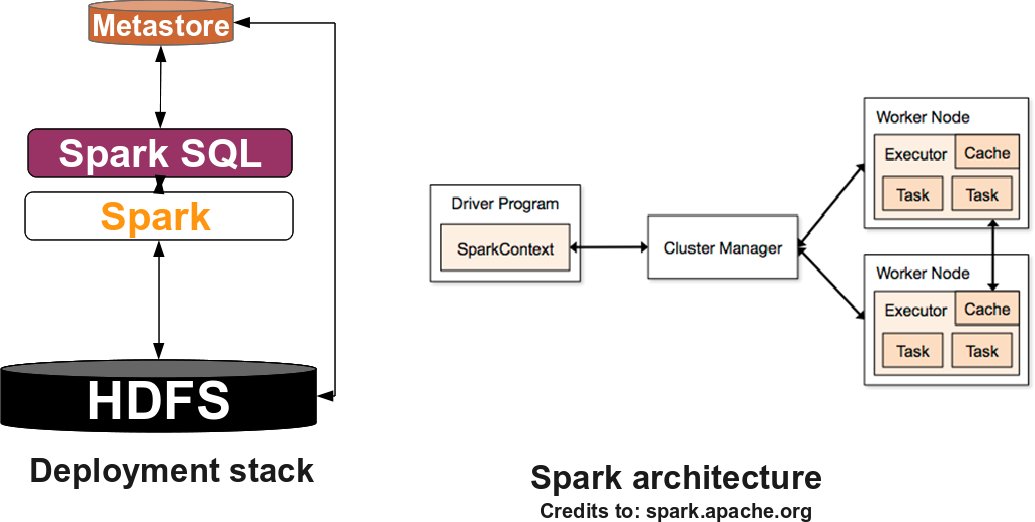
And the following figure shows the software stack for Spark:
Hadoop
The first step in building your big data stack is to deploy Hadoop. Hadoop mainly consists of two parts: a distributed filesystem called HDFS and a resource management framework known as YARN. As you will learn in the class, HDFS is responsible for reliable management of the data across the distributed system, while YARN handles the allocation of available resources to existing applications.
To become familiar with the terminology, HDFS consists of a master process running on the master instance, called NameNode and a set of slave processes one running on each slave instance called DataNode. The NameNode records metadata information about every block of data in HDFS, it maintains the status of the DataNodes, and handles the queries from clients. A DataNode manages the actual data residing on the corresponding instance. Similarly, in YARN there is a master process known as ResourceManager which maintains information about the available instances/resources in the system and handles applications resource requests. A NodeManager process is running on every instance and manages the available resources, by periodically "heartbeating" to the ResourceManager to update its status.
Now that you know the terminology, download hadoop-2.6.0.tar.gz. Deploy the archive in the /home/ubuntu/software directory on every VM and untar it (tar -xzvf hadoop-2.6.0.tar.gz).
You should modify core-site.xml, hdfs-site.xml, yarn-site.xml, mapred-site.xml in your /home/ubuntu/conf directory on every VM and replace the master_ip with the private IP of your master VM.
Before launching the Hadoop daemons, you should set the proper environment variables from the script run.sh and format the Hadoop filesystem. To enable the environment variables you need to run the command: source run.sh. To format the filesystem (which simply initializes the directory specified by the dfs.namenode.name.dir) run the command: hadoop namenode -format (This needs to be done only once).
Finally, you can instantiate the Hadoop daemons by running start_all in your command line on the master VM. To check that the cluster is up and running you can type jps on every VM. Each VM should run the NodeManager and DataNode processes. In addition, the master VM should run the ResourceManager, NodeManager, JobHistoryServer, ApplicationHistoryServer, Namenode, DataNode. The processesJobHistoryServer and ApplicationHistoryServer are history servers designed to persist various log files for completed jobs in HDFS. Later on, you will need these logs to extract various information to answer questions in your assignment. In addition, you can check the status of your cluster, at the following URLs:
- http://public_ip_master:50070 for HDFS.
- http://public_ip_master:8088 for YARN.
- http://public_ip_master:19888 for M/R job history server.
- http://public_ip_master:8188 for application history server.
To test that your Hadoop cluster is running properly, you can run a simple MapReduce application by typing the following command on the master VM:
- hadoop jar software/hadoop-2.6.0/share/hadoop/mapreduce/hadoop-mapreduce-examples-2.6.0.jar pi 1 2.
Tez
Tez is an application framework built atop YARN, which allows for a complex directed-acyclic graph(DAG) of tasks for processing data. You should take the following steps to deploy Tez:
- Download tez-0.7.1-SNAPSHOT.tar.gz in the /home/ubuntu/software directory on the master VM.
- Create /apps/tez-0.7.1-SNAPSHOT directory in HDFS using the command: hadoop fs -mkdir -p /apps/tez-0.7.1-SNAPSHOT.
- Copy tez-0.7.1-SNAPSHOT.tar.gz into HDFS: hadoop fs -copyFromLocal tez-0.7.1-SNAPSHOT.tar.gz /apps/tez-0.7.1-SNAPSHOT/.
- Extract the tez minimal tarball tez-0.7.1-SNAPSHOT-minimal.tar.gz to /home/ubuntu/software directory on your master VM.
To test that your Tez installation has been done properly, you can run a simple wordcount application:
- Create a text file and upload it to HDFS:
hadoop fs -copyFromLocal wcount_input.txt /.
- Run orderedwordcount job using Tez:
hadoop jar /home/ubuntu/software/tez-0.7.1-SNAPSHOT-minimal/tez-examples-0.7.1-SNAPSHOT.jar orderedwordcount -Dtez.runtime.io.sort.mb=220 /wcount_input.txt /wcount_output.txt.
Hive
Now, you will deploy Hive. Hive is a data warehouse infrastructure which provides data summarization, query, and analysis. To deploy Hive, you also need to deploy a metastore service which stores the metadata for Hive tables and partitions in a relational database, and provides Hive access to this information via the metastore service API.
To deploy the metastore service you need to do the following:
- Install mysql-server which will be used to store the metastore information. On your master VM you should run the command: sudo apt-get install mysql-server.
- After you have installed the mysql-server, you should replace the bind-address in /etc/mysql/my.cnf to point to your eth0 IP address. Finally, restart the mysql server: sudo /etc/init.d/mysql restart.
- Login to your mysql console as root: mysql -u root -p .
- After you are logged in, create a metastore database in your mysql console: mysql> create database metastore;.
- Select the newly created metastore database: mysql> use metastore;.
- Create a new user hive identified by password hive :mysql> create user 'hive'@'IP_master' identified by 'hive';.
- Grant privileges on the metastore database to the newly created user: mysql> grant all privileges on metastore.* to 'hive'@'IP_master' identified by 'hive'; .
- Flush privileges mysql> flush privileges; .
- mysql> quit; .
You should modify hive-site.xml in your /home/ubuntu/conf directory on the master VM and replace the master_ip with it's IP.
Finally, download and untar hive-1.2.1.tar.gz in /home/ubuntu/software on the master VM. If you type hive in the command line, you should be able to enter hive console >hive.
Apache Spark
You will use HDFS as the underlying
filesystem.
To become familiar with the terminology, SPARK standalone consists of a set of daemons: a Master daemon, which is the equivalent of the ResourceManager in YARN terminology, and a set of Worker daemons, equivalent to the NodeManager processes. SPARK applications are coordinated by a SparkContext object which will connect to the Master, responsible for allocating resources across applications. Once connected, SPARK acquires Executors on every Worker node in the cluster, which are processes that run computations and store data for your applications. Finally, the application's tasks are handled to Executors for execution. You can read further about the SPARK architecture here.
Now that you are familiar with the SPARK terminology, download spark-2.0.0-bin-hadoop2.6.tgz . Deploy the archive in the /home/ubuntu/software directory on every VM and untar it (tar -xzvf spark-2.0.0-bin-hadoop2.6.tgz).
You should modify hive-site.xml and set the hive.metastore.uris property to thrift://ip_master:9083.
Finally, you can instantiate the SPARK daemons by running start_spark on your Master VM. To check that the cluster is up and running you can check that a Master process is running on your master VM, and a Worker is running on each of your slave VMs. In addition you can check the status of your SPARK cluster, at the following URLs:
- http://public_ip_master:8080 for SPARK.
- http://public_ip_master:4040 for your application context. Note that this will be available only when an application is running.
Workload
For the purpose of this assignment, you will run SQL queries atop Hive. Some of the most popular benchmarks used for performance evaluation are TPC-DS and TPC-H. You have to download hive-tpcds-tpch-workload.tar.gz archive for your benchmarking. For consistency, you should deploy the uncompressed files in /home/ubuntu/workload on the master VM.
There are three important scripts available in the workload directory:
- generate_data.sh which allows you to generate a number of different TPC-DS databases, and to specify their size. You need to run the script with the following arguments:./generate_data.sh number_databases size_database. As default, it will call tpcds-setup.sh script which generates data in plain text format.
For example ./generate_data.sh 1 10 will generate a database called tpcds_text_db_1_10 which holds 10 GB of data and tables stored in HDFS.
- run_query_hive_mr.sh is a simple script which allows you to run a TPC-DS query using MapReduce as the execution engine and with minimal configuration. More precisely, to run a hive query using MapReduce you have to run the command:
(hive --hiveconf hive.execution.engine=mr -f sample-queries-tpcds/query.sql --database tpcds_database) 2> output/query_mr.out
where query.sql represents the query script you want to run and tpcds_database is the corresponding database holding the data and generated in previous step using generate_data.sh script.
- run_query_hive_tez.sh uses tez as an execution engine.
(hive --hiveconf hive.execution.engine=tez --hiveconf hive.tez.container.size=$containerSize --hiveconf hive.tez.java.opts=$containerJvm -f sample-queries-tpcds/query.sql --database tpcds_database) 2> output/query_tez.out
- In addition, you can pass other parameters to the underlying frameworks using --hiveconf command. For example, to enable the cost based optimizer in Hive, you need to pass an additional --hiveconf hive.cbo.enable=true flag.
Part A: Experimenting with performance
Once you have the software stack running, you should answer each of the questions listed below. To answer the questions, you will need to generate a 50 GB TPC-DS database and run queries 12, 21, 50, 71, 85 from the TPC-DS benchmark. We picked these queries because they are very different from each other.
The questions below will let you explore various aspects of performance. The first question will let you evaluate query performance. Next, you will tune some of the basic configurations in Tez and MapReduce and observe how the performance varies. Later on, you will evaluate how robust are single DAG (Tez) versus multiple "stitched" DAG (MR) frameworks in the presence of failures.
- In this experiment, you will run each of the queries mentioned above which are located in /home/ubuntu/workload/sample-queries-tpcds. You will run a query at a time using Hive/MR and Hive/Tez. For every query, you should compute the following:
- Plot the query completion time. Your plot should have five queries on the X-axis, and for each query two columns. One describing the job completion time with Hive/MR and one running Hive/Tez.
What do you observe? Is Hive/Tez always better than Hive/MR? By how much? Is the difference always constant? If not, why?
- Compute the amount of network/storage read/write bandwidth used during the query lifetime. Your plot(s) should clearly describe the amount of data read/written from network/disk for every query and for each framework(Hive/MR and Hive/Tez). What do you observe? Is there a trend? What are the possible explanations for your results/anomalies?.
To extract network and disk counters you can extract the corresponding counters from: /proc/net/dev and /proc/diskstats. Disk sector size is 512B.
- Compute various task statistics exploring the log history files stored in HDFS. More precisely, for every query and Hive/MR, Hive/Tez, you should compute the following: total number of tasks; ratio of tasks which aggregates data versus the number of tasks which read data from HDFS; task distribution over query lifetime. Is there any correlation between these metrics and performance? Why/why not?
The log history files should be located for Hive/MR in HDFS at /tmp/hadoop-yarn/staging/history. You should copy all the corresponding *.jhist files of the jobs involved in a Hive/MR query and parse them using your desired scripts. For Hive/Tez, the history logs should be available in HDFS at /tmp/tez-history.
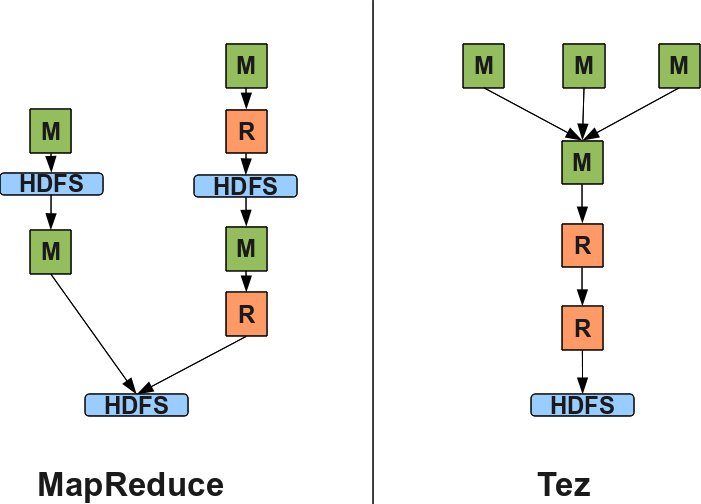
- Visually plot the DAGs generated by Hive/MR and Hive/Tez. For Hive/MR you should analyze the stdout output generated by the query and correlate the amount of data read and written from/to HDFS among stages in order to identify their dependencies. Tez generates a .dot file in the application's (/home/ubuntu/logs/apps/application_*/container_am/*.dot) logs directory. You can install and use graphviz to generate the corresponding PNG file.
What do you observe? How different are the DAGs? Do you think their structure can impact performance? If yes/no, why?
As an example, figure below shows you the DAG structures for query 21 when running atop MR and Tez for an input size of 2 GB.
- In this experiment you will fail a slave VM at different times in the query job lifetime. You should pick query 71, and run it using Hive/MR and Hive/Tez. For every such scenario, you should kill the DataNode process on the desired slave VM when the job reaches 25% and 75% of its lifetime. You should not fail a VM on which an AM container is running(either MRAppMaster in case of MR or DAGAppMaster in case of Tez).
For this experiment you need to update several properties in the configuration files:
- Increase the replication factor in conf/hdfs-site.xml to 2. You should configure dfs.replication and regenerate your data on HDFS.
- Enable speculative execution by setting to true, mapreduce.map.speculative and mapreduce.reduce.speculative in conf/mapred-site.xml.
You should analyze the variations in query job completion time between Hive/MR and Hive/Tez. Explain your observations and why do you think that failing a DataNode can impact performance.
Part B: Developing a MapReduce application
Here, you will write a simple MapReduce application that, given an
input containing a single word per line, will group words that are anagrams
of each other and sort the groups based on their size in descending order. Shown below
is a sample of how the input will and output should look like.
Input
abroad
early
natured
unrated
layer
aboard
untread
leary
relay
Intermediate Output (can be formatted as you see fit)
abroad aboard
early leary layer relay
natured unrated untread
Final Output (sorted in descending order of size)
early leary layer relay
natured unrated untread
abroad aboard
Your MR application (name it as AnagramSorter) should
run on a multi-node cluster. First, you will load the input file (input.txt)
into HDFS and run your application as:
hadoop jar ac.jar AnagramSorter /input /output
where input and output are the input and ouput directories in HDFS.
You will submit your entire source code (all java classes you created) and a brief documentation (README.txt) for the classes you implement, please reference to "Deliverables" section for detail.
Please use the exact names as specified; we will automate tests to verify correctness.
Hints/Notes
- Ordering of groups with same size does not matter.
- In the final output, ordering of words within a group does not matter.
- Leverage prior two observations to make your application fast.
Part C: Developing a Spark application
For this part, you will write a simple Spark application to compute the PageRank for a number websites and analyze the performance of your application under different scenarios. For this part, ensure that only the relevant Spark and HDFS daemons are running. You can start HDFS daemons using the start_hdfs command and Spark daemons using the start_spark command available through run.sh from your master VM. Ensure that all other daemons are stopped.
PageRank Algorithm
PageRank is an algorithm that is used by Google Search to rank websites in their search engine results. This algorithm iteratively updates a rank for each document by adding up contributions from documents that link to it. The algorithm can be summarized in the following steps -
- Start each page at a rank of 1.
- On each iteration, have page p contribute rank(p)/|neighbors(p)| to its neighbors.
- Set each page's rank to 0.15 + 0.85 X contributions.
For detailed information regarding PageRank please read here.
For the purpose of this assignment, we will be using the Berkeley-Stanford web graph and execute the algorithm for a total of 10 iterations. Each line in the dataset consists of a URL and one of it's neighbors. You are required to copy this file to HDFS.
For the questions that follow, please ensure that your application's SparkContext or SparkSession object is overwriting the following properties:
- set application name to CS-744-Assignment1-PartC-<Question_Number> .
- set driver memory to 1 GB.
- enable event log.
- specify event log directory.
- set executor memory and cores to 1GB and 4 respectively. Increase executor memory only if you encounter memory issues on the cluster.
- set number of cpus per task to 1.
Documentation about how to create a SparkContext and set various properties is available here.
Questions:
Question 1. Write a Scala/Python/Java Spark application that implements the PageRank algorithm without any custom partitioning (RDDs are not partitioned the same way) or RDD persistence. Your application should utilize the cluster resources to it's full capacity. Explain how did you ensure that the cluster resources are used efficiently. (Hint: Try looking at how the number of partitions of a RDD play a role in the application performance)
Question 2. Modify the Spark application developed in Question 1 to implement the PageRank algorithm with appropriate custom partitioning. Is there any benefit of custom partitioning? Explain. (Hint: Do not assume that all operations on a RDD preserve the partitioning)
Question 3. Extend the Spark application developed in Question 2 to leverage the flexibility to persist the appropriate RDD as in-memory objects. Is there any benefit of persisting RDDs as in-memory objects in the context of your application? Explain.
With respect to Question 1-3, for your report you should:
- Report the application completion time under the three different scenarios.
- Compute the amount of network/storage read/write bandwidth used during the application lifetime under the four different scenarios.
- Compute the number of tasks for every execution.
- Present / reason about your findings and answer the above questions. Apart from that you should compare the applications in terms of the above metrics and reason out the difference in performance, if any.
Question 4. Analyze the performance of CS-744-Assignment1-PartC-Question1 by varying the number of RDD partitions from 2 to 100 to 300. Does increasing the number of RDD partitions always help? If no, could you find a value where it has a negative impact on performance and reason about the same.
Question 5. Visually plot the lineage graph of the CS-744-Assignment1-PartC-Question3 application. Is the same lineage graph observed for all the applications developed by you? If yes/no, why? The Spark UI does provide some useful visualizations.
Question 6. Visually plot the Stage-level Spark Application DAG (with the appropriate dependencies) for all the applications developed by you till the second iteration of PageRank. The Spark UI does provide some useful visualizations. Is it the same for all the applications? Id yes/no, why? What impact does the DAG have on the performance of the application?
Question 7. Analyze the performance of CS-744-Assignment1-PartC-Question3 and CS-744-Assignment1-PartC-Question1 in the presence of failures. For each application, you should trigger two types of failures on a desired Worker VM when the application reaches 25% and 75% of its lifetime.
The two failure scenarios you should evaluate are the following:
- Clear the memory cache using sudo sh -c "sync; echo 3 > /proc/sys/vm/drop_caches".
- Kill the Worker process.
You should analyze the variations in application completion time. What type of failures impact performance more and which application is more reslient to failures? Explain your observations.
Notes:
- All your applications should take two command line arguments - HDFS path to the web graph and number of iterations the PageRank algorithm should run.
- For all your analysis, run the PageRank algorithm for 10 iterations.
- All the applications will be executed using spark-submit.
Deliverables
You should tar all the following files/folders and put it in an archive named group-x.tar.gz
- Provide a brief write-up (10pt, single column) with your answers to the questions listed above (filename: group-x.pdf).
- Folder named Part-B should contain the MR application (entire source code) developed along with a README file.
- Folder named Part-C should contain the 3 applications developed (filenames: PartCQuestion-<question_number>.py/java/scala) along with a README file.
You should submit the archive by placing it in your assignment1 hand-in directory for the course: ~cs744-1/handin/group-x/assignment1.
Apart from submitting the above deliverables, you need to setup your cluster so that it can be used for grading the applications developed. More specifically, you should do the following -
- Create a folder called grader at the path /home/ubuntu/.
- Under the folder, have shell scripts named as -
- PartB.sh
- PartCQuestion1.sh
- PartCQuestion2.sh
- PartCQuestion3.sh
- We should be able to execute the program by running the command - ./file-name.sh. Be sure to hard-code all the inputs required for your programs in the shell script. Also ensure that the commands to start the various daemons work and you have put all the necessary files in the aforementioned folder.
- At the end of the deadline, the students will not be able to access the cluster and it will be used by the TAs to do the grading. The reason for doing this is because there may be a number of dependencies in each of your programs and it is best if the programs are evaluated in the environment they were developed.