Due Thursday, November 1 at 11:59pm
This assignment will introduce you to important software defined networking (SDN) concepts and practices through the development of your own controller application. You will use Mininet to emulate a small data center network consisting of OpenFlow switches and end-hosts. You will write an SDN application that routes end-host traffic along the shortest path through the data center by installing the appropriate forwarding rules in the emulated OpenFlow switches.
After completing this assignment, should be able to:
Data center networks typically have a tree-like topology. End-hosts connect to top-of-rack switches, which form the leaves of the tree; one or more core switches form the root; and one or more layers of aggregation switches form the middle of the tree. In a basic tree topology, each switch (except the core switch) has a single parent switch. Additional switches and links may be added to construct more complex tree topologies (e.g., fat tree) in an effort to improve fault tolerance or increase inter-rack bandwidth.
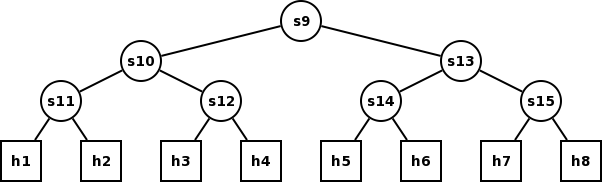
In this assignment, both simple binary tree topologies and simple fat-tree-like topologies will be considered. For example, a binary tree network of depth 3 looks like:
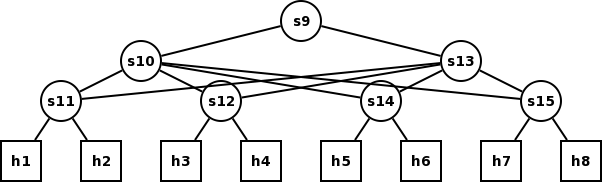
Hosts are represented with squares; switches are represented with circles. The number of hosts and switches reflects the numbering used by mininet. Our custom fat-tree-like topology looks like:
The instructions below use three different command prompts to indicate where commands should be run.
Commands that should be run on your local machine are preceded by the prompt:
you@yourmachine$
Commands that should be run directly in the VM console, or in an SSH session to the VM are preceded by the prompt:
openflow@vm$
Commands that should be run in mininet are preceded by the prompt:
mininet>
There are also two different IP addresses you will need. Both of these IP addresses are associated with the host-only network created by VirtualBox and fall within the subnet 192.168.56.0/32.
The first is the IP address assigned to host-only network adapter created on your local machine by VirtualBox. The tutorial will refer the this IP as: <host_ip>. This IP will likely be 192.168.56.1 or 192.168.56.101, but you should run ifconfig (or ipconfig in windows) on your local machine to determine which.
The second is the IP address assigned to host-only network adapter within the VM. The tutorial will refer the this IP as: <vm_ip>. This IP will likely be 192.168.56.2 or 192.168.56.102, but you should run ifconfig eth1 within the VM to determine which.
Note: These instructions assume your machine is running Linux. If you are running Mac OS X or Windows, the set up process will be slightly different; instructions can be found in the OpenFlow tutorial at http://www.openflow.org/wk/index.php/OpenFlow_Tutorial; references to specific sections of this tutorial are included in the details below. Also,
We have provided a VirtualBox VM with Mininet and the OpenFlow reference implementation already installed. (You should use the VM image we have provided, not the VM image included on the OpenFlow tutorial, as we have made some modifications to this image.) First, you will need to install the appropriate version of VirtualBox for your system: https://www.virtualbox.org/wiki/Downloads. Second, you can download the VM image (1.6 GB) from http://cs.wisc.edu/~agember/cs838_assign4.ova. It is recommended you download the image from within the CS network to save time. You should import the VM image into VirtualBox by selecting File > Import Appliance from within VirtualBox Manager.
After you import the appliance, go to File > Preferences > Network, and click the top icon on the right to add a host-only network. Click the bottom icon on the right to edit the settings for the host-only network. On the DHCP Server tab, check the Enable Server box. Set the server address to 192.168.56.1, server mask to 255.255.255.0, lower address bound to 192.168.56.102, and upper address bound to 192.168.56.200. Then, go to the Network settings for the CS838 Assignment 4 VM, and under the Adapter 2 tab, select the host-only network you just created.
You can login to the VM with the username openflow and password openflow. You should also be able to connect to the VM using SSH. Run the following within the VM to identify the IP address you should use to connect:
openflow@vm$ ifconfig eth1
When you connect via SSH, be sure to enable X11 forwarding:
you@yourmachine$ ssh -X <vm_ip>
If you are running Mac OS X or Windows, you will need the appropriate tools for connecting to the VM via SSH and displaying GUIs using X. See the following parts of the OpenFlow tutorial for guidance: http://www.openflow.org/wk/index.php/OpenFlow_Tutorial#Download_Files and
http://www.openflow.org/wk/index.php/OpenFlow_Tutorial#Access_VM_via_SSH
Your SDN application will run atop either POX (python-based) or Beacon (java-based).
If you plan to write your application in Python atop the POX controller, then obtain the latest version of POX from github:
you@yourmachine$ git clone http://github.com/noxrepo/pox
If you plan to write your application in Java atop the Beacon controller, then set up the Beacon development environment according to the instructions in the OpenFlow tutorial: http://www.openflow.org/wk/index.php/OpenFlow_Tutorial#Setting_up_a_Beacon_Development_Environment
Mininet emulates an OpenFlow network and end-hosts within a single machine. It includes built-in support to create several common topologies, plus it allows for construction of custom topologies using a python script. Since we are only considering tree-like data center topologies, will only use the tree topology built-in, plus a custom topology.
To launch mininet with the network arranged in a binary tree topology with depth 3, run the following command (either directly in the VM console or in an SSH session to the VM):
openflow@vm$ sudo mn --topo tree,3 --mac --arp --switch ovsk --controller remote --ip <host_ip> --arp
Each of the part of the command does the following:
sudo runs as root
mn runs mininet
--topo tree,3 creates a tree topology of depth 3 with the default fanout of 2 (i.e., binary)
--mac makes the mac address of mininet hosts the same as their node number
--arp installs static ARP entries in all hosts
--switch ovsk uses Open vSwitch in kernel mode for each of the switches
--controller remote the SDN controller will run outside of mininet
--ip <host_ip> switches should connect to the controller running on your local machine
We have also provided a custom topology script that generates a fat-tree-like topology of depth 3. To launch mininet with the network arranged in a fat tree topology run the following:
openflow@vm$ sudo mn --custom ~/mininet/custom/topo-fattree.py --topo fattree --mac --arp --switch ovsk --controller remote --ip <host_ip>
Once mininet is running, you can obtain information about the network, generate traffic, and run commands on individual hosts.
To display all of the elements in the network, run the nodes command within mininet:
mininet> nodes
Nodes starting with “h” are hosts, and nodes starting with “s” are switches.
To display the list of links in the network, run the net command within mininet:
mininet> net
This will output a list of switches, and for each switch, list the hosts and switches connected to that switch (along with the network interface on each host and switch that is used for the link).
One option to generate traffic is to run ping or iperf on individual hosts. To do so, you need to run a command on a specific host within mininet. This is achieved by typing the hosts name, followed by the command. For example, to send 10 ping packets to h2 from h1, run:
mininet> h1 ping -c 10 h2
To run iperf, you’ll need to start the iperf server on one host, running the command in the background, and then start the iperf client on another host. For example, to run an iperf server on h1 and an iperf client on h2, run:
mininet> h1 iperf -s &
mininet> h2 iperf -c h1
You can also provide other options to iperf, if desired. Also, you should kill the iperf server on h1, when you are finished:
mininet> h1 kill `ps | grep iperf | cut -f2 -d“ “`
Note that if you run ping or iperf without an SDN controller running on your local machine, no traffic will be sent across the switches (since there are no OpenFlow rules in the switches) and the commands will timeout.
An alternative option to generate traffic is to to use the mininet commands pingpair, pingall, and iperf. Using these commands avoids the need to run commands on individual hosts. You can use the mininet help command or consult the Mininet documentation (http://yuba.stanford.edu/foswiki/bin/view/OpenFlow/MininetWalkthrough) to learn more about these commands.
You will run your SDN controller on your local machine.
Both POX and Beacon include code to run a simple hub.
For POX, you can run a simple hub as follows:
you@yourmachine$ ./pox.py samples.of_tutorial
For Beacon, you can run a simple hub by following the instructions in the OpenFlow tutorial: http://www.openflow.org/wk/index.php/OpenFlow_Tutorial#Running_the_Tutorial_Controller.
To get started writing your own controller in POX, you should create a new Python source file (dc_routing.py) in the directory pox/pox/samples/. You will then run your controller using the following commands:
you@yourmachine$ cd pox
you@yourmachine$ ./pox.py samples.dc_routing
To get started writing your own controller in Beacon, you should follow the Beacon guide on creating your first bundle: https://openflow.stanford.edu/display/Beacon/Your+First+Bundle. You should call your project net.beaconcontroller.dcrouting and name your class DcRouting.
Your first task is to properly forward traffic between two hosts connected to a single switch.
You should create a binary tree topology of depth 1 in mininet, which will create two hosts (h1 and h2) and a single switch (s3). The switch’s datapath identifier (DPID) that is reported to the controller will be 3. On the switch, h1 will be connected to port 1 and h2 will be connected to port 2.
Rather than hard coding the ports, you should use the IP address of a packet to determine which port it should be sent to. Your controller should read in a comma-separated variable (CSV) file called hostlist.csv that contains three columns: IP address, switch DPID, and switch port. For this first task, the file will contain:
10.0.0.1,3,1
10.0.0.2,3,2
If you use POX, the file should be placed in the top-level pox directory. If you use Beacon, the file should be placed in the top-level beacon directory.
We have provided a Python script gen_host_list.py in the VM to automatically generate this file for a given topology. It takes one argument: the depth of the tree. To generate the file for this first task, you will would run:
openflow@vm$ ./gen_host_list.py 1 > hostlist.csv
You’ll then need to scp the hostlist.csv file to your local machine. Alternatively, you could scp the gen_host_list.py script to your local machine and generate the CSV file directly on your local machine instead of inside the VM.
To get started on this first task in POX, you should look at the files pox/pox/samples/of_tutorial.py and pox/pox/forwarding/l2_learning.py. You should also consult the OpenFlow tutorial (http://www.openflow.org/wk/index.php/OpenFlow_Tutorial#Sending_OpenFlow_messages_with_POX) and POX documentation (https://openflow.stanford.edu/display/ONL/POX+Wiki).
To get started on this first task in Beacon, you should look at the file beacon/net.beaconcontroller.tutorial/src/main/java/net/beaconcontroller/Tutorial.java. You should also consult the OpenFlow tutorial (http://www.openflow.org/wk/index.php/OpenFlow_Tutorial#Learning_Java_and_Beacon) and Beacon documentation (https://openflow.stanford.edu/display/Beacon/Your+First+Bundle).
Your second task is to properly forward traffic between two hosts connected in a binary tree topology.
You should create a binary tree topology of at least depth 2 in mininet. You should also create the correct corresponding hostlist.csv file using the gen_host_list.py script.
To complete this task in POX, you should rely on the discovery module which sends LLDP messages between OpenFlow switches and constructs a list of links between switches. The launch function in your POX module should include the following to start the discovery module:
import pox.openflow.discovery
pox.openflow.discovery.launch()
You can access the list of links created by the discovery module by adding the following line of code within your POX module:
link_list = core.openflow_discovery.adjacency
The POX spanning tree module relies on the discovery module, so you should look at the file pox/openflow/spanning_tree.py for guidance on how to use the list of links created by the discovery module. You can also look at the source code for the discovery module in the file pox/openflow/discovery.py.
To complete this task in Beacon, you should rely on the TopologyImpl class. Its documentation is available at https://openflow.stanford.edu/static/beacon/releases/1.0.0/apidocs/net/beaconcontroller/topology/internal/TopologyImpl.html.
Your final task is to properly forward traffic along the shortest path between two hosts connected in a fat-tree-like topology. In a binary tree topology, there is only one path between two hosts, but a fat-tree-like topology has multiple paths. You should pick the shortest path (if there are multiple paths of equal length, then any of those paths is fine).
Again, you should rely on topology information provided by existing modules/classes in POX/Beacon.
You should provide the code for your controller application, including all files necessary to build/run the application atop POX or Beacon. You do not need to provide any portion of the standard POX or Beacon code base. You should placing your code in your assign4 hand-in directory for the course: ~cs838-1/public/handin/$USER/assign4/
Since the three tasks described above build on each other, you do not need to create a separate application for each task. Rather, your final application should be able to handle a topology with just a single switch, since this is just a very simple case of shortest path in a fat-tree-like topology. Likewise, finding the shortest path in a binary tree means finding the one path through the tree. The tasks are purposefully designed to build on top of each other such that you can receive credit for completing the earlier tasks, even if you were unable to complete a later task. Hence, it is better to submit a working controller that handles the first two tasks well, rather than submit a broken attempt at the third task that also breaks the first two tasks.