So we've got these sweet free CS web pages, and you want to deck yours out, but you don't know the first thing about how to get started. Don't worry; we've got you covered. Surprisingly, the whole process is easier than you'd think. Don't believe me? Give this page a read before you jump to any conclusions.
Getting Software
There are two ways we can go about managing our CS account drives: Through a terminal or through a program with a GUI.
It's much easier to use a program with a GUI, but the terminal method is more fun. We'll go over both, then you can decide for yourself what you want to do.
The terminal method:
Mac and Linux:
You've already got the software you need! Jump on down to the Logging In section!
Windows:
You're going to need a new terminal program that can understand the commands we use to copy files securely with our CS servers.
What luck - such a program exists! It goes by the name of Cygwin, and it can be customized to do exactly what we need it to!
 |
|
| 1. Download the Cygwin installer from their website, or click here. cygwin.com/setup.exe | |
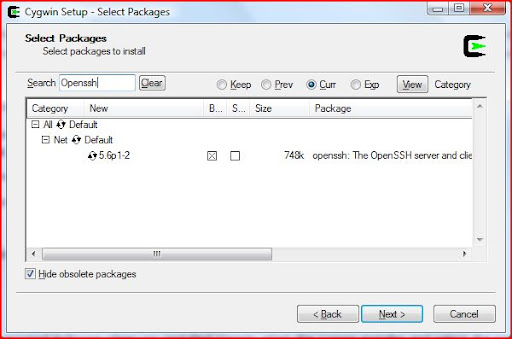
2. Run the installer, chosing the default options until you reach a large screen that says 'Select Packages' |
|
| 3. Type 'openssh' in the search bar, expand the 'Net' category, and check the box under the 'Bin' column for the openssh server/client. This gives our terminal the file transfer protocols required by our CS workstations. |
|
| 3a. Type 'mintty' in the search bar, expand the 'Shells' category, and check the box under the 'Bin' column for the mintty Terminal emulator. This stops the Cygwin window from glitching when we're logged into our CS accounts and we enter text that extends beyond the length of our window, and allows us to resize the font with CTRL + and CTRL - |
|
| 4. Finish the setup. You're done. | |
| Head on over to the Logging In section to find out how to use this nifty terminal! | |
| Selecting OpenSSH from the 'Select Packages' dialog |
The GUI method:
Mac and Windows:
I personally recommend the software Cyberduck because of its clean interface, full feature set, and responsiveness on my systems. However, the FileZilla software I use on Linux can just as easily be installed on a Windows or Mac machine.
Download and install the version of Cyberduck appropriate for your OS, perhaps having to wait to install the .NET framework if you're running Windows without it.
Linux:
Use your distribution's package manager to find and install a version of FileZilla built specifically for your OS, or try the x86_x64 build on the FileZilla site's download page.
Now that you've got your file transfer program and its prerequisites installed, read on to find out how to log in and get to work!
Logging In
Well, now you've got to make sure you can access your account. Again, follow the instructions for the method of your choice.
The terminal method:
You're going to need to know your CS department username and password for this bit. SSH, or Secure Shell, is a protocol used for the secure transfer of data between two machines on a network (in our case, the Internet). The syntax for connecting to a remote client via the command line is
ssh <USER>@<HOST>
where <USER> is your CS department username and <HOST> is an available server with a public address on the CS department network, like best-mumble.cs.wisc.edu.
After you enter something similar to
ssh prettiestuser@best-mumble.cs.wisc.edu
into your command line and press enter, you will either be promted to enter your CS department password, or to verify with a yes or no to authenticate the connection if it is your first time connecting to this server from your computer. If you're connecting to a computer on the Wisc CS network, it's a safe bet you can type a 'y' and validate your connection.
The GUI method:
In your file transfer program, click the appropriate button to "Open a new connection." In Cyberduck, this is an easy looking button at the top-left of the screen.
When given the choice of 'connection protocols,' select SFTP (SSH File Transfer Protocol), enter a CS machine like best-mumble.cs.wisc.edu as the server, your CS department username as the username, and your CS department password as the password.
Click connect!
Now, all the folders on your CS account should be listed! Double-click your "public" folder, and make sure a folder titled "html" exists in there. If it doesn't, right-click the space where the folders should show up, and select "New Folder" from the ensuing menu. When asked what to name this folder, enter "html" without the quotation marks.
Double-click the html folder, and marvel at the empty white space that you can drag-and-drop files from your computer onto your public webspace. Don't fret, we'll have files we can drop there soon enough. You're all set up and ready to start coding your webpage; move on to the CODING YOUR PAGE section of this guide.
Once you've made those files, all you have to do is select all of them in your operating system's file browser and drag-and-drop them into the html folder, and you're done!
Organizing Files
(This whole section is only applicable to the terminal method)
Once you're logged in, you can execute a couple commands to poke around and look at your files.
Command |
Usage |
| ls | "Lists" the files and folders in your current directory. |
| cd | "Change Directory" - The parameter cd accepts is the folder or directory you wish to navigate to. If you are in your home directory (you have just logged in and done nothing else) you could use cd public to navigate to your "public" folder, which is viewable even by those not logged in to your account with your password. If you wish to return UP a directory (e.g. navigating from the 'public' folder back to your home folder) the parameter you pass to cd is ".." and the command would just be cd .. If you wish to return to your home directory (the one you see when you login), the parameter you pass to cd is the tilde, "~" or cd ~ |
| mkdir | "Make Directory" - Makes a new folder inside whatever folder you're residing, and the folder's name will be whatever name you pass mkdir (e.g. "Homework"). Usage: mkdir Homework will make a new folder called homework. |
| rm | "Remove" - Removes a specific file, or an entire directory if you include the -r (recursive) argument. Say you've made your "Homework" folder in your main folder, and there is a file named Hodor.txt that you no longer wish to have. Executing the command rm -r Homework will then prompt you if you wish to If you don't pass the recursive argument (-r) to the remove command (rm), the command will not execute on directories and will only work for removing one file at a time. |
From your home directory, try running the
ls
command. You should see a list of all sorts of folders, with "public" being one of them. Navigate into this folder with
cd public
and do another "List" command to see what files and folders exist here. You should see at least one folder here, titled "html". If the "html" directory does not exist, execute
mkdir html
to create it. This "html" folder is what is automatically accessed when someone visits your personal CS department webpage at pages.cs.wisc.edu/~USERNAME.
Now that we're sure you have the proper folder created on your drive, you can close your terminal program and skip ahead to the CODING YOUR PAGE section of this guide; what follows are instructions for copying your site files to this html directory from your computer after they have already been created.
After Coding Your Page
Once you have the necessary web files saved in a directory on your computer, we'll be using a command called scp, or Secure Copy, to transfer these files using the SSH protocol from your computer to the CS servers. Because your website may contain many different elements besides just an index.html file, we'll use the recursive argument (-r) that was discussed above for the "Remove" command to transfer all of our web elements from our computer to the server. The syntax to do this is
scp -r /Users/Default/Desktop/mysite/* USER@best-mumble.cs.wisc.edu:/public/html/
The bolded elements above (the directory where your site files are saved and the CS USER name) will vary depending on what your CS department username is and where on your computer you saved your folder.
An easy way to get the full directory of your site files on your computer is to type
scp -r
Into your command prompt (with a space after the 'r' and without pressing enter) and then simply dragging and dropping the folder icon from your computer into the terminal window. This will deposit the plain text location of said folder into the terminal. After the directory appears in terminal, add an "/*" to the end of the directory so that the copy command knows to copy the CONTENTS of the folder (signified by the *), instead of just creating a new folder of the same name inside your "html" folder. It's imperative that your "index.html" file resides in this "html" folder, as that is the default file loaded when someone types your CS webpage address into their browser. After you have the directory properly inserted with the /* at the end, complete the rest of the line of the copy command by replacing USER with your CS username in
USER@best-mumble.cs.wisc.edu:/public/html/
There you go, your files should now have been properly transferred to your public webspace on Wisconsin's CS Department server!
Try visiting it at
http://pages.cs.wisc.edu/~USERNAME/
Coding Your Page
Open up your favorite text editor.
Save this file in a new directory somewhere on your computer as "index.html". This directory will hold all the files your page accesses, including any images or other webpages you may create besides just a homepage.
And that's right, you're going to create this webpage using nothing but pure, simple text.
In the HyperText Markup Language (HTML), new items are indicated in the following way:
<definition> Content </definition> (where /definition signifies the end of the definition block of code).
There exists a bare minimum of code you need in order for a web browser to accurately display your code as a webpage. That code is as follows:
<html>
<head>
<title> Title Text Goes Here </title>
</head>
<body>

    THE MAIN STRUCTURE OF YOUR WEBSITE GOES IN HERE.
</body>
</html>
The bolded and italicized entries are to be changed for each individual page. Perhaps you want your title to read "The Best Place Ever On The Web, Ever." If that were the case, you would want to enter that text, without the quotation marks, between the <title> flags.
Now, you're going to want to further divide up your code so that it's easier to manage. Perhaps you want a site header, a list of your favorite things, and a photo of you. You'd want to put some code between the <body> flags. For our example, we'd put the following:
<div class="Header">
HEADER CONTENTS
</div>
<div class="Favorites">
FAVORITES CONTENTS
</div>
<div class="Photo">
PHOTO
</div>
These <div> sections are html dividers, and separate elements that appear on the webpage, with each's "class" informing the reader what the following code should be expected to display. When an element is defined (such as the dividers we just made above), many different attributes can be assigned to them, changing their appearance. For example, if we were to replace the HEADER CONTENTS section of our above code with a large, centered, red text, we'd first tell HTML that we want to display some text, indicated by the paragraph flag <p>, and then we'd add some attributes to it, deliminated by spaces. If an attribute can change multiple things, like the style attribute, separate your assignments with semicolons. Examine the example code below.
<p align="center" style="color:red; font-size: 24px;"> MY AWESOME HEADER </p>
Make a bit of sense? Let's try to make a list of our favorite things. In HTML, you can create both ordered (numbered) lists and bulleted (unordered) lists. The way to do that is simple, with the main flags being <ol></ol> for ordered lists, and <ul></ul> for unordered lists. Once you've defined what sort of list you want, each element in the list gets set inside a list item flag, or <li>TEXT HERE</li>. The resultant code for our FAVORITES CONTENTS section of the page may look something like this:
<p style="font-size: 18px"> These are some of my favorite things. I'd be honored if you checked them out.
<ul style="color:blue">
<li>Hamburgers</li>
<li>Closure</li>
<li>Late night talk shows</li>
<li>Emancipation</li>
<li>And the list goes on and on...</li>
</ul>
</p>
Now, say you want your Hamburgers list entry to link to McDonald's website, mcdonalds.com. You do this by "anchoring a hypertext reference" with
<a href="http://www.mcdonalds.com"> to your Hamburgers line, changing it to:
<li><a href="http://www.mcdonalds.com">Hamburgers</a></li>
Note that anything between the <a></a> flags will now be clickable and will redirect to wherever your hypertext reference points it to.
If you have created another text file called "contact.html" and you wish to make a link to that page, perhaps in a section of your header, you would only need your reference to be something like:
<a href="contact.html">Contact me!</a>
Without the http://www. nonsense, letting the browser know the file it is looking for should be saved in the same folder as your index.html file.
Now, to add that photo of you to the webpage, you'll need to make sure you have a copy of that photo saved in the same folder you saved your index.html file. Say I found a picture of me and named it "GoodLooking.jpg" and dropped it into that folder. The HTML flag to add an image is <img>, with the required attribute being the image source location, or src. In the case of my "GoodLooking.jpg" file saved in the same directory as my index.html file, my code would be:
<img src="GoodLooking.jpg"></img>
But you know how on some websites, if you hover over an image you get a box of text that appears, sort of like a caption? That's called the 'alternate text' of the image, and is defined with the alt attribute.
<img src="GoodLooking.jpg" alt="My, what a handsome fellow!"></img>
If you wanted to be able to click that image and have it take you to the (as-of-yet) ficticious "Contact me!" page, you can even have an image be a hypertext reference anchor. See:
<a href="contact.html"><img src="GoodLooking.jpg" alt="My, what a handsome fellow!"></img></a>
But now, what if your image is too big, and your webpage is now mostly just a big picture of your face? You can also use height and width attributes to adjust the size of the image displayed, just make sure that you keep the percentages the same for both of them, or the image will get skewed one way or another. Scaling the image down to 80% of its original size would look something like this:
<img src="GoodLooking.jpg" alt="My, what a handsome fellow!" width="80%" height="80%"></img>
Well, there you have it! We've made a basic webpage, but you can still fill it up with content and link text and images to other .html files you may have written. There's still so much more to learn about HTML, though, and so many new and exciting attributes for elements that have the potential to enrich your pages even more! You can make tables of elements, aligning and styling each cell independently, and you could research the structure and function of Cascading Style Sheets, which have the potential to greatly enhance the visual consistency of your pages. Just about anything you can imagine, you can create with HTML, given enough time and enough dedication to using the Internet to search for examples, answers to your questions, and some of the many other basic tutorials that can help you expand your web developing skills to the next level.