Database Web Server
Software Installation Guide
By:
Scott Selikoff
Last
Modified: July 20, 2002
Introduction
This
installation guide will direct you through the process of setting up a database
web server as well as setting up a database client to access the server. The database software used in this manual is
IBMâ DB2 and the application web server is Apache Tomcat. The specific versions of these products used
by this guide are:
·
IBMâ DB2 Universal Enterprise Edition
7.2
·
Sunâ Java J2SE v1.4.0_01, SDK
·
Apache Jakarta-Tomcat 4.0.4
Although this guide uses examples from these specific
versions of Java, DB2, and Tomcat, the version of these products is generally
invariant of the installation procedure.
Also note that there is a wealth of information available on the
Internet about these products.
Here
is a quick reference chart for the installation guide:
|
Section |
Page |
|
I.
Setting up a Database Web Server |
|
|
Step 1: Install the DB2 Server Software |
3 |
|
Step 2: Add a new Database |
7 |
|
Step 3: Setting up the Environmental Variables |
9 |
|
Step 4:
Install the Java SDK Software |
12 |
|
Step 5: Install Apache Tomcat Web Software |
16 |
|
Step 6: Configure Java and Tomcat |
22 |
|
|
|
|
II. Setting up a
Database Client |
|
|
Step 1: Install the DB2 Client Software |
27 |
|
Step 2: Connect to a Database |
28 |
I.
Setting up a Database Web Server
Prerequisites:
·
OS: Win2k/WinNT, or equivalent
Server Software
·
Up to 700 MB
·
Local Network or Internet Access
Step
1: Install the DB2 Server Software
1. First, insert your IBM DB2 installation CD
into the computer you wish to install to.
If you are installing from another location such as the harddrive or a
network or if the installation process does not begin when you insert the CD,
locate the installation files and select setup.exe
from the main installation directory.
The DB2 pre-installation guide will
then open:
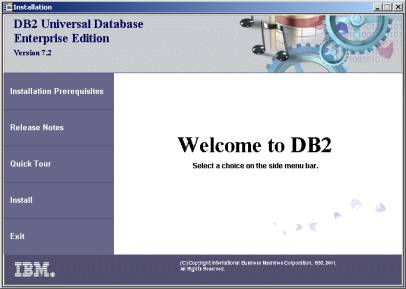
Click
Install to begin the process.
Note: If DB2 is all ready installed, you may
receive a warning message similar to the following:
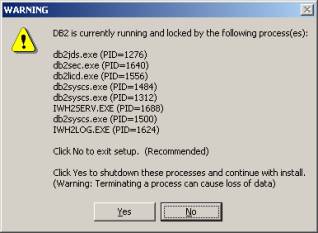
If the computer is currently being
used as an online server, it is recommended that you select No and take the databases offline properly
before continuing. You can then
continue with the installation afterwards.
Alternatively, if the system is not currently being used or you have no
concern for the previous database system, then select Yes to continue.
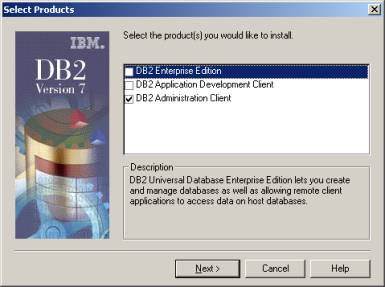
2. The first installation window will ask you
which DB2 packages you would like to install.
Keep in mind that while the packages available for your installation
version of DB2 may vary slightly from the ones we have listed, the server
installation software is essential. If
this package is not available, it may be because you are not running
WinNT/Win2k.
The packages available for DB2 7.2
Enterprise Edition are:
· DB2 Enterprise Edition:
Required to run a Server
· DB2 Application Development Client:
Operational
· DB2 Administration Client:
Recommended. Required if you
plan to perform client-side modifications of the database from the server
computer.
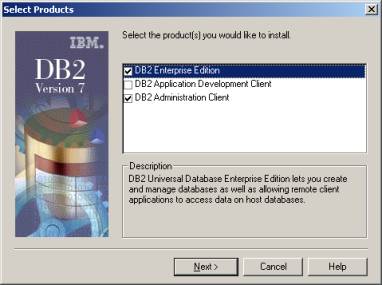
Once
done selecting the packages, Click Next
3. The installation program will then ask what
type of installation you would like. Select
a Typical unless you wish to
customize the files to be installed.
Click
Next
4. Choose a drive to install DB2 to. The Space
required field will tell you how much space the installation will take up
once complete.
Click
Next
5. Next, select a
username and password for the central database server. We recommend choosing a complex password
since the system account is of high importance. Make sure the check box at the bottom is checked. This will help to simplify managing your
system.
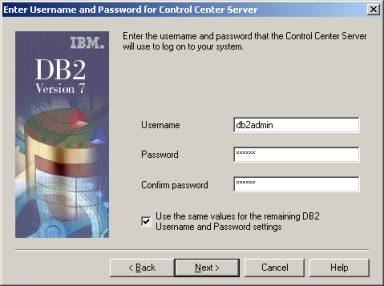
Once done entering your username and
password, Click Next
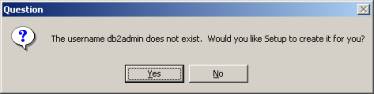
6. The installation program will most likely ask you to confirm the
creation of the account, which you can do by just select Yes.
The final page
before installation will appear, confirming the installation settings:
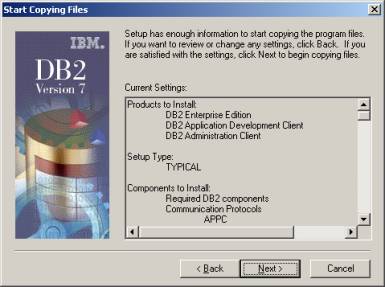
Click Next
The installation
program will now begin copying files.
Afterwards, it may take some time configuring your system, so please be
patient while it works. You should
reboot the computer after installation is complete.
Step 2: Add a new Database
1. From the Windows Start Menu,
choose:
Start Menu à Program Files à IBM DB2 à Control Center
2. Expand the Systems folder and select the computer
you wish to add the database to. If
this the local computer you are currently using, then the network name of your
computer will appear in the list.
3. Expand the Instances\DB2 folder of the computer
you selected.
4. Right click on the Databases
folder, select Create à Database Using Wizard
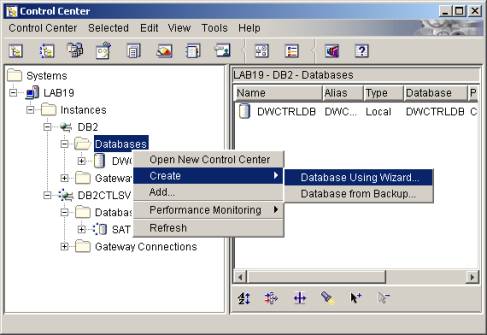
The
Database Creation Wizard will now open to help facilitate you in the creation
of your
new
database
5. First, enter the general
database info as follows:
· Database
name: System name of the
database. Choose something short and
simple
· Default
drive: Drive to store the database
files on
· Alias: Simple name or nickname to reference the
database by
· Comment: Single sentence containing a short
description of the database
Click Next
6. The next five windows ask you
many questions including how you would like to manage storage space for
different types of tables. We recommend
that unless you have any specific designs in mind for the database, you allow
DB2 to auto-configure this information for you. Simply keep clicking Next.
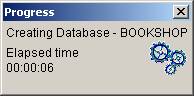
7. Finally, select Finish. The following dialogue will appear and you will be notified when
the process is complete.
8. Try viewing your table using
the Control Center since this
application was opened when you created the database. Locate your system and database folder and see if the new
database you created appears in the list.
You may need to perform Refresh to update the system profile. Simply select Refresh off of View on
the menu bar.
You
may also try connecting to your database as a client either locally from the
server itself or from another computer on the network. Recall that if did not install the Client
Administration package during Step 1, you must connect from another computer on
the network to use most of the client tools.
For instructions on how to set up a computer on the network for remote
database access, please refer to Section II.
Step 3: Setting
up the Environmental Variables
1. Next, we need to set up some environmental
variables so that the different applications will knows where each others’
files. This step is actually being done
before installing any of the
applications involved simply because some of the installations require some of
them to be set, and since it does not hurt to set them all before installing
any applications, we will do it now.
Note that you must, when installing Java
JDK and Tomcat, use the application paths that you set in this step. If you want to place them into different
locations, you must remember to go back and change the values you are entering
now to reflect this information.
2a)
In WinNT/Win2k,
From the
Windows Start Menu, go to:
Start Menu à Control Panel à System
Select the
Advanced Tab at the top:
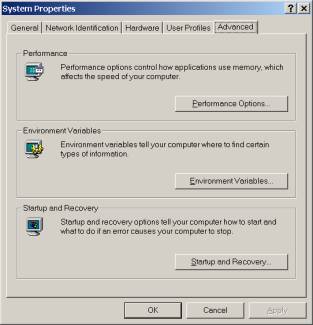
Next, Select Environmental Variables:
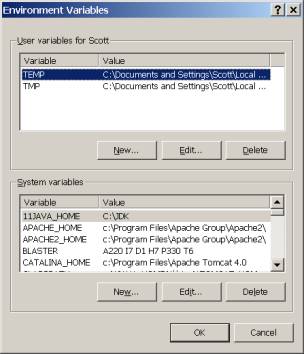
We are going to add new System
variables, which is the second section.
Please add the following variables and values.
|
System Variable |
Value |
|
CATALINA_HOME |
C:\Tomcat |
|
CLASS_PATH |
C:\jdk\bin;c:\tomcat\common\lib\servlet.jar;C:\jdk\lib\tools.jar |
|
JAVA_HOME |
C:\JDK |
|
TOMCAT_HOME |
C:\Tomcat |
We accomplish this by select New from the bottom taskbar and entering
the values in the box as so:
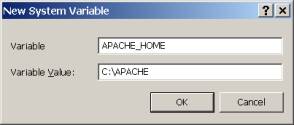
Repeat the process for all four system
variables. Note that some of them may
all ready exist on your computer, so you just need to Edit them to make sure they have the correct value. Also note that if you install these
applications in different locations than we have recommend, you will need to
update these values to reflect these changes later on.
2b)
In Win95/Win98,
From the
Windows Start Menu, go to Run, type Edit, and hit Enter.
Now, we are
going to modify the system Autoexec.bat file to include this information. On the File
menu go to Open, and type C:\autoexec.bat. The file should then open.

Then, just simply cut and paste the follow lines at the end
of the file:
SET CATALINA_HOME = C:\Tomcat
SET CLASS_PATH =
C:\jdk\bin;c:\tomcat\common\lib\servlet.jar;C:\jdk\lib\tools.jar
SET JAVA_HOME = C:\JDK
SET TOMCAT_HOME = C:\Tomcat
Finally, Go to File
menu again and now select Save.
3. Next, you need to
reboot the computer for these changes to take affect.
Step 4:
Install the Java SDK Software
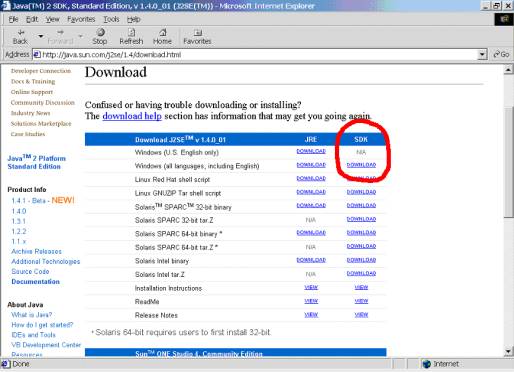
1. First, you need to download and install the
latest version of the Sun Java SDK (Software Developer’s Kit). Currently, we recommend version 1.4. Keep in mind that older versions could cause
incompatibilities with newer versions Tomcat when we attempt to bridge them later
in this guide. For a Windows-based
machine, download the SDK Windows file in the second column at:
http://java.sun.com/j2se/1.4/download.html
Note
that if this link is no longer valid, simply go to the Sun website (java.sun.com) and follow the links downloading
J2SE. Then simple follow the
instructions in the preceding paragraph when you reach the list of download
candidates
2. The next step is to install the downloaded
software. Find where you downloaded the
file to and double click it. The
installation process should begin.
Note, we are not going to be doing a standard installation so follow
these instructions carefully.
The following window will open
automatically as the installation process begins:
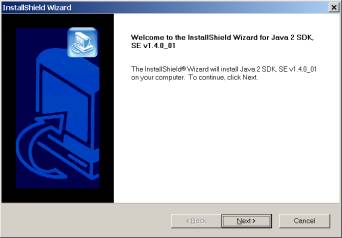
Click Next
Note: If the Java software is all ready installed,
you may receive a warning message similar to the following:
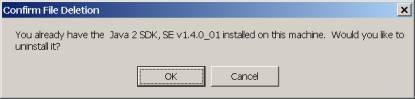
Choose OK to uninstall, since you need a clean updated version of JDK, and
after the uninstall process is complete, restart the process over from #2 by double
clicking the Java install file again.
3. The first page just asks you to read the
license agreement.
When you are done, Click Next
4. The next page asks you to do
define a home directory for the Java kit.
We are going to change this value
to be c:\JDK. Simply select Browse and type:
c:\JDK
(replace c: with
the drive of your choice, but remember that later)
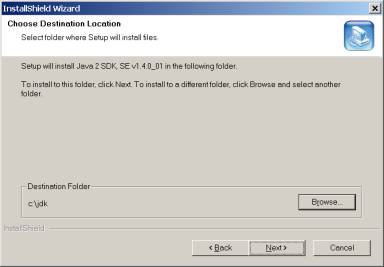
Afterwards, click Next
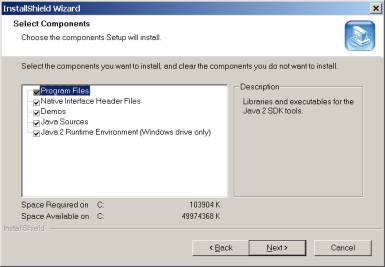
5. The next page asks about
which packages you would like to install.
Leave these settings as they are and simply click Next to continue.
6. The next page asks which
browsers you wood like Java to support.
Since this option really does not affect the server, you can select the
browsers you would like to support and then click Next to continue.
7. Finally, the installation
process will commence. You should get
the following message the process is complete:

The
installer will then ask you to restart your computer. It is recommended that you restart your computer.
Note: While the files are being installed, you may
receive a warning message similar to the following:
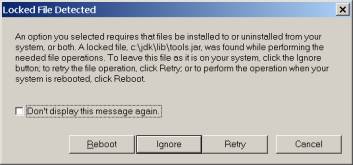
This warning means that there exists
some program on your system currently using a file the installer would like to
overwrite during installation.
We recommend closing all other
applications, including disabling any web servers you might all ready be
running, and selecting Retry. If this does not work, then we recommend Rebooting and trying the installation
procedure again. Finally, if all else
fails, you can select Ignore in the
hopes that the problem is not detrimental.
Step
5: Install Apache Tomcat Web Software
1. The first step is to download the Apache
Jakarta-Tomcat, aka Tomcat, software from the Apache Web Site. For a Windows-based machine, the direct address
to the file libraries for version 4.0.4 is:
http://jakarta.apache.org/builds/jakarta-tomcat-4.0/release/v4.0.4/bin/
Note
that if this link is no longer valid, simply go to the main Jakarta website (jakarta.apache.org) and follow the links
for the Tomcat file libraries, directory /bin.
There
may be multiple versions of the software, like 1.0.24, 2.0.26, etc. Download the latest version by selecting the
file with the latest version number and an .exe
extension at the end. For example:
jakarta-tomcat-4.0.4.exe
Note
that there is often a LE
version. This is the Light Edition of the software which takes up less space. In general, you do not want to download this version, so make sure you select the
file without an LE in it’s name.
2. The next step is to install the downloaded
software. Find where you downloaded the
file to and double click it. The installation
process should begin by informing you that it has found your Java software at c:\JDK.
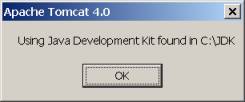
If
this message does not say this, you may need to reinstall your Java files since
its best to keep them in this specific directory for simplicity. Or, you may have simply forgot to restart
the machine after Step 4.
If
everything is fine, then select OK
and the installation will begin:
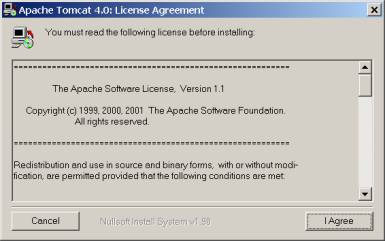
Click
I Agree when you are done reading.
3. The next page asks about
which packages you would like to install.
Leave these settings as they are and simply click Next to continue.
4. The next page asks you to do
define a home directory for the Tomcat Server.
We are going to change this value
to be c:\tomcat. In the
textbox type:
c:\tomcat (replace
c: with the drive of your choice, but remember that later)
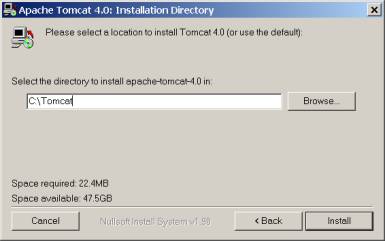
Click
Install to continue
5. Finally, the files will copy
and when they are done the following screen should appear:
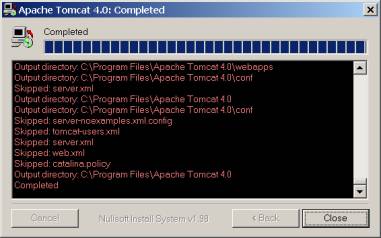
Select
Close to complete the installation
procedure.
6.
Next, reboot the computer to
initialize the Tomcat Web Server
Now that the Tomcat Software is
installed, the next four steps will go over general use and testing to make
sure the basic server is functioning properly.
7. This step describes how to turn on/off the
web server.
To
control your server, use the shortcuts Start
Tomcat and Stop Tomcat provided
by Tomcat under:
Start Menu à Program Files à Apache Tomcat 4.0
A
Tomcat command window may open on some systems. If it does, then you must keep this Window open to keep the
server running. Closing this Window
signifies shutting down the server.
Alternatively, you can use the Stop
Tomcat command in the Windows Start Menu to shut down your server.
Note: You may receive the following error message
when you attempt to start Tomcat.
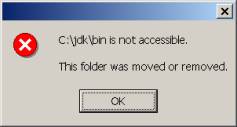
This is occurs because Tomcat cannot
find the Java JDK files at the place you told it to. Please review Step 3 and Step 4 to ensure that the path you
provided for the environmental variable Java_Home
matches the location of the Java files on your harddrive that you installed
during Step 4.
8. Next, we will test the application server
connection locally. First start the
server using the instructions from the previous step. Then go to the web site:
This is the standard
method of accessing the computer’s server locally. Note that all of Tomcat’s requests are handled through port 8080. We will modify this to use the default web server, port 80, later
on.
You should see something like this:
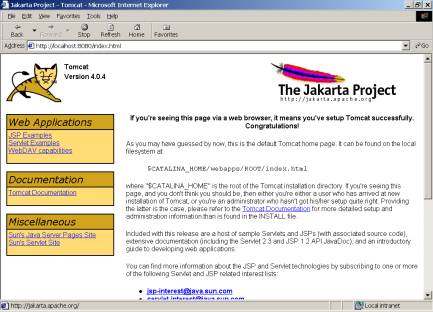
If
you do not see anything this, then it means your server might be installed but
not running. Follow the guidelines for
#7 to start you server.
10. Assuming you can access the web server
locally from the computer you are at, try next to access the web server
remotely from another computer. This
type of test can vary depending on whether or not you are running on a local
intranet or have internet access.
The best way is to first obtain the IP
address of the server computer. You can
do this by opening a command window on the server. On the server computer, go to the Windows Start Menu and select
Run, then type command and hit
Enter. In the text window that opens,
type ipconfig and hit enter. This will list all network devices and the
IP Address should be listed.
Now, simply go to the remote computer and
type http://, the IP address, and :8080.
For example, if the IP address were 11.22.33.99
then you would open up your web browser and go to:
If you are on the same local intranet as
the server, you can try accessing the computer using its network name in your
browser although this often requires permission by your local intranet server.
9. This step assumes you have complete #8
successfully and can access your server locally. We are now going to test to make sure JSP files and Servlets are
being handled correctly by your Tomcat Server.
First open up your website at http://localhost:8080. Then Under Web Applications on the left toolbar, select JSP Examples. You should
see:

Now,
select Execute on the first few
examples. If they work, you should see
a web page asking you a question or telling you information, like the date for
example. If they do not work you will
see an error saying invalid page or that you have thrown an exception.
Also
check your Servlet examples in the exact same manner. Go back to the main page, and click Servlet Examples on the left toolbar. Then, Execute the
first few just as you did for JSPs.
Troubleshooting: If these tests failed it means that the Java
JDK kit is not successfully set up for use with Tomcat. This could be because of many different
possible errors so below we have listed recommended fixes in the order that you
should try them.
1) Restart your computer and the Tomcat Server
and try again.
2) Check Step 3 and make sure your environmental
variable JAVA_HOME is set to match
the location of your Java files. Match this
up with the actual files on your harddrive to make sure they exist. If this variable is set wrong, repeat Step
3. If the files are in the wrong
directory, repeat Step 4. In either
case, restart the computer before trying again.
3) Make sure you downloaded the correct Java
version. The most common mistakes are
to have downloaded an older version of Java OR to have downloaded the JRE
build instead of the required SDK
build. Recall that the SDK build is in
the second column of the downloads
section and you must download this particular version in order to use JSPs and
Servlets.
If
this is the case, download the correct version and install it. Restart the computer before trying again.
4) You may want to try renaming the file tools.jar found at:
C:\Tomcat\common\lib
This file is actually an old Java file and
by default Tomcat should be using the copy located in the JDK directory. If you think Tomcat might be using this copy
of the file, or you are just having trouble, rename the file to tools.jar.old
and see if this helps.
5) Consult the Internet for help. There are many possible errors that could
occur and many of them depend on the versions of your software that you are
using. The Internet could be helpful in
this capacity.
Step
6: Configure Java and Tomcat
1. Note
About Compatibility:
In
this part of the guide, we will attempt to bridge the gap between Java and the Tomcat
Server. The problem associated with
producing instructions for this particular process is that it relies on
specific versions of these programs that are often being updated. It is possible that one of the programs has
been modified in such a way that the process described below is insufficient.
2. Next we need to instruct our DB2 to use
JDBC. On the Windows Start Menu, select
Run, and type cut and paste the
following line:
c:\Program Files\SQLLIB\java12\usejdbc2.bat
A batch file should open a command window
and close right away. Assuming you
installed the server version of DB2 in its default path on the C:, there should
not be any problem. On the other hand,
if the computer seems to have trouble executing this, direct it to search for
the file usejdbc2.bat and run it
when you find it.
3. Next we need to install the DB2 driver so
that Tomcat understands how to communicate with your databases. The DB2 driver file should have been
installed with DB2 and should all ready be on your computer.
In short, we need to copy the file db2java.zip from:
c:\Program Files\SQLLIB\java
to
the location:
c:\Tomcat\Lib
and
rename it to db2java.jar
In more detail:
If you are unfamiliar with how to do this,
simply open the Windows Start Menu and select Run. Then type:
c:\Program
Files\SQLLIB\java
This
folder should open up. Right-click on
the file db2java.zip and select Copy.
Now, open up the Tomcat folder by going to the Windows Start Menu and
typing:
c:\Tomcat\Lib
In
this folder, right-click on a blank space and select Paste. The db2java.zip
should now exists in this directory.
Next,
we need to rename the file to have a different extension. This might be difficult since some systems
are set up to hide the extension from you.
If you cannot see the extension .zip
on this file, then you need to first turn on your ability to see it. In Win2k, go to Tools on the menu bar and select Folder Options. Then select
the View from the top row and
uncheck the box that says:
“Hide file extensions for known file types”
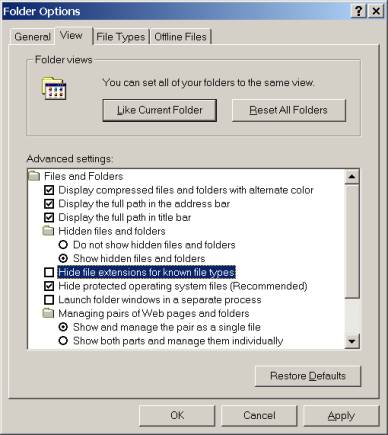
Then
select OK. Note that while this process
varies on other versions of Windows, it is essentially the same.
Back in the folder window you should
now see the file name with the extension .zip. Right-click on the file and select Rename. Change the extension so that the new file name is db2java.jar. You will most likely receive the following warning message:
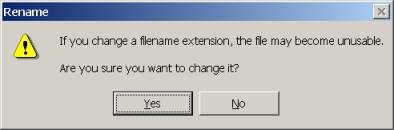
Simply click Yes to rename the file.
Afterwards,
you need to restart Tomcat. Once this is completed, you should now be
able to access your DB2 database on Tomcat
3. In this step we are going to test to make
sure the JDBC driver was set up properly during the previous step. We are not going to actually make a
connection to the database, since you might not have a database set up yet, but
simply test that the server can process JDBC requests correctly. Remember to restart Tomcat after making the
changes of the previous step before trying this out.
Using the Windows Start Menu, go to Run and type notepad. The notepad program should now open. Cut and paste the following code:
<%
// Check that the DB2Driver class is available
Class.forName("COM.ibm.db2.jdbc.app.DB2Driver");
out.println("The test is complete, your JDBC driver is now
setup");
%>
Use
the file menu and save the file as test.jsp and save it in the directory:
C:\Tomcat\webapps\ROOT
Test the file by going to:
http://localhost:8080/test.jsp
If the JDBC driver is set up, you should
simply see a message telling you the test is complete. If it is not set up properly, you will
receive an error message similar to the following:

If
this the case, we recommend repeating the previous step and making sure the
file db2java.jar exists in C:\Tomcat\Lib and that you have
restarted Tomcat after making any changes to this file.
4. If you have a database setup on server, you
can test your connection to it in this step.
Like in the previous step, use notepad to create a test file called test2.jsp in the folder c:\Tomcat\webapps\ROOT with the
following code in it:
<%@page
import="java.sql.*"%>
<%
// Define the connection
Connection con = null;
// Check that the DB2Driver class is
available
Class.forName("COM.ibm.db2.jdbc.app.DB2Driver");
try {
// Attempt to connect to the Database
con
= DriverManager.getConnection("jdbc:db2:<database>","<user>","<pass>");
out.println("The test is complete,
your Database has been contacted");
}
// Make sure to catch any exceptions
catch
(SQLException e) {
out.println(e.getMessage());
}
%>
Note: You need to change the line:
con = DriverManager.getConnection("jdbc:db2:<database>","<user>","<pass>");
so
that it matches a database, username, and password, such as:
con = DriverManager.getConnection("jdbc:db2:bookshop","jim","apple");
where
the database is named bookshop, the
username is jim, and the password is apple.
Then,
test the file by going to:
http://localhost:8080/test2.jsp
If
the test is successful, you will be informed that it has contacted your
database successfully. If not, you
might be told that the username and password were incorrect, or that the
database does not exist. This means
that the Tomcat server was still able to contact your database server successfully,
simply that the information you provided was incorrect.
5. The last step is optional. We are simply going to change the default
listening port of the Tomcat Server.
Normally, to access your server, either locally or remotely, you need to
add the port 8080 to the IP
address. We are going to change this so
that the default http port of 80 is
used so that you do not need to type an additional port address.
Open up the file C:\Tomcat\conf\server.xml using Windows Notepad. Look around line 56 for the following code
snippet:
<Connector
className="org.apache.catalina.connector.http.HttpConnector"
port="8080"
minProcessors="5" maxProcessors="75"
enableLookups="true"
redirectPort="8443"
acceptCount="10" debug="0"
connectionTimeout="60000"/>
Change
the second line where it says port="8080" to be port="80", such as:
<Connector
className="org.apache.catalina.connector.http.HttpConnector"
port="80"
minProcessors="5" maxProcessors="75"
enableLookups="true"
redirectPort="8443"
acceptCount="10" debug="0" connectionTimeout="60000"/>
The file contains two other occurrences of 8080, although these references are
commented out so they do not affect the application server at all. You can change them if you wish but changing
them should have no affect.
Afterwards, you need to Stop and re-Start the Tomcat Server.
Test to see if the new port is working properly by running:
Note:
After making this change, you may receive the following warning in the
Tomcat command window:
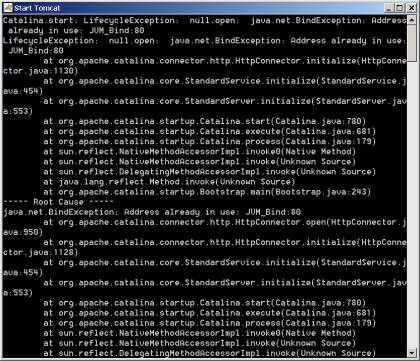
This
occurs when you all ready have a http server using the default web
address. If so, then you either need to
shutdown whatever program is using this port to run a server on your computer,
or go back to using the 8080 port as
before. Simply go back to the server.xml file and change the value
back from 80 to 8080.
II. Setting up a Database Client
Prerequisites
·
OS: Win95/Win98/WinNT/Win2k
·
Up to 600 MB
·
Local Network or Internet Access
Step
1: Install the DB2 Client Software
The installation procedure for installing
the DB2 client software is nearly identical to the DB2 server software
installation guide as described in Section I.
Follow the same instructions except install only the DB2 Administration Client. The other packages are optional and not
required to run the client software.
Step
2: Connect to a Database
Before attempting to attempt to an online
database, make sure that the database server is up and running, accepting
client access, and is available to you from the network that you are on. For example, it is a common setup to only
allow database access from computers at one office and not allow anyone outside
access from their home.
In
order to connect to an online database, you must first create a database entry
in the Client Configuration Assistant. Once
this step is accomplished, it does not need to be repeated again for the
specific database on that client computer, unless the client entry is deleted. Also, it is normally safe to leave the database
entry on the client computer after using it, even if this computer is in a lab
shared by other users, since most database systems require you to enter a
password each time you connect.
1. From the Windows Start Menu, choose:
Start Menu à Program Files à IBM DB2 à Client Configuration Assistant
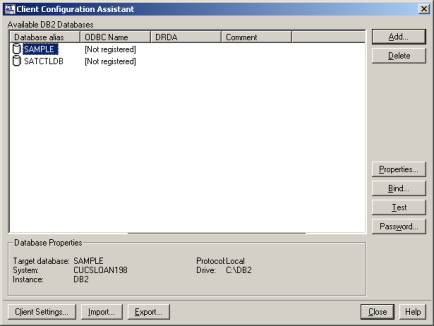
2. Click the Add button
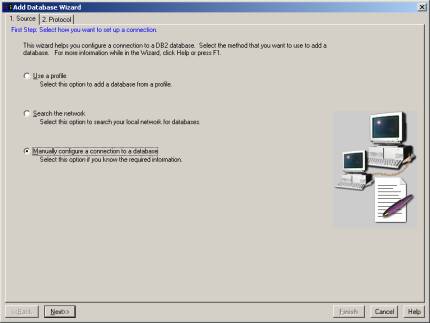
3. Click on the Manually configure a
connection to a DB2 database option and then Click Next
4. Choose TCP/IP for your protocol and
click Next
5. Enter the following information:
Hostname: < Enter the IP Address or Host Name for the
computer >
Port number: < Enter the port number for
the Database Server >
Service Name: < eave it blank >
Click Next
to continue
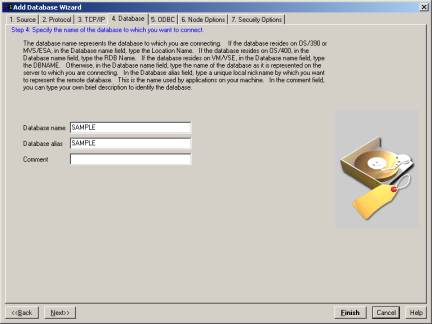
6. Under Database Name, enter the name
of the database you are connecting to Click
Next to continue
7. Make sure the Register this database for
ODBC box is checked, along with
the As
a system data source option
Click
Next to continue
8. You can leave the Node Options information blank
Click
Next to continue
9. Under security options, click
the Configure security options box and make sure the Use the server’s
DBM configuration is chosen.
Click
Finish when you are done.
10. You may now test your configuration using database
username/password:
Select Test Connection
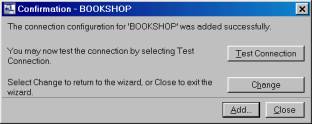
Enter the
database username and password
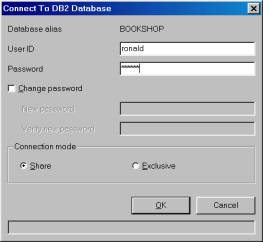
Click OK when you are finished
The
application will now test to see if it can find the database. If it can, then it will inform you of success,
and you are finished. If it cannot, it
means there is an error on either the client side, the server side, or
both. If someone else is able to access
the server, then it most likely means the error is on the client side and you
should try adding a new entry to the client configuration table or working from
another computer.
11. Click the Close box once you are
finished
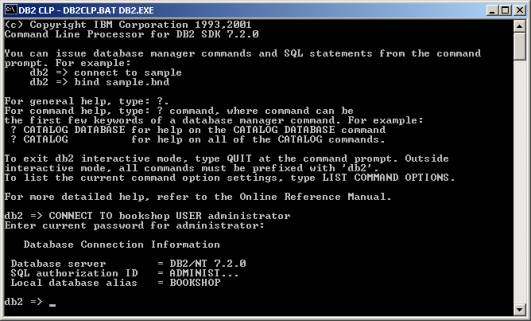
The database is now set up. One way to access it is through the command
line processor:
From the
Windows Start Menu, choose:
Start Menu à Program Files à IBM DB2 à Command Line Processor
To log
into the database, type:
connect
to <Database Name> user <username> using <password>