CS433 Fall 2002
Setup Guide
TA’s: Vincent
Gu (vg32@cornell.edu)
Scott
Selikoff (sms65@cornell.edu)
Lin
Zhu (lz26@cornell.edu)
Introduction
As
discussed in class, each project will be modeled on a modified three-tier
architecture: the database, the
application server, and the web browser.
All groups will use the same database server, Egret, and each group will
be given a single database from which to work.
If later in the semester a group requires the use of a second database,
specifically for the data replication assignment, students can contact one of
the TA’s for assistance.
Each group will run its own
application server using Apache Tomcat.
The software has all ready been installed on each of the computers in
the CSUG lab in Upson. If a student is
having trouble getting the software to work properly, it is recommended that
they try another computer in the lab.
Finally,
you may use either Microsoft Internet Explorer or Netscape to access your web
server one it has been loaded.
While
reading this guide, keep in mind that writing appropriate SQL statements will
be discussed in more detail in CS432.
This guide simply provides a method for executing such queries in a
different environment that you will be using in CS432.
Step I: Setting up the Application
Server
Each
student needs to configure his or her network drive for use with Apache
Tomcat. This step only needs to be
performed once.
The Tomcat software for the application server will
run locally on the harddrive of the lab computer, and the application server
data will be stored on each student’s network drive. Create the following directories on your network drive exactly as
they appear below:
Z:\CS433\Work // Temporary directory for the server
Z:\CS433\ROOT // Root Directory of the server
Z:\CS433\ROOT\WEB-INF // Hidden System Directory
Z:\CS433\ROOT\WEB-INF\classes // Location of java class files
Z:\CS433\ROOT\WEB-INF\lib //
Location of java .jar files
Next, download the files “msbase.jar,
mssqlserver.jar, msutil.jar” containing the Microsoft SQL Server
2000 JDBC Drivers from the MSDN
SQL Server 2000 website and put the
contents in the folder:
Z:\CS433\ROOT\WEB-INF\lib
These files contain the SQL drivers that allow your
allow your application server to access the database and can also be obtained
freely from Microsoft’s website.
Step II: Using the Application Server
Start
and Stop the application server using the following two files already located
on the harddrive of each lab computer:
C:\Program Files\Apache Tomcat 4.0\bin\startup.bat
C:\Program Files\Apache Tomcat 4.0\bin\shutdown.bat
After the server has been started, you will see a
command window:
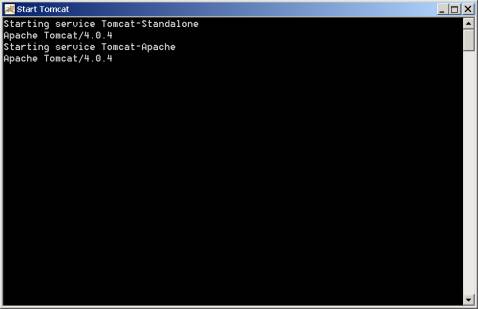
You need to keep this command window open at all
times while your server is running.
Closing this window will take the server offline. We refer to the computer running the
application server as the host computer.
Tomcat always loads the file, Z:\CS433\ROOT\index.html, when you access the root of the web
server. Initially, you should create or
download a simple .html file, rename it to index.html
file, and put it in Z:\CS433\ROOT so
that you can verify that your server loads properly.
To test the web server from the host computer, open your
browser and go to:
Partners attempting to use your web server need to
use the host computer’s IP Address, such as:
Notes:
1) Tomcat has
been set up to use the standard Web Browser port 80.
2) Only one
partner needs to run the application server at any given time.
3) In order for partners to modify the data in the host computer’s root directory, you will need to give your partners security rights to that folder and/or files.
4) Java Class files go in the WEB-INF\classes directory. Although not always necessary, it is recommended that you restart the server anytime you add/modify files in this directory.
Step III: Accessing the Database
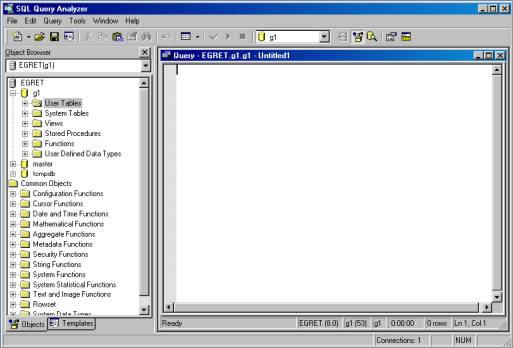
We are using Microsoft SQL Server for
the database server. The recommended
tool to access the MSSQL Server is called Query Analyzer. You can start it by going to:
Start Menu à All Programs à Microsoft SQL Server à Query Analyzer
It will bring up a dialog box looks like below:

Notes:
1) You can
check SQL statement syntax before executing by pressing Ctrl+F5 on the keyboard
or click on the checkmark button on the toolbar.
Step IV: Establishing Database Connection
To access a database within a
JSP/Servlet, you will be using JDBC. In
general, JDBC stands for “Java Database Connectivity”. Many of you may be familiar
with ODBC, which is Microsoft’s version of the same type of software.
Before
proceeding, make sure that the designated .jar files, mentioned in Step II of
this guide, have been downloaded and installed into your library
directory. Second, insert the following
line in the top of your JSP file:
<%@page
import="java.sql.*"%>
This
line tells the JSP to load the appropriate SQL libraries. For servlets, you load the same library
using the standard Java method for importing a class.
To invoke the JDBC driver, use the following
line of code:
Class.forName("com.microsoft.jdbc.sqlserver.SQLServerDriver");
This line can conceivably throw a “ClassNotFound”
exception. You must make sure to
try/catch this exception as well as any other potential exceptions in your code. To establish a connection, type:
Connection
con =
DriverManager.getConnection("jdbc:microsoft:sqlserver://egret:1433;databasename=
g192","g192","password");
In our example, we used g192 for the group name and login.
You must replace this with your group name, login, and appropriate
password without removing any of the quotes.
Note that getConnection can also throw a SQLException, so you need to
catch it as well. At this point, you
have established a valid connection to the database, and can proceed to invoke
SQL commands on the database as if you were using Query Analyzer.
The connection is stored in the
Connection object called “con”. Next,
you will create a Statement object. A
Statement object is used to pass information to and from the server for an
individual SQL statement. Create a
Statement object using the following syntax:
Statement stmt = con.createStatement();
Once you have a Statement
object, you can use it to send SQL statements to the database as is done in the
following executeQuery method:
String sql =
“SELECT column1, column2 FROM table”;
Statement stmt = con.createStatement();
ResultSet rs = stmt.executeQuery(“sql”);
Notes:
1) If your SQL statement is to update the
database that uses INSERT, UPDATE, or DELETE, use the method executeUpdate
instead of executeQuery.
2) In our example, we used the labels sql, stmt, and rs to denote the instances of
each object. Keep in mind that you can
name these instances anything you wish, and for cases in which you have nested
queries, you will need to use other labels.
In our example, the results of the query are stored
in the ResultSet object. The Java API
provides many useful methods to process the ResultSet. Assuming column1 is of type integer, and
column2 is of type string, to print the result of query on screen, type:
while(rs.next()) {
out.println(rs.getString(“column1”)
+ " " +rs.getString(“column2”);
}
Results are sent as one record at a time. rs.next() simply scrolls through
each record one at a time and returns false when there are no more
records in the set.
Notes:
1) Always remember to close your ResultSet,
Statement, and Connection when you are done using them by calling rs.close(), stmt.close(), and con.close().
2) In order to return the results in some
specified order, recall that you can use the SQL command ORDER BY as will be
discussed in CS432.
3) The command executeUpdate does not return a ResultSet object, but
an integer value, which indicates the successfulness of the query sent. Do not use a ResultSet object when executing
an executeUpdate query or the server will throw an exception.
4) Here is an
example with all the smaller examples put together to show what a simple JSP
accessing a server might look like:
<%@page
import="java.sql.*"%>
<%
Class.forName("com.microsoft.jdbc.sqlserver.SQLServerDriver");
try
{
//
Open Database connection
Connection
con =
DriverManager.getConnection("jdbc:microsoft:sqlserver://egret:1433;databasename=
g192","g192","password");
//
Query Database (all queries use the same connection)
String sql =
"SELECT column1, column2 FROM table";
Statement stmt = con.createStatement();
ResultSet rs = stmt.executeQuery("sql");
// Print header and each record returned
out.println("List of items in the
database:");
while(rs.next())
out.println(rs.getString("column1")
+ " " +rs.getString("column2"));
// Finished using the database instances
rs.close();
stmt.close();
con.close();
}
catch (Exception e) {
out.println(e.toString()); // Error message to display
}
%>
Note that in this example, in the event of an error,
we output the error exactly as it is returned from the database. You may want to refine this in practice so
that the exact type of error is hidden from the user.