Rebuilding a Failed IOMEGA NAS A300u Array
By Gregory R. Bronner MS ’00
IOMEGA NAS A300u, Raid5, Recovery, RaidFrame,
MultipleDisk Failure, FreeBSD
Background
Disks fail often. Most computers and laptops have no backups. When I started doing taxes electronically, I realized that I should go out and get a more permanent storage solution.
The IOMEGA NAS A300u
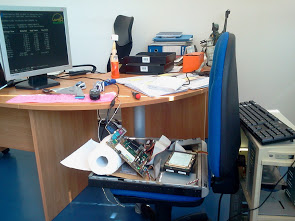
The IOMEGA NAS A300u was roughly the size of a pizza box, and sounded like a jet airplane taking off, due to the two cooling fans. Here’s a picture:
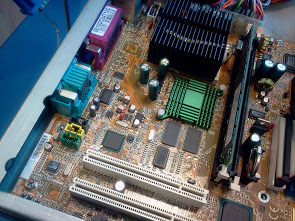
It turns out that this was basically low-end PC running FreeBSD 4.6.2 with three hard disks in a relatively heavy duty case. I suspect that they must have gotten a special deal on motherboards, because there’s no reason to put a graphics card, a serial/parallel port, a mouse and keyboard, and two USB ports on this otherwise. Here’s a picture of the inside:
Since this thing was so loud, I pretty much only used it during tax season, and to back up other important documents such as my mortgage closing statements. The 10baseT Ethernet was pretty slow. Nevertheless, I never got around to replacing it, as it just sat there and worked.
The IOMEGA NAS had 3 disks of 40g each. Some disk space was consumed as overhead, and the whole thing was put into a RAID5 configuration, so the actual effective size of the array was about 73 g. I never filled it, as the io speeds were too slow to make it useful for storing photos and videos, and as it made so much noise that I didn’t really enjoy having it turned on when at my desk.
Symptoms of the Failure
When I started doing my taxes, I noticed that my previous year’s tax file was corrupted. I assumed that TurboTax was the source of the issue, but I prophylactically copied the last year’s tax documents to my main computer.
At some point, I turned the NAS on, and the front power
light never stopped blinking, meaning that it was in a ‘booting’ state. I tried cycling it a few times, and then
thought uh-oh!
Recovering the IOMEGA NAS A300u
The first thing that I did was google the problem. Unfortunately, this machine was never popular, nor was it widely distributed. Presumably most of them are in the scrap heap by now. However, the most pertinent result was this web page:
gfdsa vs. iomega a300u, written by Michael Tabolsky, who was extremely helpful in the process.
There’s a tremendous amount of information on this web page, but unless you are an expert, it is intimidating.
Note that my problem was different from his – I had two failed disks.
Removing the Data from the Disks
If you are reading this, you may want to contact a commercial data recovery service. Most of them appear to be scams (see below), but if your disks are, in fact failing, you want to minimize the amount of spinning, and these services have the ability to replace the circuit boards, motors, and drive heads—these techniques are beyond the scope of this document. These guys charge $1000 + per disk for this service, so beware.
Here’s what worked for me:
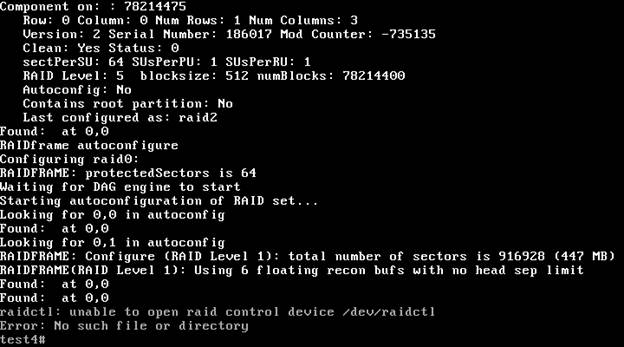
First, I removed the top of the IOMEGA NAS, and examined the content. No fires, mouse infestations, or other obvious signs of damage. Based on Mike’s pictures, I plugged my monitor in and powered it up. I observed that IDE 0 (the middle disk) had failed, and that the machine wouldn’t come up, as it had different ‘Mod Counters’. A few more power cycles convinced me that there wasn’t anything that I could do. I noted that Drive 0 (the middle one) had failed. When I tried to boot from Drive 2 (rhs), I got this::

Label the Drives
Each drive should be labeled with its number (I used 1/2/3), and whether it was an IDE Master or slave and which IDE cable it was connected to. Label the circuit boards as well and separately. I used stickers.
The Data Recovery Scam
After reading the account of how this happened, I looked for raid recovery experts in the NYC area. Most of these people seemed to spend more time on their google ranking than on their actual service.
Given that most people in this situation are willing to pay literally any amount to recover their data, a high google ranking gets the suckers with easy problems in the door – the comments on Yelp convinced me that that many of these guys were aggressive kids armed with a few basic tools, but no deep technical knowledge.
Their business model seems to be to pick off the easy-to-solve problems and to charge a very high price for their service. One guy quoted me $3000, but said it could go ‘much higher’ – but his interview process appeared to be designed to probe my depth of wallet and willingness to pay, not my technical abilities. At this point, I knew that I needed to do it myself.
Getting the Tools
Michael’s solution used an old PC that happened to have IDE cables. I don’t happen to have one of those lying around. This only works if the disks are reasonably good, and if you happen to have a computer that has the newer 80-cable 40-pin 133mhz IDE cables, which were pretty much obsolete by around 2005. I don’t recommend it, as moving drives around is dangerous and as rebooting a PC multiple times is slow and annoying.
Magic Screwdrivers Bits
If you don’t have a 100pc set of security screwdriver bits, you should get one. You’ll probably need to go shopping on Amazon anyway:
Neiko 100 piece security screwdriver set
The magic screwdrivers have already paid for themselves and have other uses beyond this project. I’ve used them to open up the microwave and swap out the circuit board, and to open up certain tamper-proof intercom components.
SATA- USB Converters.
I really had no idea that these existed until I saw them on Amazon. These allow you to turn an old hard drive into a USB device. I strongly advise you to buy two or three, as the build quality is terrible, and you want to avoid spinning the disk excessively because your cable failed. I bought two and used both.
USB Pen Drive
These are basically throwaway items. You need a 2G drive capable of running a livecd. Buy a decent quality version, as these things fail at alarming rates. Get two.
An Extra Hard Drive
When your hard drives are sick, you really don’t want to turn them on and off a bunch of times. Having an extra hard drive to ‘practice’ that can help you get the technique down and save wear and tear on the damaged disks. I had an old computer with a 500G hard drive that had an unused partition of 200G
An Extra Computer connected to the Internet
You are going to use the main computer to back up the data, so you need some way to get to google to read this document!
A Practice Computer
I used an ancient netbook to test my linux data copying skills and to test my pen drive linuxes – it saved me a bunch of reboot cycles.
Approaches that Did Not Work:
Here’s a list of things that I tried when backing up the disk that did NOT work.
Using ddrescue on VirtualBox
I have a virtualbox linux guest that I use for programming. I tried to use it for data capture, and worked hard to set up USB filters in virtualbox, but I could never get the machine to recognize the external hard drives, so I gave up. I also had problems in that sometimes the filters would capture my keyboard. My eventual conclusion was that while this might be possible, it wasn’t worth trying to figure out.
Using the bootable pen drive image maker from SystemRescueCD . I thought my pen drives were bad, but really the installer was the problem. I eventually downloaded a different installer and it worked.
Copying to my main Hard Drive
For reasons that I can’t explain, when I tried backing up the RAW image files to my main Windows 7 hard drive, when I rebooted back into windows, Windows ate the files. This was very disconcerting, as one my hard drives often refused to spin up and be recognized.
Copying to a FAT32 Drive
This was just dumb. I formatted the extra partition of my external target drive as FAT32. It doesn’t work. Make sure it is formatted as NTFS.
SysrescueCD
SystemRescueCD is a bootable linux livecd that has a large number of disk tools on it. You can boot the computer off the pen drive (press F2 or F12 at boot time to change the BIOS boot order!).
I downloaded a copy of SystemRescueCD as it has a good collection of tools to recover and back up hard drives. However, the ‘installer’ that they provided never worked correctly, and my pen drives would not boot when I tested them on an ancient laptop. Eventually, I got the installer from PenDriveLinux, and that did the trick.
Mounting the Recovery Drive
After booting up pen drive linux, the next step is to ensure that you can mount the target hard drive.
Plug a SATA adapter into it, and plug the USB cable into the computer.
First you have to go find it – in linux it typically has a name like /dev/sda
mkdir /mnt/gooddrive
nfs3-g /path/to/drive /mnt/gooddrive
Do NOT use mount here, as it will trash an NTFS hard drive – I was lucky, as CHKDSK managed to fix the issue. I was also lucky because I’d only written 300g out of the 2TB on my main hard drive, so when I copied another 80G, it went to an empty spot.
Also, I recommend using an external disk. For some reason, NTFS deleted all of my disk images when I logged back into windows. It also keeps you from accidentally destroying your good computer.
Write a file to the disk. (e.g. ls > /mnt/gooddrive/x).
Now reboot to windows (yank the pen drive!), mount the external drive and verify that you can see the file that you just wrote.
Imaging the drives.
Reboot using the pen drive.
Move the NAS next to the target computer.
Unplug all IDE cables and power cables for the hard drives.
Plug the power and cable adapters into the first drive, and ensure that the drive has power.
Power up the NAS
I had the best luck when I powered up the drive and then plugged the USB port into the computer. MAKE SURE YOU GET THE ORIENTATION OF THE IDE ADAPTER RIGHT!. These things are so cheap that they often don’t put the little ‘key’ on the connector, so you screw up quite easily. Also, depending on which adapter you use, the little cable tail may get in the way of the drive’s power plug. Put the power plug in first and then the adapter.
Now start up your external destination drive and verify that you can see it in linux.
startx
gparted
Now hit ‘Rescan all drives’. You should be able to
ddrescue –d
–b4096 /dev/sd2 (or whatever gparted
calls it) <path to recovery drive>/disk1.raw <path to recovery drive/disk1.log
Make sure you know which disk image file corresponds to which
These commands will let you see the partition tables, the used space, and will image the drive
I was lucky – ddrescue reported no errors. It takes about half an hour per drive.
Now repeat this two more times.
Power off the NAS. Move the adapter and power cable to the next drive, and repeat 2 more times, being careful not to overwrite existing backup files or fill up your target hard disk.
Problems Spinning up a Drive
One of my drives imaged cleanly. The other one was recalcitrant, and I had to power-cycle it a few times.
If this happens SKIP THIS DRIVE. You need 2/3 to work. Don’t waste time.
The feeling on the net is that this generally futile: attempt to fix a drive. I did not attempt to sacrifice a virgin keyboard, but I don’t think it would have helped.
My third hard drive was dead.
The Circuit Board Trick
This guy documents how he got his data off a failed hard drive here: Circuit Board Replacement
You can try this (the drives use TORX T-8 screws), but make sure that you’ve gotten data off of the donor hard drive first! Also, make sure that you’ve labeled the circuit boards and the drives, so you know where everything goes if you do decide to use a data recovery service.
The Freezer Trick
I tried putting my dead hard drive in the freezer and changing its circuit boards, as described above and freezer trick.
It didn’t work. This complicates matters further.
Copy the image
Reboot to Windows, and copy the data from the external drive. Now make a backup copy of that. You are now done with part 1, and can go put the NAS and cables away. Walk away for a while – this process is slow.
Setting Up VirtualBox
This example assumes that you are working on a Windows based computer.
Download and install VirtualBox, VirtualBox Guest Additions, as well as a modern linux virtual disk image and the first ISO CD image of FreeBSD 4.2.6, available at ftp-archive.freebsd.com
Now set up three virtual computers:
· Ubuntu 12.04 (or higher) – for testing and programming
· FreeBSD 4.6.2 (for recovering the data)
· Blank (call it FreeBsd), you will use this to test the boot of the original NAS.
Save Your Work!
I got a bunch of Blue Screens of Death when working in VirtualBox with freebsd. YMMV. Save your work!
Install the VirtualBox package into Ubuntu
You will need the VBoxInteralCommands later. Also set up mount points for copying to the host computer (using Shared Folders)
Convert the RAW file to VDI format:
VBoxManage convertfromraw file.raw file.vdi --format vdi
Wait a while. This process is slow.
Install the FreeBSD Distro.
Using virtualbox, put the CD in the virtual CD drive, and make sure that the boot order has the CD before the hard disk.
I recommend using the general developer category. Go through the install process, but don’t install a lot of stuff. You
Now go to the virtual CD, mount it (using mount /dev/acd0 /cdrom), and go and visit the cdrom
Go to the src directory, and run the install.sh – you will need the whole source tree later.
Test your internet and set up a mount for the local drive.
I had problems with internet connectivity until I added this
/etc/resolv.conf :
nameserver 192.168.2.1
Obviously, this works on my network,
but not necessarily yours.
You will also need the lynx package
See what’s wrong with your NAS:
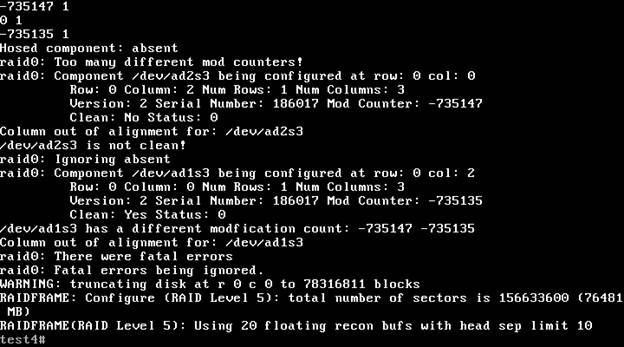
Make a COPY of your VDI files, and attach a copy to the disks of the blank VirtualBox guest. You should be able to boot it and see if the disks were readable. Record the error and any warnings that it produces.
In my case, the reboot cycles had caused the Mod Counters to differ, and the machine had (I think) responded by trying to reboot in RAID 1, leaving it with two conflicting RaidFrame Geometry listings.
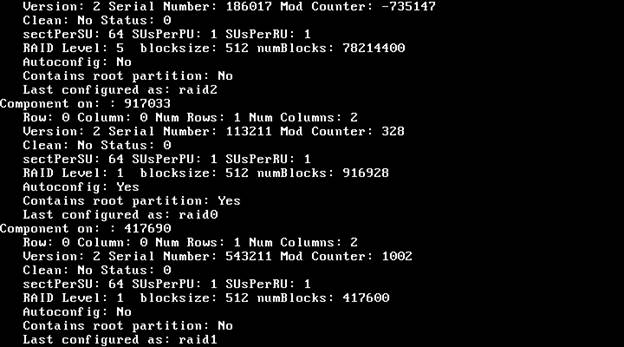
Note that the modcounters (-735147 and -735135) are very close. This indicates that the second disk failed recently.
Start working in FreeBSD
Add COPIES of the VDI images made earlier to the FreeBSD 4.6.2 machine and boot it
Mount the first partition of either Disk 1 or Disk 2, but not Disk3, and look at /dev in there.
Add ‘block special’ files that you’ll need later:
mknod /dev/raid0 200 65538 root:operator
mknod /dev/rraid0d 200 3 root:operator
mknod
/dev/raid0d 200 3 root:operator
The /dev/raidctl device is supposed to be made as part of the
installation script for raidframe – look in /dev/src/etc/MAKEDEV
for the exact syntax, but I think it is mknod /dev/raidtcl 200 (?) root:operator
Now set up Network Shares:
Pick a folder, and share it in windows.
Now add a mapping in the config of the VirtualBox folder.
You will need to use SMB to connect to windows hosts:
Mounting the disk:
mount_smbfs -I 192.168.2.15 //gbronner@BUTTERHEAD/myshare
You will need to provide your password.
I usually put this into a script, as you’ll
probably reboot this virtual machine fairly often.
Verify this by doing file /mnt/disk1/dev/raid0d and verifying that your file is set up in the same way
Download RaidFrame for FreeBSD
Raidframe download using lynx
Now follow the instructions on that page to remake it (I used the module mode)
Write the config file
See Michael’s discussion. I believe that the actual arrangement of drives should be
Disk1
Disk0
Disk2 , which is how they appear from left to right in the box, but not how they appear in FreeBSD, where you will have /ad1 pointing to disk 1, /ad2/ pointing to disk0, and /ad3 pointing to disk 2.
It isn’t documented, but I had good luck adding a section to the raid.conf file:
START debug
EngineDebug 1
printDAGSDEBUG 1
Look in the options file for more suggestions.
Fire up the raid
If you have all disks, you might as well try running the Raidframe:
raidctl – c <confile> raid0
Use the scroll-lock and pageup/pagedown to scroll through errors.
If it mounts cleanly, great. If not, try raidctl –C to force-mount it. This will instruct it to throw away some of the updates.
Modify the Kernel
I modified two spots: one in ConfigureDisk, where I elimated the check to verify that the disk was, in fact a real device, This allows you to use an empty drive bay and keeps the array from going into RAID0 mode.
The second one was in raidctl --- I eliminated the check to verify that the device existed, if it was named’absent’
Modify the Config File
Stick the ‘absent’ entry in place of the failed disk.
Mine looked like this:
START disks
/dev/ad1s3
absent
/dev/ad2s3
Reboot and restart raidctl – it should work now. I got something that looked like this on one of my attempts, and I fixed the geometry – notice how it tells you where it thinks the disk should go via the Row/Column listings vs what was stored on the disk. If this happens, reboot, change the config file and try again.
FSCK the disk
You will not be able to use the disk until you’ve fscked it. If your raid configuration is wrong, you’ll get bunches of errors. I had a few errors, and I answered ‘Y’ to all of the questions. This seems ok – the original NAS bootup script did this automatically. Luckily the UFS filesystem has redundant superblocks and inodes.
Mount the Filesystem
mkdir /mnt/baddata
mount /dev/raid0 /mnt/baddata
Now go and copy everything off the disk. Go out and buy a new backup solution.
Root Cause:
RAIDFrame is a log-structured
block device. The main reason to do this is that RAID5 is not optimized for
small writes – this system gathers them up and writes them at the end.
What I think happened here is that I lost one drive (0), and
the system shifted to operating in degraded state. Because the third drive had issues being
recognized by the bios (and had some write errors), the startup script on drive
1 assumed that this was now half of a RAID1 array, and tried to boot from
it. This obviously failed, but not
before RaidFrame had updated the Mod Counter and put
some meta data in that described the new geometry of
the array. On subsequent reboots, this
new meta data conflicted with the prior geometry and RaidFrame got confused and quit.
Final Thoughts:
This took me several days of work. It was not easy, and I have a graduate degree in CS. I’m surprised that there are no user-level programs to read and unscramble the data on a RAID system.