REGISTER AS A TEAM FOR PROJECT 3
IMPORTANT INFORMATION FOR WORKING ON PROJECT 3 AS A TEAM:
All students who wish to work on project 3 in teams of two MUST REGISTER as a team on/before Monday, 18 July 2016.
BOTH TEAMMATES must register by providing team information using this Google Form.
Make sure you choose your teammate carefully! Requests to change teams after signing up will NOT be encouraged.
Students without a registered partnership must work individually on Program 3.
UPDATES:
Corrections, clarifications, and other announcements regarding this project will be found here.
July 28th: If you run into errors/exceptions (in the Coin class) related to the use of java.awt.Color, you may want to try this workaround:1. Comment out the existing code in the getDisplayColor() method in the Coin class.
2. Add only this line in the getDisplayColor() method: return Color.YELLOW;
Doing so will no longer allow your coins to change color. (You will not lose points for not changing color of coins).
July 28th: Sample pseudocode for checkForCrashes() method posted. See checkForCrashes.
July 28th: Pseudocode for notifyDrivers() posted. See notifyDrivers-pseudocode.
July 27th: In the pickUpCoins() method, remember to remove all coins that have their isCollected field set to true. This ensures that coins that have already been collected are no longer displayed on the highway. The isCollected field can be used to keep track of whether the coin needs to be removed in the pickUpCoins() method or not. If you are not removing coins that have been collected in your pickUpCoins method, please remember to add this in your code!
July 25th: The sample image shown as the output of the first step (A window opens) has been updated. You should be able to see just the highway without any cars on it.
July 25th: The sample video output of the completed game has been updated to show the coins changing their colors. See: Updated Sample Output
July 18th: More details on how to develop this program.
Overview:
Learning Goals:
- Gain experience with Object-Oriented Programming.
- Use instantiable classes provided by other programmers.
- Understand provided classes by reading their javadocs.
- Use Java's ArrayList class.
- Implement, in whole or in part, basic instantiable classes for which interfaces have already been defined.
Description:
A few semesters ago, your fellow CS 302 students wrote a program that
simulated traffic on a highway and displayed a portion of the highway
in a window. Motivated by many a facebook game of the form "you
have 60 seconds to do something," you decided to turn this traffic
simulation program into a game where the player controls one of the cars
on the highway and collects bonuses without crashing into other cars.
The player is given 60 seconds to control a car. He or she may speed up, slow down, or switch lanes. The objective is to get a high score by collecting as many coins along the way as possible. Upon collecting a coin on the highway, the player's score is increased and the player gets some extra time. The increases in score and time depend on how quickly the coin is collected. The game ends when the player runs out of time or when he or she crashes into another car on the highway.
Specifications:
Provided Files:
Start by creating a new project and downloading the code that we've provided as well as the code skeletons to your project directory:
CarGameClasses.jar
Add this jar file to your project directory.
Right-click on the CarGameClasses.jar file and choose "Build Path" --> "Add to Build Path".
You're invited to look at our part of the code, but don't change it! We will use our original files when we grade your work.
skeletons.zip
Unzip this file and add its contents into your project directory. It contains code skeletons for all of the classes that you will be implementing.
You'll find that most of the commenting is already in the files, but don't forget to fill in other comments as required by the commenting guide.
Classes You Must Implement:
You must implement the methods EXACTLY as they appear in the skeletons we've provided. By this we mean:
- Do NOT change method names.
- Do NOT add or remove parameters.
- Do NOT change parameter types.
- Do NOT change method return types.
Of course, you will need to change each method's body so that it works as described.
Below are the classes that you will be completing for this project.
Note that we've kept the descriptions short here and put the details in the
javadocs for each class.
Make sure you carefully read these javadocs and
implement the classes as specified.
Recall that the method summaries aren't complete.
For complete specifications, you'll need to see the
method details by clicking on the method names in the summary section or
by scrolling down the javadoc page.
Note that the code
we've provided will use your implementations of the unfinished classes.
Our code will only work when you implement the classes as specified in
their javadocs.
Before you start writing code for a class, you should look into the provided code skeleton. Sometimes there is code provided to you, and it suggests what some of the instance variables should be called. You may need more instance variables than those that are already mentioned (and causing compiler errors at the moment) in the skeleton.
The Coin class represents coins that appear on the highway. The player collects these by driving over them.
The Highway class represents a highway. It stores information about all lanes and has an interface that allows the programmer to modify the lanes' cars and coins.
The CarGame class ties together all the classes that make up the game: Car, Driver, Lane, Highway and Coin.
Classes We've Already Implemented:
The Car class maintains information about a car.
The Driver class represents a driver sitting behind the steering wheel of some car.
The Lane class represents one lane of a highway. It stores information about all cars and coins in it.
The CarGameGUI class displays the game in a window. Your code should NOT call any methods from this class.
The CarGameController class ties together the graphical user interface in CarGameGUI and the game code in CarGame. This class runs the car game. It also processes any key presses made by the player and changes the state of the car game accordingly. Your code should NOT call any methods from this class.
The CarGameMainClass class is the main class which you should run in order to run the car game.
How To Develop This Program
There is a lot of ground to cover in this program. This means you should
start early!
To make your work easier, here is an outline which tells you
which steps you need to take in order to get a working program. Before
you move on to the next step, you should test your code
to see if what you have written so far works correctly.
Your grade for correctness of execution will be proportional to how many of these steps you finish.
-
A window opens : This requires you to implement the
Highway class constructor, its two hasNext___()
iterator methods and the getNumLanes() method.
You also need to code up the CarGame
constructor, which includes making a player and a car for the player (but there
is no need to add it to the highway), and the CarGame
accessors getHighway(), getPlayer(),
getTimeLeft(), getScore(),
getTickNumber() and isGameOver().
Nothing really happens yet when you run the program, but at least the user interface shows up. When you try to run the incomplete program, eclipse may warn you that there are still compiler errors. You can ignore that warning and your program should run assuming that there are no compiler errors in the methods we outlined in this paragraph.
-
Cars are there and move :
You should be able to add cars to the
highway and they should move in every tick.
This requires a nearly complete implementation of the Highway
class (the methods dealing with coins can be completed in step 4). It also
requires a complete implementation of the CarGame class
addRandomCar() and setAddCarProbability() methods as
well as a partial implementation of its moveEverything() method.
-
Minimal game : The player's car is on the highway
and can be controlled by pressing keys.
At this point the player should be able to speed up,
slow down and switch lanes. If the player crashes, the game should
stop (our code will stop the game assuming the isGameOver()
method is correct).
With what you have written so far, the player's car will crash or the player will lose after 60 seconds with a score of zero. But that's fine. At least you see that you can play the game now. You will implement the CarGame class processKeysPressed(), checkForCrashes() and isGameOver() methods in this step.
-
Playable game : Coins randomly appear on the
highway and the player can pick them up to improve his or her score
and increase the game time. A coin is picked up if it is in the same
lane as the player AND overlaps with the player's car (see the
section on distances later in this specification).
This step requires a complete implementation of the Coin class and the methods setAddCoinProbability() addRandomCoin(), pickUpCoins() and removeExpiredCoins() in the CarGame class (and the coin methods in the Highway class if you didn't implement them in step 2).
-
Complete game : Before this step, the computer drivers are
rather boring. They probably all go at the same speed (if they move at
all) and don't switch lanes.
The player cannot really restart the game either. There could also be lots of cars which would slow down the game if it runs for many minutes or even hours.
(i) To resolve the first issue, you need to implement the notifyDrivers() method. For each car except for the player's car, this method calls the driver's makeDecision() method. The makeDecision() method will change the car's velocity (so you don't need to) and will return an integer indicating whether to switch lanes. If this integer indicates the driver chose to switch lanes, you must update the highway accordingly.
(ii) To restart the game, implement the reset() method.
(iii) Finally, to avoid having excessively many cars, implement the removeDistantCars method.
-
Enjoy the game!: This is not a step in the project. Completing
the first five steps correctly will give you full credit for
correctness of execution.
You can experiment with various ways of adding cars and coins as well as change probabilities to get the most enjoyable game. We will be curious to see your settings. But remember that you probably have other things to do besides playing your game!
Ticks
While time passes continuously in the real world and events such as
drivers on a highway choosing to switch lanes may
happen at any point in time, computer simulations of the real world
require that time be partitioned into small discrete steps which we
will call ticks. A tick is a certain amount of time, for example
ten seconds. Each event may happen once during each tick.
For example, if each tick takes 10 seconds, a driver may choose to switch
lanes only once every 10 seconds and has to wait 10 seconds before he or
she can choose to switch lanes again. Of course, to get computer
simulations as close to the real world as possible, we want tick lengths
that are much shorter than 10 seconds. In your program, a tick length
will be roughly 0.025 seconds.
For the car game, the following events will happen in each tick. There is more detail in the javadocs for the CarGame class and in the code skeleton.
- Depending on what keys were pressed, the player's car accelerates, decelerates, and may switch lanes.
- If the player switched lanes, check if the player's car crashed into another car.
- If the player did not crash, he/she may have picked up some coins in the new lane. Remove those coins from from the highway and update the player's time and score accordingly.
- Notify all other drivers about their surroundings by calling their makeDecision() methods. The driver may then change the driven car's velocity and switch lanes.
- Move everything on the highway (all cars and all coins) by calling their tick() methods.
- Everything has moved, so now we need to check again whether any crashes have occurred.
- Check whether the player has caught any additional coins after everything has moved. It could be that faster moving coins ran into the rear of the player's car or that the player's car caught some slower moving coins.
- Some coins may have expired, so remove expired coins from the highway.
- To speed up the game, every car that is more than a certain distance away from the player's car should be removed from the highway.
Positions, Distances and Notifying Drivers
We now explain how positions and distances are represented in the program. You will need this to detect accidents, pick up coins, and notify drivers about their surroundings. We use the picture below in all examples in this section.
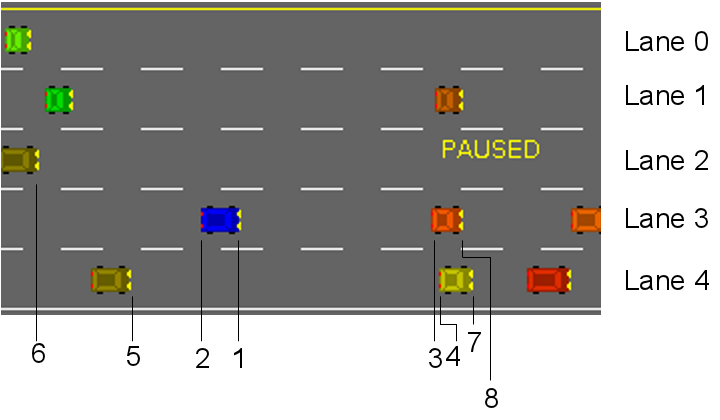
If c is a reference to the blue car in the picture, we get the position of its front (point 1) by calling c.getPositionOfFront(); and the position of its rear (point 2) by subtracting the length of the car from the position of the front, i.e., by using c.getPositionOfFront() - c.LENGTH.
You will need to find distances between cars when you call the makeDecision() method from your your notifyDrivers() method in the CarGame class. The distance between two cars is the difference between the position of the rear of the car that's ahead and the front of the car that's behind. Being in different lanes will have no effect on this distance between two cars in this program. This is probably confusing, so let's see some examples.
-
The distance
between the blue car in lane 3 and the orange car (the one you can see
in its entirety) in lane 3 is the difference between positions 3 and 1.
-
You will also need to find distances between cars in adjacent lanes.
The distance between the blue car in lane 3 and the leftmost car in lane
4 is the difference between positions 2 and 5 in the picture. Being
in different lanes has no effect on how distances are computed.
-
It may also happen that cars in different lanes overlap.
Consider the orange car in lane 3 whose front is at position 8 and the
car underneath it whose front is at position 7. The car in lane 4 is
further ahead, so the distance between those two cars is the difference
between positions 4 and 8. This is a negative distance, which is fine.
Let's also look at some examples of what to pass to the makeDecision() method. The table below shows all the arguments that describe distances and velocities when calling this method for drivers of two different cars: the blue car at position 1 and the car in lane 4 at position 5. Each column of the table corresponds to one set of arguments passed to the makeDecision() method. We point out a few conventions you must follow for our code to work correctly. The example also assumes that the cars in the picture above are the only cars that are currently on the highway.
-
If there is no lane to the driver's left, set information for cars
in that lane as follows:
Set the velocity to any non-negative number and distance to -1.
Do the same for the case when there's no lane to the right. We see an example of this in the last four rows of the table in the column corresponding to the car at position 5.
-
If there is no car ahead of (or behind) the driver in his current
lane (or left/right lanes):
Set the velocity and distance information for those cars to -1.
For example, there is no car in lane 3 behind the blue car, so we set velocityOfCarBehind and distanceFromCarBehind to -1.
For the same reason, we set velocityOfCarAheadLeft and distanceFromCarAheadLeft to -1 for this car.
| Parameter variables in makeDecision() | Arguments for car at position 1 | Arguments for car at position 5 |
|---|---|---|
| velocityOfCarAhead | velocity of car at position 8 | velocity of car at position 7 |
| distanceFromCarAhead | position 3 - position 1 | position 4 - position 5 |
| velocityOfCarBehind | -1 | -1 |
| distanceFromCarBehind | -1 | -1 |
| velocityOfCarAheadLeft | -1 | velocity of car at position 1 |
| distanceFromCarAheadLeft | -1 | position 2 - position 5 |
| velocityOfCarBehindLeft | velocity of car at position 6 | -1 |
| distanceFromCarBehindLeft | position 2 - position 6 | -1 |
| velocityOfCarAheadRight | velocity of car at position 7 | any positive value |
| distanceFromCarAheadRight | position 4 - position 1 | -1 |
| velocityOfCarBehindRight | velocity of car at position 5 | any positive value |
| distanceFromCarBehindRight | position 2 - position 5 | -1 |
Iterators
It is bad programming practice for a class containing lists (such as arrays or an ArrayList) to give the user direct access by returning references to those lists. Doing so would break the idea of encapsulation, because the user could modify the structure of the lists. Therefore, classes often provide iterators which allow the user to access the data in a list without letting the user to modify the underlying list directly.
You can think of an iterator as a pointer to a list that goes through that list in some order. The user can ask for the element the iterator is currently looking at by calling the appropriate method. The user can also tell the iterator to go back to the beginning of the list or to look at the next element in the list. Thus, to go through a list, we take the following steps.
- Tell the iterator to go to the first element. For our iterators, this can be done by calling the appropriate rewind() method.
-
As long as there are more elements to look at (this is checked by
calling the appropriate hasNext___() method), we can do
the following
- See what the iterator is currently pointing at by calling the appropriate lookAtNext___() method.
- Advance the iterator to the next element by calling the appropriate getNext___() method.
The iterators in this program
traverse the list of cars (or coins) in decreasing order
of the return value of the getPositionOfFront() method.
That is, the iterators traverse the list of cars (or coins) from
the Right of the lane to the Left.
This is best explained using an example. Let h be a reference
to the highway in the picture
for the section on positions and distances, and consider the following
code fragment:
Using the Graphical User Interface
Once your game is running, you can see it in our provided graphical user interface. The following controls are available.- UP key: Move the car one lane to the left.
- RIGHT key: Accelerate.
- DOWN key: Move the car one lane to the right.
- LEFT key: Slow down.
- R key: Restart the game.
- P key: Pause/resume the game.
- Q key: Quit the game. This will exit the program.
- C key: Works only if the game is paused. Toggles showing/hiding cars.
- T key: Works only if the game is paused. Runs one tick of the game. This will help you with debugging.
- S key: Calls the toString() method of the game. This will help you with debugging.
Running Your Program
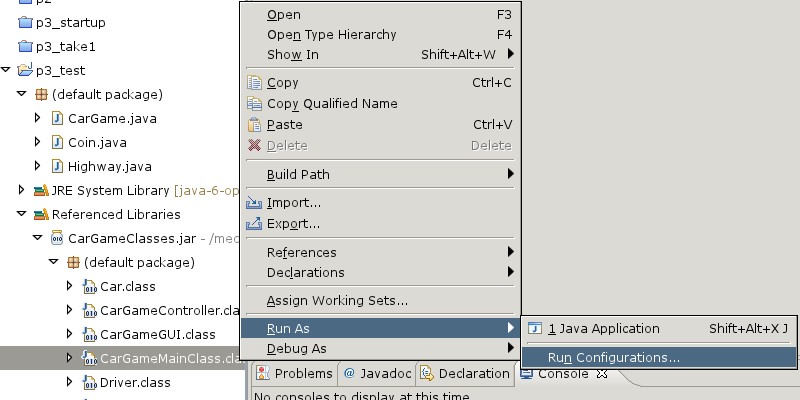
You will need to do something different in order to run your program in Eclipse. The main class uses command line arguments, which you need to specify. Also, the main class will not be listed in the usual place.
To run the program:
- Open the referenced libraries link.
- Open CarGameClasses.jar and the default package. There, you will find CarGameMainClass.class.
- Right-click CarGameMainClass.class, and choose Run As -> Run Configurations. See the picture below.
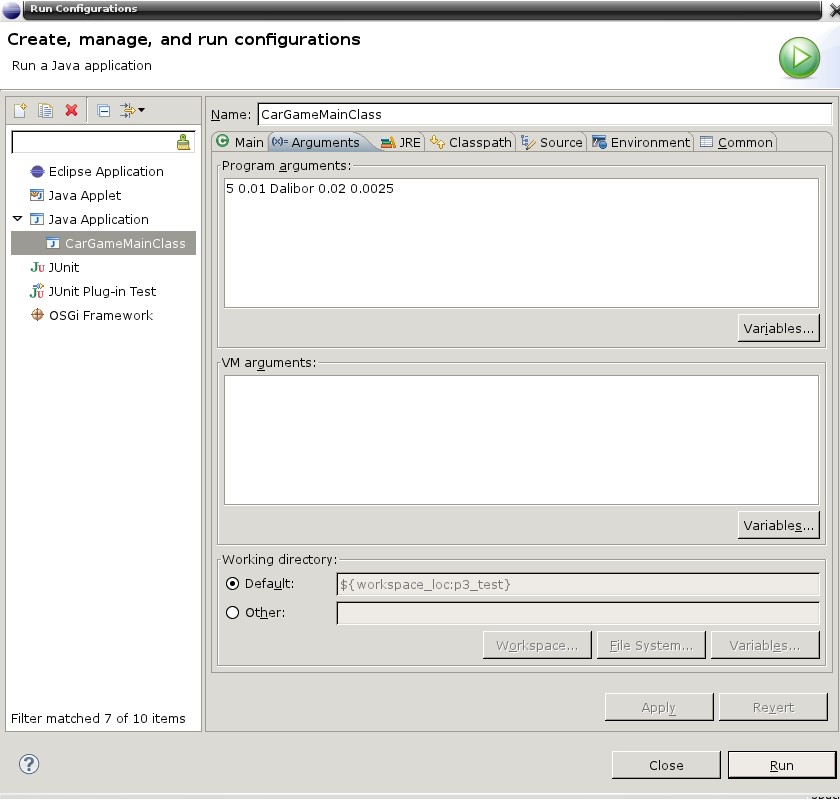
Clicking Run Configurations brings up a dialog that lets you tell Eclipse
some additional details about how to run your program. In this dialog box,
you should go to the second tab under 'Java Application', labeled Arguments. In the program arguments
text field, you must enter five pieces of information separated by
spaces:
- The number of lanes
- The tick length (0.01 is recommended)
- The name of the player (without spaces or in double quotes with spaces)
- The probability of adding a random car to the highway in any tick (a positive double less than 1)
- The probability of adding a random coin in any tick (also a positive double less than 1)
Submission:
Before handing in your program, check that you've done the following:
- Verified that your program works correctly.
Note: To get full credit you must make sure your program works for normal inputs/circumstances and is robust (i.e., works reasonably for abnormal/unusual/erroneous input/circumstances). - Turned in all necessary source files.
- Properly commented your program by following the Commenting Guidelines.
- Used good programming style by following the Style Guide.
Use the Dropbox folder for Project 3 at Learn@UW to submit your work.
INDIVIDUAL SUBMISSIONS (if you have NOT worked with a partner):
To submit your work, upload a SINGLE ZIP FILE CarGameP3.zip containing the following files:
- "Coin.java" with your implementation of the Coin class
- "Highway.java" with your implementation of the Highway class
- "CarGame.java" with your implementation of the CarGame class
The names and emails of both the project partners should be mentioned in the file header comments in all submitted java files.
Students who work in teams MUST sign up by providing team information using this Google Form on or before Monday, 18 July 2016.
Make sure you choose your teammate carefully! Requests to change teams after signing up will NOT be encouraged.
To submit your work, ONLY ONE TEAMMATE should upload a SINGLE ZIP FILE CarGameP3.zip containing the following files:
- "Coin.java" with your implementation of the Coin class
- "Highway.java" with your implementation of the Highway class
- "CarGame.java" with your implementation of the CarGame class
- "team.txt" with the information mentioned below
  a. Student 1 details
    1. Name:
    2. UW ID#:
    3. Wisc email:
  b. Student 2 details
    1. Name:
    2. UW ID#:
    3. Wisc email:
Each person in the team is responsible for making sure that your team's project is submitted properly.
If your teammate forgets to submit your team's CarGameP3.zip OR team.txt,
then both you and your teammate will receive a grade for the project.
Copying Code and Academic Misconduct:
Do not post your project solutions (or drafts) on any publicly accessible web sites. This specifically includes GitHub. It is academic misconduct to post your solution.
Just a note to remind everyone what is OK and what is not OK in terms of talking to other people in class about this and future projects.
It is definitely OK to:
- discuss the project in general terms
- discuss how to implement logic for a task
- help others debug their code and find problems
- ask the TAs or the instructor for help
It is NOT OK to:
- share your code with other students in this class
- ask other students / someone outside the class to write code for you
- bug someone else for a lot of help (particularly if they are already done!)
Discovery of any inappropriate code sharing will lead to harsh penalties for all involved parties. This draconian policy is in place to protect the bulk of you who have put in the hard work on the project.
The penalty for academic misconduct on this project (and all CS 302 projects) will be a failing grade in the course. This penalty is significantly more harsh than if you simply do not do the project. You will gain much more by doing the project than by copying, possibly modifying, and turning in someone else's effort.