We will consider four approaches to register allocation, ranging from simple but ineffective to more complicated but effective:
Using the stack model, values are loaded into registers every time they are needed (i.e., every time they occur as operands of some expression). No values are saved in registers and reused. To generate code for an expression, the expression is represented as a tree and is processed bottom-up:
                +
               / \
              *   c
             / \
            2   b
LOAD R1,2	-- Process leaf node "2"
PUSH R1

LOAD R1,b	-- Next leaf node 'b'
PUSH R1

POP R2       --
POP R1	       | Non-leaf node, operator '*'
MUL R1,R2,R1   |
PUSH R1      --

LOAD R1,c	-- Leaf node 'c'
PUSH R1

POP R2       --
POP R1	       | Non-leaf, operator '+'
ADD R1,R2,R1   |
PUSH R1      --
  ADD   R1    R2     R3    // R1 = R2 + R3
  ADD   R1    R2     x     // R1 = R2 + x
  ADD   R1    R1     10    // R1 = R1 + 10
		t
	       / \
	    n1:j  n2:k
		+2
	       /  \
              /    \
             *1     +2
            / \    / \
           a   b  /   \
           1   0 +1    *1
                / \   / \
               a   c d   e
	       1   0 1   0
Use the recursive function GenCode defined below, starting with the root of the tree. GenCode's parameters are:
GenCode(n, reglist, tmp) {
	cases (n) of

		x: 1  - Left leaf for var/literal x

			R = First(reglist)
			gen("LOAD R,X")
			return R

		op
	       /  \   - Right child is leaf
	      n1  x:0
			R = GenCode(n1, reglist, tmp)
			gen("op   R,R,x")
			return R

		op
	       /  \   - k<=j and k>0 and k < Length(reglist)
	    n1:j  n2:k
			R1 = GenCode(n1, reglist, tmp)
			R2 = GenCode(n2, reglist - R1, tmp)
			gen("op   R1 R1 R2")
			return R1

			// Note: since k < Length(reglist), there
			// will be enough registers for n2's subtree
			// (with no spills) even with the result of
			// n1's subtree in a register.

		op
	       /  \   - k > j and j < Length(reglist)
            n1:j  n2:k
			// Similar case as above, but do n2 first
			// (Note: in both cases, the subtree that
			// requires *more* registers is processed first).

		op
	       /  \   - Both j and k >= Length(reglist)
            n1:j  n2:k
			R = GenCode(n2, reglist, tmp)
			gen("STORE R T<tmp>")
			R = GenCode(n1, reglist, tmp+1)
			gen("op   R R T<tmp>")
			return R

			// Note:
			// The "STORE" code is a spill into a temporary.
			// Another phase of compilation will have to deal with
			// the details of that -- e.g., designating space on
			// the stack for each temporary and replacing
			// references to temporaries with references to the
			// appropriate stack location.
			//
			// The reason for generating code for n2 first, is
			// that we have assumed that only the second
			// operand can be in memory, the first operand
			// must be in a register.  So we generate code
			// for n2 first, spill it to memory, and use
			// that memory location when we do the operation.

	end cases

} // end GenCode
Example expression tree with phase-1 labels:
		+2
	       / \
              /   \
             *1    +2
            / \   / \
           a  b  /   \
           1  0 -1    *1
               / \   / \
              a  c  d   e
	      1  0  1   0
First, consider the code that would be generated for this expression
tree if there are at least two registers;
i.e., assume that the initial call to GenCode is with reglist = {R1,R2}.
Here's the resulting code:
Load R1,a
 -   R1,R1,c
Load R2,d
 *   R2,R2,e
 +   R1,R1,R2
Load R2,a
 *   R2,R2,b
 +   R2,R2,R1
Now consider what happens if there are not enough registers; i.e., if the initial call to GenCode is with reglist = {R1}. Here's the resulting code:
Load  R1,d
 *    R1,R1,e
Store R1,T1
Load  R1,a
 -    R1,R1,c
 +    R1,R1,T1
Store R1,T1
Load  R1,a
 *    R1,R1,b
 +    R1,R1,T1
This method allocates registers within 1 loop, which may include many basic blocks. The main idea is to choose the values to be kept in registers based on estimating, for each value, how much time would be saved by keeping that value in a register. Nesting level of instructions is taken into account in computing the estimated savings.
To illustrate the approach, consider the following nested loop:
   +->  while (...x...)
   |        |
   |        v
   |      x = w * z
   |        |
   |        v
   |      y = x * w
   |        |
   |        v
   |      while (...z...) <-+
   |      |    \            |
   +------+     v           |
                z = ... ----+
If a variable v is not in a register, then:
| w | x | y | z | |
| # loads | 40 | 41 | 0 | 220 |
| # stores | 0 | 20 | 20 | 200 |
| total | 40 | 61 | 20 | 420 |
Given: R, the number of registers available for allocation, and L the loop in which to do register allocation, use the following technique to choose the "best" R variables to allocate for the whole loop (where "best" means avoids the most dynamic loads and stores).
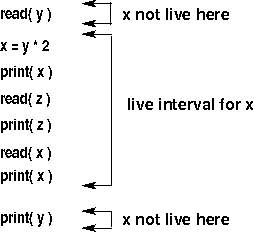
Linear-scan register allocation uses the results of live-variable analysis to create one live interval for each variable. We then try to allocate a register to each live interval; i.e., the corresponding variable is stored in that register throughout the live interval instead of being stored in the procedure's activation record. The live interval for a variable x is the sequence of statements that starts with the first definition of x (the first statement in the linear representation after which x is live) and continues to the last use of x (the last statement in the linear representation before which x is live). Here's an example (showing only the live interval for x, not for y or z):
If two live intervals do not overlap, then those variables can use the same register. Note, however, that there may be "holes" in x's live interval where it is in fact not live (that is true in the example above). In this case, it is a waste to have allocated a register to x for the part of the code where it is not live. The algorithm that does register allocation via graph coloring addresses that issue.
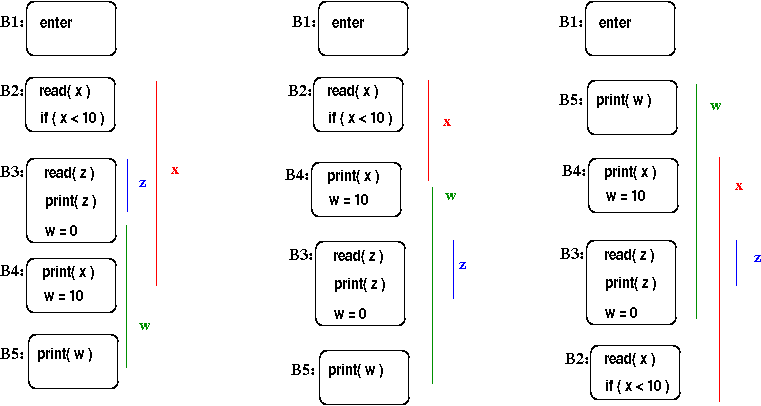
Note also that for non-straight-line code, different linear representations can lead to different live ranges (some of which may have more overlap than others). Here's another example, this time in the form of a CFG:

In this example, the colored regions show the statements where each of the three variables (w: green, x: red, and z: blue) are live. We'll have different overlaps between the three variable's live intervals depending on how the 5 blocks are laid out linearly. (If we assume that these are LLVM blocks, which all end with a conditional or unconditional jump to the next block(s), then they can be laid out in any order as long as B1 comes first.) Here are 3 different layouts, with the live intervals shown for the variables in each case.
Step 1: Do live variable analysis, and compute live intervals
for each variable.
Step 2: Store the live intervals in a list, sorted by their
starting points.
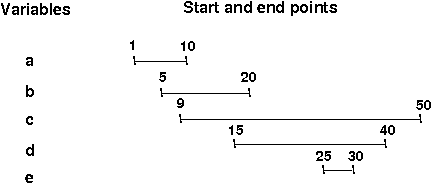
Here's an example (the start and end points are the instruction numbers
in the linear ordering of the code):
In this example, there are 5 live intervals, one for each variable,
and each is represented by a horizontal line that shows where
the interval starts and ends.
Note that the intervals are sorted (top to bottom) by their starting point.
Step 3: Keep a list of available registers, and process each interval
in the list in order.
As we process the intervals, we also need to keep an active list:
this is a list of the intervals that have been given a register,
and overlap with the "current" interval.
The active-interval list is kept sorted by the end points
of the intervals in that list.
Here's how to process one interval:
Next, we process d's interval.
Now we find that a's interval is expired, so we remove it from the active
list and free its register (R1), so we can give R1 to d's interval.
Now we process e's interval.
This time, b's interval is expired, so again we are able to
allocate a register to the current interval.
Now we're done, with this allocation of registers to intervals:
If two live ranges don't overlap then they can use the same register.
For example:
The algorithm for global register allocation via graph coloring consists
of 4 steps:
Example
In the running example, suppose we have two colors (R1 and R2).
There are two "easy" nodes, the ones for x and a that are only
connected to eachother (the magenta a and the light blue x).
Those would be pushed onto the stack first.
The remaining nodes all have 2 incident edges, so we'd choose one of
them to be pushed. Assume that we choose the node for a. Now the
two remaining nodes both become "easy", and are pushed.
At this point, the stack might look like:
Linear Scan Algorithm
Now that we understand the basic ideas,
here's how the linear-scan algorithm works:
Example: Suppose we start with 2 available registers, and we
process the list of live intervals shown above (for variables a, b,
c, d, and e).
We would start by giving a's interval R1, and putting a's interval
on the active list.
Then we'd give b's interval R2, and put it on the active list, too.
When we process c, there are no expired intervals, and no more
registers.
Using the heuristic given above (spill the interval with the largest end
point), we'd spill c's interval.
a: R1
b: R2
c: none
d: R1
e: R2
Graph Coloring
Register allocation via graph coloring, like linear-scan
register allocation, considers allocating registers to variables
across a whole procedure.
However, it uses live ranges instead of live intervals.
This addresses the problem mentioned above with linear scan allocation,
namely that if there are "holes" in a variable's live interval,
then it can be wasteful to tie up a register for the entire
live interval (as illustrated below).
    x = ...;
      .
      .
      .
    use x;
      .    \
      .     => no use of x.  x will be overwritten anyway so we don't need
      .    /                 to keep its value in the register here.
    x = ...;
      .
      .
      .
    use x;
A live range is a pair of the form: (<variable>, <set of CFG nodes>).
A live range for variable x is roughly all of the nodes of the control flow
graph starting from a definition of x, up to all the uses of x
reached by that definition.
        x = ...; -+
          .       |
          .       |    overlap of live ranges; x and y cannot use the
          .       |    same register
        y = ...; -|--+
	use x;   -+  |
	use y;   ----+
          .
          .
          .
	x = ...; -+ no overlap with preceding live ranges; y could use
	  .       | the same register as this x, or the two x's could
	  .       | use the same register
	  .       |
	use x;   -+
Step 1: compute live ranges
Note: the variables of interest are those that are candidates
for registers.
Variables that are not candidates might include:
What's left: locals that are scalar, and not floating point.
This might include parameters, though they are sometimes more
difficult to handle than "plain" locals.
( <x>, <{D} union {N | x in N.live-before and D in N.reaching-defs-before}> )
Note: the live range is a pair: the variable defined at D,
and the set of nodes in the range.
for each var x
   for each live range R for x
         if there is another live range R' for x such that R intersect R' != {}
         then R "absorbs" R' (i.e. R = R U R', R' goes away)
initial live ranges
-------------------
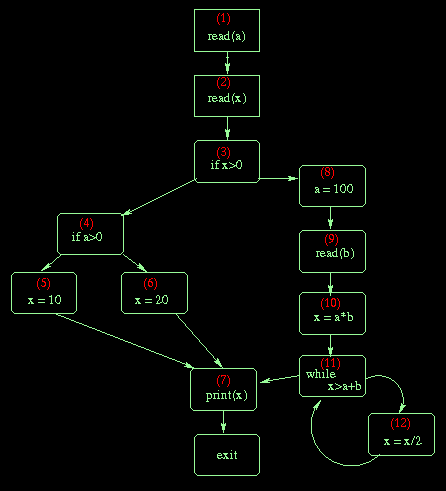
Def of a at node (1), {1, 2, 3, 4}
Def of x at node (2), {2, 3}
Def of x at node (5), {5, 7}
Def of x at node (6), {6, 7}
Def of a at node (8), {8, 9, 10, 11, 12}
Def of b at node (9), {9, 10, 11, 12}
Def of x at node (10), {7, 10, 11, 12}
Def of x at node (12), {7, 11, 12}
Final live ranges
-----------------
( <a>, {1, 2, 3, 4} )
( <x>, {2, 3} )
( <x>, {5, 6, 7, 10, 11, 12} )
( <a>, {8, 9, 10, 11, 12} )
( <b>, {9, 10, 11, 12} )
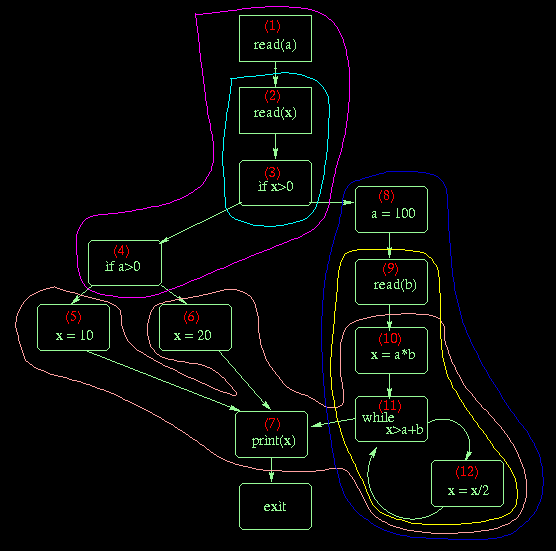
Step 2 - Build the Interference Graph
Here is the graph for the live ranges shown above;
the colors used above to encircle the live ranges
are used to color the nodes of the interference graph.
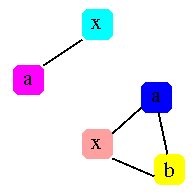
Step 3 - Color the Graph
given k, ( # of available registers )
  do: color graph with k colors
    such that no adjacent nodes have the same color
Note: This is an NP hard problem
until there are no more easy nodes in the graph
     x {5, 6, 7, 10, 11, 12}  <-- top
     b {9, 10, 11, 12}
     a {8, 9, 10, 11, 12}
     x {2, 3}
     a {1, 2, 3, 4}
When the nodes are popped, they might be colored like this:
          Live Range             Color (register)
	  ==========		 ================

     x {5, 6, 7, 10, 11, 12}           R1
     b {9, 10, 11, 12}                 R2
     a {8, 9, 10, 11, 12}              -- no color --
     x {2, 3}                          R1
     a {1, 2, 3, 4}		       R2