Yoshimura Zyclone slip-on exhaust
I have an '87 VFR 700FII and last summer I
installed a Yoshimura Zyclone slip-on exhaust. Apparently this exhaust is
rather hard to find as it took me three mail order companies before
somebody could find me one. I wound up getting it from Competition
Accessories, and had it at my door for $250. This exhaust uses the stock
headers, and connects where the original two mufflers connected. After
removing the stock exhaust(not as easy as it sounds on an eight-year old
bike!), the instructions tell you to simply install the new muffler to
the stock headers. Since the Yosh is a single, right side exit piece
instead of the sock dual mufflers, it employs a Y-connector to bridge the
4-2 to 4-1. However, this Y-connector is not detachable from the
cannister, so you have to balance the whole thing at once. After
struggling for a while trying to connect the new exhaust, I realized that
I would have to loosen the header pipes so I could maneuver them into
position. As you all know, getting to the rear cylinder header nuts takes
some doing. After loosening up the headers, I finally got the connector
to slide on. However, it is a real pain to get the crossover pipe to
clear the rear shock linkage, and the cannister is extremely close to the
rear axle nut.(Mine scraped a little during the first few rides.) What
about power and sound, you ask? Well, as far as power is concerned, I
can't really tell a difference. On a negative note, my bike began to
backfire moderately on occasion after this modification, meaning that I
probably need to look at the jetting. However, I am going to do a full
tune-up(valves, carb synch, plugs) first, to see if that helps. I'd
rather not have to mess with the jetting. On the sound front, it only
takes one word to describe: LOUD. Whereas the stock bike is whisper quiet,
this thing roars. It is a more pleasing roar than a similarly-piped inline-four,
at least to my ears. I didn't weigh the new system before I put it on, so I
can't say exactly what the weight savings are, but the stock system
weighs a ton, and the Yosh was definitely much lighter. In sum, I would
have to say that overall it is a good quality product, but installation
takes a while, and it is loud enough to be an issue. I think Yosh now
makes a quieter version(ZRS?) of the Zyclone exhausts to address this
problem. howeed9@wfu.edu (Howe Edward Dehanne)
(Ed. Jon was telling me the results of installing a Yoshimura slipon
exhaust when he mentioned that I should post them here)
Well I got my results back. I only jumped three horsepower with the Yosh
zrs slip on, but I jumped as much as eight ponies in the mid range. It's
got a nice throaty sound, and does sound better than stock, but its not
offensively loud. It looks great. Oh, i'm running just under 80 h.p. with the
pipe. On the dyno the jet kit made the biggest difference on the graph,
while just the pipe actually made less horsepower than stock at the top
end. Was it worth it? I spent $220 on the pipe, $119 on the jet kit, and
another $220 to have it dyno-tuned. I lowered the gears before I had it
tuned, and I was running 6 grand at 65mph, but now I'm only at 5 grand at
65mph, maybe I wasn't catching 6th gear for some reason. I like the
results, but I guess that if I change the baffling and make it louder I
can get more hp., but I'm broke now so that will have to wait .
--------Hey hows it going? damn hundred already. I went and had some progressive
springs put on my 86' last week and love it. it's a harsher ride, but when
you lean it into a corner it makes a world of difference. When braking
hard the bike feels much more stable, especially when leaning into a
corner. I spent $60 on the springs, and another $40 on seals. I highly
recomend this addition to anyone with an older vfr.
127926@ef.pvc.maricopa.edu (Jon Christopher Gustafson)
Kerker Left-Exit Exhaust
I own the Kerker left exit pipe, purchased it about 2 months ago.
I had a hard time tracking one down.
It's more than just a slip-on. The header goes 75% to the front of
the bike. You'll save A LOT of weight.
Parts/Arrival Package:
Big honking box, one main header, one small joint header, and pipe.
A dozen bolts.
One bolt was 1/8" too long that came with the package. Hardware store!
Eyelets where one pinchbolt had to go through were at a slight off
angle, and the bolt had to be "coerced" in. (read:big hammer)
Installation:
Pretty straight forward. The toughest part is removing 3 bolts where
the header meets in the rear of the bike, behind the right footpeg.
Get the right size extension, and you can do it... I swear!
You'll have to lose/cut the lower fairing behind the kickstand. They
give you a template if you want to cut around it. I just removed it...
Performance:
Haven't noticed any stumbles whacking the throttle on from any rpm
range. It's louder than stock... noticeably. I find myself wearing
earplugs more often. Note: It's no louder than the standard 2
Brothers left exit... I've "tested" it between 2 other VFR's with the
"Countermeasures" at Alice's Restaurant.
It backfires on deceleration, worse on some days, not too bad on
others.
It seems to be -slightly- stronger on top... above 7000rpm.
I notice no loss of power anywhere in the powerband from stock.
Looks:
100 times better than the standard 2 Brothers... the 2 Brothers looks
dorky and homemade. The high exit 2 Brothers looks good, but then you
lose the passenger peg. The pipe is pretty long, extends to be flush
with rear of bike. The canister is narrow, kinda smallish. It runs
higher than stock, and looks racier. It looks like an ass-kicker.
Sounds:
Other than being louder than stock, it rocks. It rumbles and turns
heads. If you've ever heard another VFR with a pipe on it, you know
what I mean. You won't be disappointed.
Real life with the pipe:
I noticed rust building around the joints of where the pipe connects
to a header... note that I live in an apartment complex, ride in the
rain nonstop, and the bike stays outside uncovered 100% of the time.
For $330, it's a great investment. (My $10 rear brakelight project is
a better investment). (Ed. this is on a 92 VFR)
mcoustier@mindscape.com (Mike Coustier)
Vance & Hines Slip-On
In March of 97 I installed a Vance & Hines slip-on muffler on my 94 VFR,
the SS2-R. It has a great throaty sound and everyone who listens to it
comments on how great it sounds. I recently had plugs and filters (K&N)
changed and had a dyno check too. I'm running a smooth line up to 90
horses, so it hasn't hurt performance any. The unit cost me $298. I've
been very happy with it. (Tony Nelson - ADNELSON@prodigy.net)
Vance & Hines SS2R Carbon Fiber Slip-On
I bought a 98 VFR800FI September of 1998. It's a very pleasing bike.
In December, I bought and installed a Vance and Hines SS2R Carbon Fiber
Slip on. Installation was straightforward, but I would recommend
ordering a new gasket with the new slip on, or purchase on in advance
from your Honda dealer, as the new one didn't come with a gasket and I
couldn't remove the old one without destroying it. So I had to wait 4
days until I could finish the installation because my dealer had to
order the gasket. The canister sounds great, rather like a small block
Ford or Chevy until it hits about 8000 rpm, then it just screams. Price
is about $400. Mine is the low mount right side because I didn't want
to lose the passenger pegs. Also, no re-jetting because of the fuel
injection......!!!! I recommend it highly. (Jim Kelly - 711gt@duesouth.net)
Erion Racing Exhaust
The Erion Titanium Slip-On was very easy to install on my 99 VFR800FI
and comes with
good quality hardware. The sound of the pipe is excellent with a very
throaty exhaust note that is forceful but not loud and obnoxious. The pipe
sounds especially amazing at low RPMs when downshifting on compression and
also provides a notable boost in the 4000 - 6000 rev range. The pipe was
about $800.00 CDN and is well worth the money.
(Keith Formosa - keithf@computerworkware.com)
DEVIL Exhaust
Ok, the installation of the pipe was easy. The directions were clear and easy
to follow. I am pleased with the appearance and sound of the pipe, It is not
loud, it does emit a healthy growl especially when on the gas. The pipe seems
to be well made, there is no packing to replace, the guts are all metal. The
finish of the pipe was very good except in one area where a section seemed to
have been scratched. It comes with all the hardware needed. That includes a
spacer for the right passenger foot peg bracket so it will clear the pipe. It
even comes with a nifty piece of carbon graphite as a heat sheld for the
passenger's right leg. A word of caution here when tightening the nuts
connecting the muffler to the pipe, the carbon heat guard is easy to crack.
The pipe routes high over the wheel to display the single side arm or rather
the absence of a swing arm on the right side. The pipe is French made, brand
name DEVIL, I think I paid almost 500.00 for it. It depends on the pound,
dollar exchange rate. That is high I know but no other pipe looks like it. I
bought mine from SKIDMARK, a British company, phone 011-441-920-487547. This
is the complete number to dial direct from the USA. The only diffecult part
of the instilation was that you have to cut a small slot in the rubber
mud/water guard for the bracket for the pipe, but this is not a problem for
anyone. I installed this pipe and a Fram air filer and gained 5hp at the rear
wheel according to the dyno. The midrange does feel much torquier. I
hope I covered everything here if not drop me a line.
Ed. Click here
for a picture. Sbudo@aol.com (Steve Rodgers)
Staintune Full Header (2003)
As soon as I opened the box I was impressed..Even the header pipe was
polished unlike brand x pipes..I knew I couldn't live with single
Exhaust on a dual exhaust bike. These Staintunes mean
Business..It took aproximatly 2hrs to install with a little red
RTV. Here's a tip Loosen the tail section plastic to gain access
and slide it back a few inches. These pipes did not require
remapping at an elevation of 600 ft AGL in Minnesota. The sound
is fantastic and no raspy sound over 7,000 rpm like most
aftermarket pipes for vfr's produce. Order the Factory Hard Bags
and install the pipe at the same time. This bike is a giant 996.
(James Hicks - flatsslam2@aol.com)
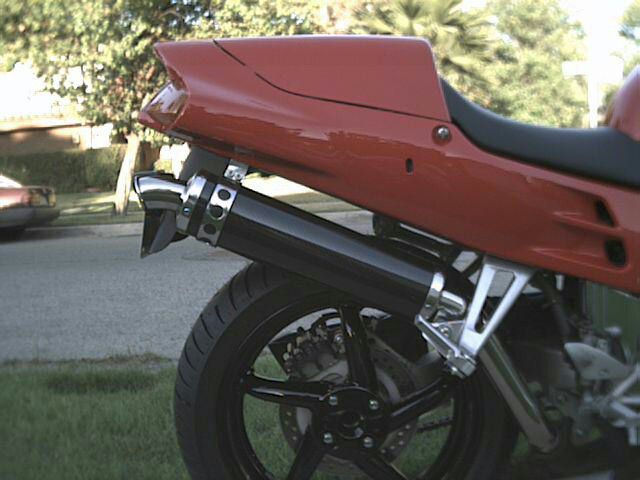
Staintune High Right Slip-on Exhaust
[Picture]
The Staintune slip-on exhaust system is designed for late model VFRs (I
own a 1994), and bolts directly to the pivot joint where the stock
muffler attaches to the rest of the exhaust system. Cost is
high $495 (stainless muffler)(check the price) or $585 (carbon fibre
muffler), depending on who you buy it from. I bought my carbon fibre
model for $499 plus shipping from a dealer in California who gave a
group rate to a bunch of us. Staintune is reknowned for their
high-quality BMW and Ducati aftermarket pipes, and the VFR pipe shows
their uncommon (some would say incomparable) attention to finish and
detail. The pipe extending from the pivot joint to the muffler can is
highly polished stainless steel, mandrel bent in a graceful curve, and
is about 4 inches longer than the stock pipe. The muffler can is
available in the same stainless steel or in carbon fibre. The SS
advantage is that it never needs repacking (a permanent baffle) and
it looks way awesome; the CF advantage is weight and looks it looks
totally cool. One of the big advantages to the system as a whole is
that you retain the centerstand while opening up the view of the
Pro-armed rear wheel. Verrrrryyyyyyyyy tasty.
The pipe moves upward toward the tail section and then turns rearward,
where it slips behind the passenger peg and locates the muffler behind
the peg bracket and parallel to the tail section, about an inch below.
Mounting points are (1) at the peg, same as stock, bolting to the end of
the exhaust pipe, and (2) at the end of the can, via bracket which bolts
to the tail section at one of the factory (saddlebag) location points.
To install, you move the tail section to reveal the tapped hole in the
tail section, bolt on a small steel bracket, which hangs down and bolts
to the muffler can. On the SS can the mounting bracket is welded on;
the CF can has a round, highly polished stainless bracket encircling the
can and attaching to the same point.
Installation takes all of fifteen minutes, including opening the box and
starting the motor for the first sounds--which you will not believe.
Simply wonderful, small-block Chevy V8 rumblings. A very social muffler
though, easily within acceptable sound limits for all who have heard
mine so far. Appearance is factory spec--Honda might as well make this
pipe now. (See archive photo). Factory dyno readings show small
improvements in power across the entire range (up about 3-5 horsepower
everywhere from 6000 rpm up, with a smoother band and torque up the
same), and no jetting changes are necessary as long as you retain the
stock air filter. If you run a K&N or similar aftermarket filter, the
factory recommends going up one main jet size. Jetting changes may vary
with your location and bike, I'm sure.
A number of people on the VFR listserver have purchased this pipe and
have nothing but the highest marks for the system. Staintune may be
reached via email to [
jeff@cbtimports.com]
dafeller@aloha.com (David Allan Feller)
If you would like to include an e-mail address for Staintune exhaust
information and availability in Canada, our e-mail is:
taylor@cadvision.com
(Patti Taylor)
I just installed the new Staintune slip-on for my 98 VFR. The pipe
went on with no problems (after I cut-off the old muffler's gasket,
ahem) and looks and sounds great. It has a factory warranty of 3 years
and never needs re-packing as Staintune uses stainless steel mesh rather
than fiberglass packing material inside. $499 is a bit steep for a
slip-on but, hey, it is all stainless steel. PS: I got the high right
side pipe. fred_lewis@hp.com (Fred J. Lewis)
Since Staintune doesn't send mounting instructions with their Slip-ons, here
are installation instructions for the high-mount system on a VFR800:
Remove the old cannister first. Spraying a little WD-40 on the joint where
it mounts to the header helps. After removing the bolts to it, turn it out,
away from the bike, pulling away from the header at the same time. It should
come off easily. You do not use the stock exhaust gasket to mount the
Staintune.
There is a part coming with the Staintune that is stepped with a hole at
each end and a extension at a 90 degree angle with a hole at the bottom.
This goes on the right side between the rear frame & plastic cowling,
mounting under the right passenger handgrip. Remove the right passenger
handle. Gently, slip the extention piece between the cowling & the rear
subframe. You can wigggle the piece & bend the plastice cowling a little to
have it slip into place. Take your time and it should slip through easily.
Loosely mount it under the rear passenger grip. The other stepped piece
mounts under
the left passenger grip to keep the grips at an equal height. If you are
using the rear sear cowling instead of the grips, you'll have to buy shorter
bolts. I'd suggest using one long enough to also use a flat washer and lock
washer. Remove the centerstand rubber from the old cannister & put it on the
Staintune. Using contact cleaner to remove & remount it makes life a whole
lot easier. Spray the slip-on with WD-40, put it on the header and gently
twist it forward and towards the bike. It should go pretty easily. Line up
the pipe with the footpeg mounting hole & loosely screw it in. Use the bolt
& lockwasher supplied by Staintune to mount the rear of the slip-on to the
bracket hanging on from the passenger grip. Line everything up, tighten all
the bolts & check for leaks. Mine lined up & mounted perfectly on the first
try. Good luck. I think you'll love it. It also sounds better & makes more
power with the baffle in. It gives the bike a whole new, nasty personality
which I have called GAGS (Growling And Gearwhine Syndrome). I swear, it's
the neatest sound in all of motorcycling.
When you remove your rear wheel to change tire, etc, you will have to loosen
the Staintune & twist it out from the bike or remove it. If you try to
remove the wheel without doing so, the brake mounting plate at the bottom
left will scratch your rear wheel. (Jack Roe - pjr@ithink.net)
Perfect fit, awesome finish & wicked sound. Buy one. high rise shows
off single sided s'arm perfect. ("Steve" - howl99@fishinternet.com.au )
I ran my '98 VFR800 on a Dynojet Model 150 dyno today. She's a little tired
with 14,200+ miles on her and still has the original spark plugs. I forgot
to
look at the air filter, though it was replaced at 10,200. I figure it should
be OK. The chain was a little loose, but has a tight spot in it, and that's
where the play was set. Otherwise, the bike was completely stock, no changes
to the EFI. We ran both a 4th gear roll-on and a through-the-gears run for
all tests. They were so close, the numbers you see here are averages. The
results were really surprising, especially since Staintune makes no claims
for increased horsepower. Two Bros. claimed 6.1 HP for their slip-on, and 9
HP for their full pipe without any fuel injection changes. Also, if the 4th
gear roll-on HP peak is the same as the through-the-gears peak, it indicates
your are jetted properly. If the 4th gear roll-on is higher, you are too
lean on the main jet. If it is less than the through-the-gears HP peak, then
the main jet is too rich. A moot point since the VFR doesn't have jets.
However, the EFI either compensates for a change in the pipe, or it is
broadbanded enough to accomodate significantly different exhaust flow. In
all cases, the 4th gear roll-on and through-the-gears runs coincided
perfectly, indicating proper fuel management (ie: the proper main jet if
there was one). Here are the results:
Stock exhaust system----92.7 HP
Staintune high-mount stainless steel slip-on with the baffle in----93.6 HP
Staintune with the baffle removed----101.3 HP
Since Staintune makes no claims for HP increases, I was really surprised at
these results. We're talking an 8.6 HP increase with only a slip-on. Eat
your heart out Two Brothers! Pretty impressive, I'd say. The down side is
that the Staintune is pretty loud with the baffle removed. Trust me for an
extra 8.6 HP when I wasn't expecting any, I'll learn to live with it. I
haven't
had a chance to check out the throttle response with the baffle out, but
with the baffle in, it was absolutely perfect. It was also perfect with the
stock exhaust. I expect it to be the same without the baffle, especially
since the dyno graphs showed virtually perfect throttle response
in all three dyno runs. The Staintune is even better than the manufacturer
claims. Now there's a switch! (Jack Roe - pjr@ithink.net)
Laser Slipon
I put a Laser slip on exhaust on my 94 VFR when it was about 1500km old.
The note is fantastic; everybody comments on the sound and it also sits
higher than the OEM pipe tucking up close to the ducktail exposing the
whole rear wheel. The bike needed no re-jetting and runs much smoother
out of corners,the other day a Honda mechanic rode it and commented on
how sweet it runs. The bike also seems to have better midrange power as
well,it will powerstand (wheelie) now,it did not before..
wayne@powerup.com.au (Wayne Winton)
Super Trapp Superlight Slipon
I recently bought a '95 VFR with only 2000 miles. It was in excellent
condition and all original with the exception of a Two Bros. Slip-on exhaust.
The canister looked to be in near new condition. When I first heard it, It
didn't seem overly loud and it had that robust sound that only a 90 degree
V-four can make! But after living with it for a while I became more
self-conscious about the noise, especially around the quiet suburbs near my
home. It seemed to reverberate off the houses on either side of the street.
I also felt that it was a beacon for every cop to home in on whenever I
twisted the "loud handle". I looked into purchasing a stock muffler. A new
one cost close to $500. A good used one was about $350 from commercial
sources. I found a couple of exaust system evaluations in some magazines and
decided on a Super Trapp. I shopped around and got the best price from
Motorcycle Accessory Warehouse (about $200). It has a beautiful satin,
stainless steel finish with a real look of quality. I installed it with 4
discs, the minimum number recommended. It comes with 8 discs and Super Trapp
claims that no jetting changes are required with up to 8 discs. They also
say that 4 discs is about equal to stock flow. Weight wise I'm sure that the
Trapp is lighter than stock in fact it seems comparable in weight to the
aluminum and stainless Two Bros. In the below 5000 rpm range it is still
louder than stock but pleasingly so. It still allows that beautiful V-four
music to come through. At freeway cruise it doesn't "boom" continuously like
the Two-Bros. pipe. In all fairness, the Two-bros. cannister may need
repacking but in my experience any muffler you can see through is going to be
somewhat loud. Joelwolf@aol.com (Joel Wolf)
Pictures

Renegade
I have a 1989 VFR 750 FJ and have recently fitted a RENEGADE pipe,
performance and acceleration have got a real kick in the arse and as for
the exhaust note, well it's rorty as F*<Ł!! Well done Renegade Products,
Brands Hatch Kent England UK. A right bargin at a mere Ł200 (thats 200
quid) for a Stainless system with a lifetime guarantee!!
(Colin Parkinson)
BOS Oval Carbon
A cage performing an illegal U-turn resulted in a multiple rib fracture,
free morphine and a scraped bike ('97 VFR750). Luckily a bunch of motorcycle
cops were rapidly on the scene (I was unconcious). They "read" the
situation/position of the vehicles correctly. This ensured that the offender
withdrew his 1st -wrong- account of how the accident happend and his
insurance had to fork out.
This enabled me to purchase an high, right side, BOS Oval Carbon
(HFL1,100/$540). It comes with a new hanger for the right rear foot peg.
Fitting was done by the Honda dealer (Safe, Veenendaal, The Netherlands) so
I cannot comment on that. Quality is impeccable, both the carbon and the
stainless steel caps. You get what you pay for
(An original Honda exhaust costs HFL1,450!!!)
No more original Honda sewing machine sound, this is a loud pipe. A deep
rumble at tick-over, a deep roar when pulling away, culminating in a
screaming sound. Being an absorbtion damper, I suspect it will require
re-packing at some time and/or fitting the "DB-eater". This is a length of
tubing that slides into the exhaust and fixed with a screw. (It is not
fitted in the pictures). It is claimed to reduce by 3Db and I believe it.
The jury is still out on whether I should fit it or not. It is not at the
moment, but for events like the TT Assen Grand Prix and WK Superbike (where
the cops lurge in the bushes...) it probably will be. (the -smaller than
legal- sized registration plate doesnot help either..)
The engine has not been re-jetted or anything, straight bolt-on. There is
minimal backfiring and no hick-ups at high speeds (200+ KPH). As the bike
will go in for service soon, I will ask them to verify mixture (just to be
safe). (Leon Dickhoff - Leon.Dickhoff@digital.com)


BOS Oval Carbon, 98 VFR
A few weeks ago, I bought a BOS oval carbon muffler (high mounted) for my
VFR800 -98 and these are my experiences: The
muffler is fairly easy to install, though a friend's helping hand might be
good to have as you will have to remove the back fairing to
install a piece of metal in the chassis (under the saddle, behind the
fairing; drop me an e-mail if you can't find the place), which is
then applied to the backside of the muffler as a support. This piece of
metal, however, is almost invisible once you've finished the installation
of the muffler. (Should take you about two hours.) The fit and quality of
the muffler are outstanding (as well as the looks!) which however you
should expect at a price (in Sweden) of around $600. Also, I would have
expected a fitting manual at this price,
but never mind, if I could do it, most people should be able to...
I don't understand all the talk on German web sites about the BOS mufflers
being so loud (or even too loud). In my opinion, the
sound is superb and not too loud, not with and not without the easily
removable "decibel eater". The sound is dark, a bit like a V8
but louder, and I can't imagine how this bike could sound better! Still,
the system is not too loud as long as you take it a bit easy in
the city centers. As for the effect, I didn't have it tested, but it seems
to me, which I would not have expected, that my bike gained some power at
mid range rather than at top rpms. (BOS claim 5HP power gain at top rpms.)
The power seems to come more even
and not as much with a kick at the top as before, but this is of course
difficult to judge exactly. Anyway, don't expect any power
miracle, this pipe you buy for the sound and looks! By the way, the fuel
injection automatically compensates for the new muffler, no need for any
adjustments! (Max Schultz, Stockholm, Sweden - maxistockholm@hotmail.com)
M4 Performance Exhaust
I have a VFR750, and these guys used my bike to build the
prototype slip-on. Not only did it improve performance all the way up
the spectrum, it looks and sounds great too!!! I've included a
picture of my bike with the M4 slip-on.
A little FYI, the "M" stands for "Martin", family last name. Can you
think of the name of the, several time, World Champion sport bike
endurance racer?(currently retired) He also teaches the Team Suzuki
riders school. (Marty Posinski - EUSRMPO@am1.ericsson.se)


Wolf Exhaust
The system takes twin silencers up under the seat of the bike much like a
Ducati 916. There is no loss of storage space, no loss of pillion pegs or
seat and there is a very useful 8 bhp power gain with no re-jetting
required.
The system has been tested and approved by the VFROC in the UK and is very
popular here. We believe the system is very reasonably priced at $995 US.
You can see the system at www.wolfracing.co.uk and contact me for more
information at info@wolfracing.co.uk. (Peter Sorrell - info@wolfracing.co.uk)
Wolf Underseat Exhaust for Honda VFR800/750
I recently purchased of a Wolf under seat exhaust system for my 1998
Honda VFR800. First let me say that I was impressed with the prompt
delivery of the exhaust system. I purchased the system on-line Thursday
night from the "B and B Xtreme" web site, and it was delivered from
England the following Tuesday morning. I was surprised by the promptness
of delivery. However, my attitude soon changed after beginning the
installation.
The installation is not easy. It requires the disassembly of the rear
portion of the bike, the removal of the rear fender liner, the removal
of the EFI computer, a few relays and fuse holders, and the battery box.
My first
disappointment came with the screws supplied for the new battery box
installation. The metric screws supplied were about twice as long as
needed. I had to make a quick trip to a couple of hardware stores to
find appropriate replacements.
The opening on the "L" shaped exhaust pipe (where it couples to the
factory exhaust header ) was so badly out of round, that it would not
mate to the factory header. It took two hours of cutting and shaping to
modify the
coupling so that it would fit on the factory header. Also, it required a
trip to the Honda dealer for a new exhaust gasket.
The installation kit comes with a black coated stainless steel replace
fender tray. The fender tray was about 13mm short of lining up with the
holes in the mounting bracket for the exhaust cans. I could push fit the
tray, but it required flattening out the riser over the exhaust cans to
the point where they rubbed on the back side of the cans. I had to do
some reforming of the new fender tray.
The instructions with the kit say to re-use the bolts and nuts that held
on the factory fender tray when attaching the can mount to the frame.
Unfortunately, the nuts that held on the original tray are molded into
the factory fender tray. Off to the store again to find some 6mm lock
nuts.
The installation requires you to remove the EFI computer from its
position in the tail portion of the bike. Kit instructions tell you to
Tie wrap it to the side of the frame. Not likely! It's a poor solution
at best. I cut a 6"
piece of 12 ga. aluminum, and mounted it in the center of the rear part
of the tray using 10 x 32 screws and lock nuts. By spacing it ˝" off the
tray base it acts like a heat shield. The EFI computer was fastened to
the aluminum with Velcro. The computer now rests in a secure area,
firmly attached to the bike. It's about one half inch from the bottom of
the seat. In all fairness, I brought this solution to the attention of
Wolf exhaust and they said they would look into the possibility of
making this installation recommendation part of the kit.
The carbon fiber license plate mount is about 1" too narrow to fit a
California license plate. I had to drill two new holes in the plate to
get it to mount. Small problem, yes, but at the price of this system it
should be
addressed.
Once you remove the factory fender tray, here is no mount for the seat
cowl at the rear of the bike. True, the six bolts towards the front of
the plastic should be enough to support the plastic and they do.
However, the rear of the cowl is cantilevered quite a bit without any
visible means of support. And because of this, the plastic cowl shakes
at speed or high RPM and causes a noticeable vibration. Also, if you
remove the two tie-down bolts (rear most bolts) to remove the rear seat
cowl cover, the plastic droops down and makes it difficult to re-insert
the bolts. I made an aluminum support mount to alleviate this problem.
It was a simple matter that should have been included in the
installation kit.
Not including the time to drive in search of bolts and parts, I spent
twelve hours installing this kit. Way too much time, when considering
that proper design could have reduced the installation time to less than
two hours.
I have to admit this under seat exhaust system improves the bike's
appearance, and sound of the bike is beyond description. I am constantly
asked about the exhaust system when ever I stop the bike. Is the kit
worth the price? Good question. When I bought the kit, it sold for
$1095. In addition to the sale price, there was a DHL shipping bill of
approximately $79. A week later I was billed an additional $85 tariff.
This pushes the bill towards $1200. Definitely a premium price although,
in my opinion, the installation quality severely distracts from the
overall value of the kit. However, with a little thought and
consideration, I think the
manufacture could make the improvements that would justify the price. If
you are considering this
exhaust, perhaps you should bring these points up to distributor or
manufacture, and ask them what
step they have taken to reduce the installation problems I've listed. I
sent them basically the same letter you see here. Their response to me
was that my problems were the first they'd heard. (Dave Ryskamp -
dryskamp@earthlink.net)
Viffers Beware! While the Wolf Underseat Exhaust is unbelievably
cool, beautiful and sounds incredible, there ARE downfalls. I found the
system online and told my buddy about it.
First look, he ordered it for his 2000, for better and worse. First,
the instructions are terrible, sometimes its like youre not even reading the
instructions for the right bike. Secondly, fit and finish is not so good.
Ovalized pipes that should be round (which leads to leaks), brackets and
fittings that dont line up without a little "Macgyver-ism).
But probably the worst (and most expen$ive) is the part where you
remove the thick black plastic underseat tray/mudflap/fender. This is to
make room for the cans underneath. Unfortunately, you don't realize how much
strength and rigidity this part gives to the tail section of the VFR until
you dont have it. After all the smiles, oohs and ahhs of the look and sound
of the new system, we took our VFRs (my 98 is equipped with the Wolf high
mount race-spec can), I immediately noticed while riding behind him the the
entire tail section body plastic bobs up and down and fluctuates with bumps
in the road and at certain revs. I mentioned this to him and we pretty much
instantly knew it was due to the strength the body paneling had lost.
Well, within a couple weeks, a small crack appeared, starting at the
one of the holes for the solo-seat cowl bolt. By the end of the season, each
side had large cracks from the bolt holes reaching almost to the bottom of
the tail section. Aint cheap to replace and sucks to fix!!! I can assure
anyone this is NOT from overtightening the bolts. There is no question this
system needs to come with some sort of bracket to beef up where the
fender/mudflap use to be. Wolf did a beautiful job with the appearance/sound
aspect, but the fit and finish along with poor instructions are a bit of a
let down, especially for the $1400 it cost. I wont even get into how bad the
instructions were for my hi-mount system...oh yeah, i didnt get ANY
instructions and ended up buying new hardware (clamps and bolts) because they
gave too little of what was needed and too much of what was not. It was like
a guessing game.
Anyway, take this with a grain of salt, and if youre listening Wolf,
youre losing 2nd time buyers by not addressing these problems that i have
heard from others as well. (ChfPontiac@aol.com)
Remus
I have owned THREE VFR's ('93-stock, '94-minor mods, and now
'98-currently exhaust mod only). The '94 had a TBR slip-on. Nothing bad to
say at all...great sound, good fit, nice build quality, and as others have
stated...great customer support. My current mount is a sharp '98 and I've
just added a REMUS high mount slip-on (Titanium). It is made in Austria,
has stainless packing, so no need to ever repack, which can be very tedious!
Amazingly easy install, even with directions printed in German!(I'm in
California and speak NO German!). Took maybe twenty minutes. The price
was extremely competitive for what I believe is a superior product. I found
it through a site called
www.MaxMoto.com
.....your contact will be Knut, he's a
fine gentleman, and very honest! Enjoy!! REMUS, REMUS, REMUS...!
(Stan Saporito - suddenimpact@mindspring.com)
I have just fitted a Remus EC legal High level titanium can to my
UK '99 800. Remus do not figure much in this list so for what it
is worth, here's a report.
Instructions
In German and the line diagram showed the bracket hanging
straight down, when it needs to angle to the rear of the bike.
But it was all fairly intuitive.
Finish
Excellent. The can is a silky finish titanium with S/S end caps
welded and finished to match the skin of the can. There is a
welded S/S plate to keep boot heels off the connecting pipe.
The bolts supplied are all S/S allen bolts, two to replace the
footrest hanger bolts (spacers go behind the hangar to move it
clear of the can), two to mount the can to the bracket and one as
a pinch bolt to the collector pipe joint.
The inside of the can has baffling plates and varying length
pipes, said to be stainless steel (but coated with some black
material). The connecting pipe end has a large diameter
perforated tube with absorbent material behind it. No additional
baffling in the 54mm diameter elbowed connecting pipe (some Remus
race cans and the standard mount VFR can apparently use 76mm
tube, but with some baffling there).
The can itself measures (approx despite spurious implied
accuracy!)
end cap to end cap 460mm
max width 95mm
max height 123mm
How to do it
- Remove seat and rear cowl.
- Remove original can and throw away the gasket, which is
not needed. Keep the original footrest/can mounting bolt with the
old can, not needed for this installation.
- Remove passenger footrest hanger, stow the original
mounting bolts - no longer needed.
- Cut a slot in the black plastic inner mudguard to allow
the bracket to pivot to the rear. I used a craft knife - the
material yields easily to a really sharp knife, and so do
fingers, so keep them out of the way.
- Put bracket against the rearmost footrest hangar mounting
point, angled face pointing inwards, refit hangar using the
longer allen bolts and the two S/S spacers. Sequence is
subframe, bracket, spacer, hangar at the rearmost point, and the
same but without the bracket for the front mounting point.
- Slip the elbowed connecting pipe onto the collector. Or,
in my case huff and puff, use lots of copperslip, and it will go on
all the way eventually.
- Wriggle can onto the elbowed pipe using lots of
copperslip. Sounds easy, but like the elbowed pipe to collector, it was a
tight fit.
- Fit bolts from the inside of the bracket to the can.
Attach mounting springs from the can to the elbowed connecting pipe.
- Tighten all bolts, replace rear cowl and seat.
- Transfer centre stand bump stop from original can.
- Ride. Check bolts after about 60 miles.
- I have an NWS hugger and found I needed an extra step as the
pinch bolt at the collector was just touching the hugger.
- Optional - Remove hugger, file notch to clear (works on
grp, may be a problem if carbon fibre) and refit.
What they don't tell you.
If you are not lucky in aligning the can mounting bolts it will
be quicker to remove the rear wheel (and hugger if fitted).
Otherwise you may find it takes a long time to line things up on
the blind side.
What does it look like?
Very neat installation, nicely follows the line of the bodywork.
No visible mounting bolts on the can, and the bracket is mainly
hidden by the can and the rear cowl. If you have a red VFR, the
Remus sticker matches the bike.
What does it sound like?
Mine was an EC Road legal version, so it makes no more measured
noise than the OEM can - they say, and there is the paperwork and
etched ec4 mark to prove it! But it doesn't sound like that at
all.
A more noticeable bass beat at tickover, and while the OEM was
near silent at low revs - drowned out by gear whine - this one is
always audible, but not offensively so. There seems to be
little difference at the top end, though perhaps the Remus
screams a bit more. In mid range the Remus growls much more than
the stock can. It is as audible with ear plugs in as the stock
can was without.
My son noticed the difference in sound immediately. A friend I
ride with and I were approaching the meeting point from opposite
sides of the road this morning, and there was a high wall on his
side of the road. As we both arrived to pull in on my side of
the road, I changed down quickly, and he quickly looked round.
When we had both stopped, I asked him why and he said he heard
the sound of another bike bouncing off the wall and was looking
to make sure it wasn't about to collide with him: then he saw the
new Remus.
What does it go like?
Remus make no performance claim for the EC model, but the UK
Importers said I would notice a slightly improved throttle
response.
I think that's about right, the bike picks up off the throttle at
around 3-4k more smoothly - no stutter. It may have a slightly
better mid-range response, but there is not much in it, if
anything. But I have been caught out a couple of times looking
for a seventh gear when just pootling along, it was that much
smoother.
Oh, and it sounds so much better. And all-up weighs around three
and a half kilos. So that's better too. Recommended.
Price in UK listed at Ł345, got mine for Ł312 delivered.
(Peter Hawkes - p.hawkes@virgin.net)
Laser (Jama) Prof-Race high-right carbon fiber slip-on (94-97)
The combination of a very quiet stock exhaust and high wind noise on
my 96 VFR meant that I couldn’t hear the engine at all above
45 mph. After experimenting to try and reduce the wind noise by
changing helmets (Signet & RF800) and removing the windscreen
(I’m 6’ 4”) I found that it couldn’t be reduced
enough to hear the engine. My goal in purchasing an aftermarket
slip-on was to increase the sound level and improve the
sound. What I was after was a deep V-8 type sound that was loud
enough but without being raspy. I preferred not to rejet if
possible. After much research I decided on the Laser slip-on.
Ordering
I received my exhaust canister from M&P Motorcycle Accessories
(www.mandp.com) in the UK 5 weeks after my order was placed (I
live in California). It was a special order and I was originally
told that it would take 2 weeks. As far as I can tell there was
some kind of delay getting the part shipped from the manufacturer
Jama in Holland (www.laser-jama.nl) to M&P. M&P customer service
responded immediately to my e-mail concerning the status of my
order and my exhaust arrived sooner than their revised
estimate. Cost was $335 USD + $60 shipping.
Packaging
Packaging (original Laser/Jama box used) I would describe as mediocre but it did it’s job. The canister was wrapped in bubble wrap. Some corrugated cardboard sheet as well as some Christmas wrapping paper took up unused space in the box. A separate bag contained the fasteners, band clamp, and hanger along with a parts list with an exploded view of the mounting. No scratches were found on the carbon fiber. There were a few minor scratches on the connector pipe as well as some marks that I believe were made by the tubing bender.
First Impression
After removing the stock muffler and discovering how heavy it was I
had to get some numbers. The stock muffler with connector pipe weighs
12 lbs. The Laser weighs 4 lbs. It’s a straight through design with
a perforated tube. The can is 4 inches in diameter and 16.5 inches
long. The connector pipe and canister end caps are polished stainless
steel. The canister is riveted together with a polished stainless band
at each end. I was very pleased when I finally saw the exhaust as I
had ordered it without ever seeing one in person (had seen some good
pictures on the Australian VFR homepage).
This unit has a look and feel of quality. The carbon fiber is a
standard weave with a clear coat. The forward canister end cap is
welded to the connector pipe which means that this exhaust doesn’t
need springs to hold itself together. I view this as a big plus as
most people I know with spring type mounting have lost a spring or
two. It also adds to the clean sleek look not to have spring hooks or
springs. An oval, adhesive backed “Laser Deeptone Exhaust
Systems” emblem is included in the box but not installed which is
nice because I prefer not to have an emblem on mine. The rear end cap
is engraved with “Laser Exhaust Systems”. Discretely hidden on
the underside of the connector pipe bracket is another engraving which
proclaims “Race Use Only”. The band clamp is stainless and has 8
3/4 inch holes. A rubber sleeve fits between the clamp and the
canister to protect the carbon fiber.
Performance
I now have 3000 miles on this exhaust. The sound level and quality are
exactly what I was hoping for. I can just barely hear the exhaust
(with earplugs) on the highway at 75 mph. At low revs (below 4500) on
acceleration the bike has a deep growl that some have said sounds like
a V twin with aftermarket pipes. As the revs increase the tone changes
to a higher pitch. It sounds awesome. On deceleration you get some
nice low pitched burbling that makes you want to downshift through all
the gears. Those who have heard my bike have indicated that it
isn’t loud at all. Holland’s idea of a race use only sound level
must be less than most others.
My seat of the pants feel is that the bike hasn’t lost power
anywhere compared to the stock silencer. The dyno may say otherwise
but it isn’t obvious. If anything the bike seems to accelerate
harder than stock above 7500 rpm. On deceleration I had some slight
popping which may have been there with the stock exhaust but
couldn’t be heard. I turned the idle mixture screws 1/2 turn richer
which eliminated the popping and gave me a more steady idle. Other
than this my bike is stock (49 state) with air pumps functioning and
the original air filter. Throttle response seems to be as good or
slightly better than with the stock silencer.
I’m really pleased with my Laser exhaust. It sounds and looks
great. The high mount design shows off the rear wheel and single sided
swing arm. The canister tucks in close to the bodywork making the bike
seem slimmer. I have no reservations recommending this exhaust to
other VFR owners. I have included 2 pictures with this report.
Mounting
Mounting is a 3 point affair and requires removal of the rear half of
the bodywork. The first two points are the connector pipe to header
collector, and the bracket welded to connector pipe just below the
canister to the stock silencer mount. Finally, the stainless band
clamp around the canister body near the end cap which attaches to a
hanger bolted to an unused threaded hole at the end of the
subframe. The bracket welded to the connector pipe and the band clamp
hanger have slots which allow for some flexibility in orientation of
the exhaust.
I found during trial fitting of the exhaust without the band clamp or
it’s hanger that mounting the exhaust at the middle of the
connector pipe bracket slot yielded the canister roughly parallel to
the bodywork. I then noticed that the canister was angled outward to
the side more than it really needed to be as there was more than ample
clearance between it and the rear fender. This can be seen in some of
the pictures on the Australian VFR homepage.
I decided to place an 1/8 inch thick washer between the stock exhaust
washer and the connector pipe mounting bracket in order to tuck the
canister in closer to the bike. This did the trick. After removing the
red reflector from the rear fender I ended up with about 1/4”
clearance between the edge of the canister and the rear fender. At
this point I removed the rear bodywork to install the band clamp
hanger. I found that with the canister tucked in closer than Jama
intended, I would have to slightly modify the hanger bracket. I
lengthened the slot approximately 1/2 inch to allow the bracket to be
slid up higher on the bike. The hanger is really stout (3/16 thick
stainless) and bolts to the rear part of the subframe. I also had to
decrease the bend built into the hanger near the clamp mounting holes
and twist it slightly so that the band clamp would line up correctly
with the can. After trial fitting the rear bodywork, I found that it
made contact the clamp hanger. I solved this problem by filing a small
relief into the underside of the bodywork to allow clearance for the
bracket. This done, the canister is parallel with the bodywork with
about 1 1/2 inch gap. The canister extends to the fender with a
slightly turned down tip on the endcap extending past the license
plate. Mounting is very solid for an exhaust this light. (Brent
Lottman - brent.lottman@worldnet.att.net)

Hindle Slipon
It's been a few weeks since I installed a Hindle slip-on
on the 800 so I thought I write a review of the pipe.
First of all, the price is right ($350 Cdn or $230 US) for a race baffle
carbon fiber oval high mount slip-on. Construction quality is about 7 out
of 10. It is built to the quality of a pipe to be used on the track (such
as Erion Racing). Looks, fit and finish isn't as good as Yosh or Micron CF
pipes. But material used in its construction is excellent. Thick CF
wrapping and thick gauge stainless steel high mount connecting pipe. The
springs are strong and welding quality excellent.
Power wise, at part throttle, it removed the 6000 RPM power surge. Power
comes on gradually. At 8000 RPM, there's more power than stock. The extra
power lasts well into 12000 RPM when the rev limiter kicks in. So to sum
up the pipe, I gained top end at the expense of mid-range. It is a bit
harder to pass on the highway without the 6000 RPM power surge. But on
back roads now the bike pulls very strong out of corners. Corners exits at
full throttle used to feel so stable but now (with the new pipe) I can feel
the 207 front tire sliding. If I snap the bike up straight in second gear
and full throttle the front wheel just comes off of the ground. In
mid-corner long sweepers (270 degree highway on/off ramps) throttle is much
more sensitive than before as the rear tire tends to slide if I give it too
much throttle. I really have to learn the bike over again with the extra
power.
Installing the pipe is a snap if one knows the trick. Since the pipe
didn't come with any instructions, I spent about an hour fiddling with the
connecting pipe as it simply seems too long (pipe slides into the collector
at the bottom - no need for clamp, and the top mounts to right passenger
footpeg bracket). Initially, now matter what I did, the top mounting hole
seems to be off by 1/8" so it wouldn't fit into the passenger footpeg
bolt. I didn't want to cut the pipe either. Turns out lossening the
passenger footpeg bracket and then installing the mounting bolt did the
trick.
The pipe comes in two pieces. One piece is the cannister and the other the
high mount connecting pipe. The connecting pipe slides into the cannister
nicely and is secured with two springs. I put in some high-temp silicon
sealant to help the seal.
I didn't know where to install the cannister clamp as there doesn't seem to
be any place to mount it on the sub-frame. I would appreciate any insights
in this matter. Otherwise, the cannister seems very secure so I didn't
bother with the clamp.
During installation, I got several CF splinters in my finger. Clearly, the
splinters weren't cleaned up thoroughly at the factory.
Sound wise, the pipe is fairly loud (also hear all the backfires too). To
get an idea of what this pipe sounds like simply remove the VFR's muffler
and start the bike. Now, imagine the same sound just a tad softer and with
more bass. As the pipe ages (now a few weeks old), the sound gets lower
and lower and the raspy sound begins to diminish. I like the note more and
more. It's cross between Harley & TL1000 but with 4 cylinders instead of
2. Instead of "potato, potato", you get "popotatatoto, popotatatoto".
Overall, I'm satisfied with the pipe. If I can get it for $350, I would
buy it again. (Wilfred Lee - chopstix@home.com)
D&D
I ordered this exhaust from
www.parts411.com for $221 shipped. The product
arrived in perfect condition. The exhaust I ordered was the show-and-go high
pollished aluminum can (looks like chrome though, maybe it is). The sound is
nothing but amazing. The wimpy exhaust note of the stock 94-97 VFR is gone
and replaced by a very angry exhaust sound. I find myself revving up the
engine alot more just so that I can hear the music. At speed it is a little
bit more difficult to hear the sound due to wind noise, but make no mistake
everybody will hear you coming a 1/4 mile away. I wish it was even louder. I
know it will give many harleys a run for their money.
(ErrolTazbaz - etazbaz@austin.rr.com)
Leo Vince Evolution II
I own a new Honda VFR VTEC/ABS (2003). Lovely bike with excellent roadholding
and braking capabilities. But the factory sound needed improvement. Looking
at the after market, I stumbled over LeoVince exhaust systems. Looking good,
rigid quality, nicely polished aluminium, (in my case) and good fitting. It
comes with all the bolts, nuts, springers and material you need to get it
fitted. No holes to be drilled, and it's fitting is excellent. The rear now
lookes like a Ducati?A hidden dream of the owner?
After mounting was done which took me one hour, the VTEC LV with DBKillers
still in place was placed on a DynoJet bank for 3 testruns. Run 1
shifting through all the gears up till 12.000 rpm's, run 2 in the 3rd gear
from 2000 rpm till 10.000 rpm and quickly opening and closing the throttle.
Run 3 the same procedure but in 6th gear. The results were: 5 BHP more, 3,2
more newtonmeter and a very linear rpm line with no powerdip whatsoever. It
also decreases the weight by 7 kilo's. Also the airfilter was changed and a
BMC washable filter found its place in the airbox. During the normal driving
the engine picks up very quickly, the response is more 'agressive' and the
sound is lovely aspecially above 7000 rpm when the VTEC takes its place in
the mechanical action.
A clubmember with a VTEC and LV exhaust was put on for a testrun without the
DB killers. Suprisingly the results where diffterent: 2,3 less BHP, a dip
around 9000 rpm and only 2,3 Newtonmeter extra. (Erwin José - je.jose@ICS.LeidenUniv.nl)
Exhaust Sound Clips


![[Picture]](http://www.cbtimports.com/304b3.jpg)