Tony Kamenick, Alexander Koenadi, Zhi Jun Qiu, Sze Yeung Wong
HeadMouse Extreme (http://www.orin.com/access/headmouse) has a similar product, which replaces a standard computer mouse for people who cannot use their hands. It operates from the top of a computer monitor, laptop computer, and measures the user's head movements. The web price for this software is around $300. Our project has similar function, but it is free provided that the user has a webcam that can capture 320x240 images.
IBM provides a Windows head tracking program that is similar to our project ( http://www.alphaworks.ibm.com/tech/headpointer). It is provided free of cost. It is similar to our project, although the exact implementation details are unknown. It is only provided as a user program, not for research purposes.
An open source program called CamTrack (http://live.gnome.org/CamTrack) is also similar to our program. Instead of using SVM, the program uses "A Bayesian 'Maximum Likelihood' classifier". The system also looks at the hue of the image to determine which regions are skin and non skin to increase accuracy. It currently works only on linux.
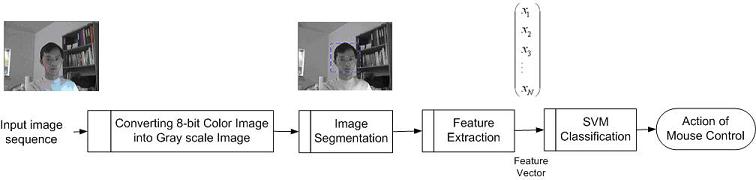
Figure 1. WebCam Face Tracking System Structure
A color perceived by the human eye can be defined by a linear combination of the three primary colors red (R), green (G) and blue (B). These three colors form the basis for the RGB-colorspace. Hence, each perceivable color can be defined by a vector in the three-dimensional colorspace.
A grayscale image is simply one in which the only colors are shades of gray. The reason for differentiating such images from any other sort of color image is that less information needs to be provided for each pixel. In fact a “gray” color is one in which the red, green and blue components all have equal intensity in RGB space, and so it is only necessary to specify a single intensity value for each pixel. Often, the grayscale intensity is stored as an 8-bit integer giving 256 possible different shades of gray from black to white. The transition relation adopted in our system is:
Grayscale = 0.299 * R + 0.587 * G + 0.114 * B
After the process of image processing, we need an interface to generate the input file for SVM that contains the information of the images captured by the webcam. These images that contains 5 different labels (1 for looking forward, 2 for looking up, 3 for looking down, 4 for looking left, and 5 for looking right) are sent as training data set for SVM.
In our program, we created 5 training options in the Training menu (see figure 2).
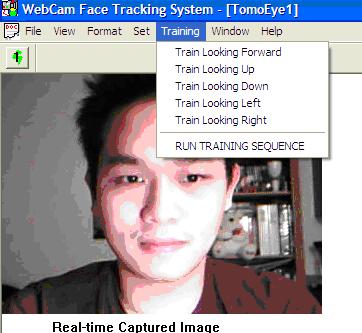
Figure 2: 5 training options in training menu
When the program is run, it will create an empty new file “train.trn” and it will require the user to click each training options (train looking forward, up, down, left, and right). Each training options will generate about 100 corresponding training data (indicated by the label) that is gathered in about 4-5 seconds in average (real-time capture). So, when the training is done it will generate about 500 training data that represents each of the 5 movements.
The format of the input file for SVM (train.trn):
[label] [featureId]:[featureValue] [featureId]:[featureValue] ...
So, for each training data, it will have a label (1 for looking forward, 2 for looking up, 3 for looking down, 4 for looking left, and 5 for looking right), 10,000 features, and 256 possible values for each feature (represent the grayscale value from 0-255 for each pixel).
We decided to generate 10,000 features in order to optimize our program, since reducing the number of the feature will improve the process time. The image captured by the webcam has the size 320x240, but we will only extract 100x100 pixels of the original image captured to generate 10,000 features (instead of 320x240=76,800). These 100x100 pixels will be extracted from the original image by taking the original image information from row 70-170 and from column 110-210. This is represented by the bounding blue blue-white box in the middle of the image (shown by the lower left corner in figure 3).
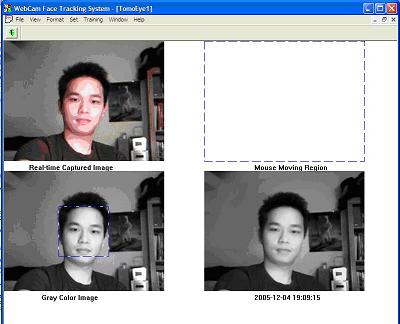
Figure 3: 100x100 pixels bounding box to be used for training data shown in the lower left corner
Then when the Training sequence option is chosen, SVM will use the file with training data to create a model.
The SVM implementation used in the program is libsvm (http://www.csie.ntu.edu.tw/~cjlin/libsvm/). It was chosen because it is written in C++, and it has support for more than two classes in a single input file. To start the process of training, the input file with about 1000 images is sent to libsvm. Next, libsvm will process the data, and return an SVM model. Once the model is obtained, the program enters "testing" mode-- the actual moving of the mouse. To receive the class label of the test image (the current live image), the test data is sent with the SVM model to libsvm. Libsvm will then return the class label, and the mouse position is updated accordingly.
A file "test.tst" is generated for testing purposes and to determine the mouse movement. This file has the same format as "train.trn", except that the label can be ignored or be used to test the accuracy. This "test.tst" will always be updated every fraction of a second depending on the speed of the camera. The program will continuously input this test file to SVM during testing sequence. The output would be a label/classification from SVM that is used to move the mouse cursor (if classification is 1 cursor doesn’t move, if 2 cursor moves up, if 3 cursor moves down, if 4 cursor moves left, if 5 cursor moves right). So, mouse cursor will be updated in a fraction of a second.
For screenshots of our program, refer to the figures included in the method. Our program can successfully move the mouse cursor using face position (move up when the face is looking up, etc), provided with initial training of each position and building a model using SVM. The system is usable, but higher accuracy can be obtained. While testing and training, the users head must stay within the bounding box, otherwise the accuracy is not high enough to be usable.
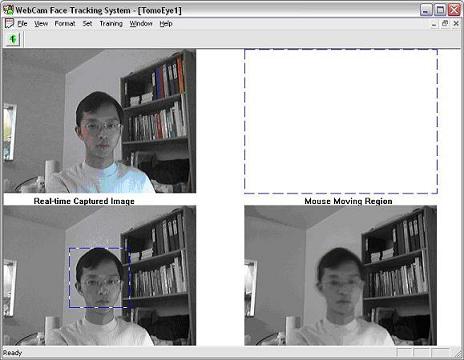
Figure 4. WebCam Face Tracking System Interface