Project 2: Panoramic Mosaic Stitching
Ba-Quy
Vuong and Nan Chen
1. Introduction
Regular
cameras can only capture images with some certain small angles. Even human eye
can only observe an angle less than 360o. The purpose of this
project is to create panoramic images which cover a full 360o view.
In addition to creating panoramic images, we implemented the following
extensions:
·
Threshold Blending: We
developed our own algorithm to blend images so that there are less blurs in the
final image.
·
Exposure balancing: We
developed our own technique to balance the exposures among different images.
This helps to make the final panoramic image have a smooth looking.
·
Ghost removal: We
implemented the ghost removal algorithm proposed by Mathew Uyttendaele [1].
·
Bundle Adjustment: To
avoid accumulated errors which cause the drifting problem.
·
Multi-Band Blending: To
avoid blurring and new coloring of the overlapped area.
2. The overall process
The
process of constructing panoramic images basically consists of four steps:
l Taking
Images: A series of images is taken by rotating the
camera around the optical center. Each pair of successive images must overlap
and all the images must cover the full 360o scene.
l Warping
Images into Cylindrical Coordinates: All the taken images are
warped into a cylindrical coordinate to make sure that they can be stitched
using translations.
l Computing
Alignment: For each pair of successive images, we
calculate the necessary translation to bring the images together and create a
bigger image.
l Stitching,
Cropping, Bending, etc: Bring all the images together to create a
panorama. Blend the images to have smooth transitions. Crop images the make
edges matched. Some other techniques may be performed to balance the exposures
among images or to remove ghosted objects.
3. Implementation Details
l Taking Images: The
images were taken by a regular camera, which can rotate around its optical
center. Then camera was placed on a fixed location, and only two successive
images have overlap scenes (Not required). Total 24 images are taken for a 360o
panorama.
l Distortion Removal and Image
Wrapping: The original images were first removed
distortions using the following formulas:


![]()
In
the above formulas, (x,y) is the coordinates in the ideal image (no distortions)
and (x’,y’) is the corresponding coordinate in the taken image. We started by
creating an empty image with the same size as the taken image. Then for each
point (x,y) in this newly created image, we found the corresponding point
(x’,y’) in the taken image and brought the point from the taken image to the
new image.
After
distortions were removed, we used the following formulas to warp each image
into a cylindrical coordinate:

In
these formulas, (xcyl,ycyl) is the coordinate of a point
in the cylindrical coordinate. (xc,yc) is the coordinate
of the center point of the image and (x,y) is the coordinate of the
corresponding point in the taken image. The process of warping is pretty
similar to distortion removal process.
l Feature Detection, Matching
and Image Alignment: The images were first processed by
using SIFT feature detector. Then the features of different images were matched
using nearest neighbor method. To reduce the impact of outliers, homography
matrix (in this case only translational motion) between two images was
estimated using RANSAC techniques. For each run, 10 samples were randomly
selected, and the corresponding inliers are counted. Among the 1000 runs, the
one with most inliers were chosen, and the inliers were collected together to
get the final homography matrices.
l Stitching and Blending: After estimating the
homography matrices, the images were stitched together. To smooth the
overlapping areas, a simple linear blending technique was used. The linear
weight function was used to determine the final image pixel value in overlap
area. The image was finally cropped and adjusted to remove vertical drifting.
4. Initial Results
The
results of our initial program on the sample test images are shown in the
following figures.

Figure 1: The test
image panorama before cropping

Figure 2: The test
image panorama after cropping but before vertical drift removal

Figure 3: Initial
result of the test image panorama
We
can see from these figures that there are some brighter or darker bands on the
image. The possible causes are the different exposure time, and correspondingly
different intensity on the images. Therefore, we are considering using some
other techniques to solve this problem.
5. Extensions
5.1. Threshold blending
We
noticed that the matching process is not perfect due to many factors (such as
focal length or optical center of the camera is not perfectly measured). Thus,
if the blending areas are large, some blurs will appear in the final image. To
alleviate this effect, we employed a simple technique in which we set an upper
threshold for the width of the blending area. If two images have an overlapping
area larger than this threshold, then threshold is then used for blending. This
results in very little blur in the final image.

Figure 4: The test
image panorama with Threshold Blending
However, this technique has the disadvantage
of making the final images with very clear bands if the original images are
taken with different exposures. We’ll see how this problem is solved in the
next section.
5.2. Exposure Balancing
To
remove the effect of different exposures, we developed our own technique. This
technique maybe mentioned elsewhere, but in the process of developing it, we
did not refer to any source.
For
each pair of overlapping images, we first calculate the total difference for
each color channel in the overlapping area. We then divide each difference by
the number of pixels in the overlapping area to get the average. After that, we
adjust all the pixels in the second image with these averaging differences to
make its exposure match the first image.

Figure 5: The test
image panorama with Threshold Blending and Exposure Balancing
Due
to accumulated adjustments, the last image in the sequence may have a very
different exposure in comparison with the first image. This causes a big jump
in exposure when we connect the two ends of the panorama. To eliminate this
effect, for the last pair of images, we only adjust the second image up to the
center of this image. In addition, instead of changing each pixel exactly the
amount of averaging difference, we use a linear function such that there’s a
smooth transition at the center of the second image. At the end, we crop the
final panorama at the center of the first image.
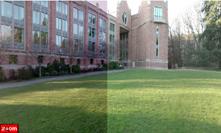
Figure 6: Accumulative
effect when making the panorama
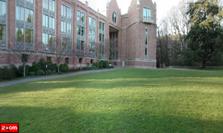
Figure 7: Accumulative
effect is removed
5.3. Ghost Removal
When
an image with a moving object is blended with other images, the moving object
may become a ghost due to the blending process. To remove this effect, we apply
the technique proposed by Mathew Uyttendaele [1].

Figure 8: Ghosted
birds
This
technique can be summarized as follows:
l First,
we identify objects in the blending area by comparing the color intensity of
each participating images with the final blended image. If the intensity
exceeds some threshold, it’s a clear indicator of the presence of some objects.
l We
then identify adjacent points with an intensity difference greater than the
threshold. These points belong to an object.
l Finally, instead of blending every single
point in the blending area, we only blend those that do not belong to objects.
For points that belong to objects, we just bring the points of one image
directly to the blending area.

Figure 9: Ghosted
birds are removed
5.4. Bundle Adjustment
Because
of the accumulated error, the drifting problem is unavoidable using the
original alignment methods. Instead, we consider a global optimization with
constraint to get better alignment results. The objective function we are
considering here is that
![]()
where![]() is the location of the kth feature of image i, and
is the location of the kth feature of image i, and ![]() is the mapping of the
corresponding feature from image j.
The optimization is conducted under the constraint that the total shift along height
direction should be zero. Mathematically, we have
is the mapping of the
corresponding feature from image j.
The optimization is conducted under the constraint that the total shift along height
direction should be zero. Mathematically, we have
![]()
under
our simplified cases, which is only two successive images have overlap area,
and only translation motion is considered, the optimal solution can be solved
analytically. Therefore, no iteration is needed to find the optimal results.
The images with and without bundle adjustment is compared below (no drift
adjustment is made in stitching):

Figure 10: Images
before bundle adjustment

Figure 11: Images
after bundle adjustment
5.5. Multi-Band Blending
To
avoid blurring and new coloring of the overlapped area, a multi band blending
technique is used. In our project, we use two-band blending to test its
effectiveness. Basically, each image is first smoothed using a low-pass filter
kernel, and the difference between the original image and the smoothed image is
treated as the high frequency part. Then the blending is conducted on low
frequency and high frequency separately, and the final image is obtained by
summing them together.
From
our experiments, we find that the two band blending can indeed provide
different effects on the image. However, due to the ad-hoc nature of the
implementation, such as the smooth kernel, weight function for high frequency
and low frequency components, the results do not demonstrate its effectiveness
well. Especially, after exposure balancing and ghost effects removal, the
improvement can hardly be seen. Better results are expected if more frequency
pyramids are used and parameters are fine tuned.
6. Final Results
The
following are images as our final results:
Figure 12: The final
test image panorama
Click for the full
resolution image

Figure 13: The panorama
of a street near Villas Park
Click for the full
resolution image

Figure 14: The
panorama of the Wingra lakeshore in the Villas Park
Click for the full
resolution image

Figure 15: The
panorama of a street near Marry’s hospital
Click for the full
resolution image
7. Contributions
Our group has two members
and the work was distributed as follows:
- Ba-Quy Vuong
·
Image taking.
·
Distortion removal.
·
Cylindrical warping.
·
Stitching, blending, cropping and drift
removal.
·
Extension:
Threshold blending.
·
Extension:
Exposure balancing.
·
Extension:
Ghost removal.
- Nan Chen
·
Image taking.
·
Image alignment using RANSAC method
·
Extension:
Bundle adjustment.
·
Extension:
Multi-band blending.
8. Reference
[1]
M. Uyttendaele, A. Eden and R. Szeliski. Eliminating Ghosting and Exposure
Artifacts in Image Mosaics
[2]
R. Szeliski and H.-Y. Shum. Creating
full view panoramic image mosaics and texture-mapped models, SIGGRAPH 1997,
pp251-258.
[3]
M. Brown, D. G. Lowe, Recognising
Panoramas, ICCV 2003.
[4]
P. Burt and E. Adelson, A Multiresolution Spline with application to Image
Mosaics, ACM Transcation on Graphics, 2, 217-236.