Installing a Custom Linux Kernel on Cloudlab
This document walks you through how to build, install, and boot a custom Linux kernel on CloudLab.
Building the Kernel
Before you install the kernel, you need to build it. I will assume you already have a clone of the kernel, possibly with some of your own modifications. I will also assume that your kernel compiles.
All of the commands here are meant to be run on the machine whose kernel you are replacing. Make sure you have a backup of your code!
I will assume that the kernel is cloned into a directory called linux-dev. The name is not important; you can choose something else.
Build directory and Configuration If you just execute (don't actually do this) make defconfig && make in linux-dev, it will probably compile. However, you will polute your source tree with all sorts of compiled object files. Also, your configuration will likely not boot.
Instead, I recommend creating a separate build directory. I call mine kbuild, but the name does not matter.
cd linux-dev
mkdir kbuild
cd kbuild
make -C .. O=$(pwd) defconfig
That last line initializes the build system in kbuild (via the pwd command). It will create a few files needed including a Makefile and a default config.
The Linux kernel has thousands of configuration options. Some will be needed for your system to run; some will just waste compile time and bloat your kernel; some are just debugging aids.
I would recommend taking your kernel config from whatever is already installed. You can find the config of the currently-installed kernel in /boot/. For example, on the machine where I'm writing this, I have /boot/config-4.15.0-36-generic.
cd kbuild
cp /boot/config-4.15.0-36-generic .config
yes "" | make oldconfig
That last line makes sure the config is up to date. Dozens of config options get added to each kernel release, and it's likely that whatever kernel config was used for your distro's kernel is old.
If you added additional kernel configurations for your own features, you should now go and manually edit the .config file (e.g. with vim) to enable those options. For example, if you wanted to make sure the CONFIG_KERNEL_BZIP2 option is enabled, you would look for a line in .config that looks like this:
# CONFIG_KERNEL_BZIP2 is not set
and change it to this if you want the feature built into the kernel:
CONFIG_KERNEL_BZIP2=y
and change it to this if you want the feature built as a module:
CONFIG_KERNEL_BZIP2=m
Note that not all features support being built as a module. Moreover, many features also have dependencies, so you should make sure you have all of the dependencies also enabled.
Compiling At this point, we are ready to compile the kernel. This takes a while. The more cores you have, the better.
First, make sure you have installed the following packages. These are their names on Ubuntu, but they are also available on Centos and other distros.
sudo apt-get install build-essential libssl-dev
Now, we can compile. If you just want to get a compiled kernel, you can just do:
cd kbuild
make
This will produce the kernel image in linux-dev/kbuild/arch/x86/boot/bzImage. If you wanted to boot your kernel in QEMU, you would want this image. However, since we want to install the kernel and run it on a machine, we will produce a .deb file.
cd kbuild
make bindeb-pkg
Similarly, you can produce an .rpm with make binrpm-pkg.
However, this has two problems: first, it's really slow; and second, the installed kernel will replace the existing kernel, so if your kernel crashes (and it will), your machine is unusable (or at least, annoying to use). So instead, you should run the following:
cd kbuild
make -j 41 bindeb-pkg LOCALVERSION=-my-k
In this command, -j 41 says that we should run the build with 41 threads. You should replace the number 41 with whatever number is suitable for your environment. A good rule of thumb is to use N + 1, where N is the number of hardware threads available on the machine.
The LOCALVERSION=-my-k appends the string -my-k to the name of your kernel, so that it is distinct from the kernel already installed. This means that it won't overwrite your current kernel, so you can boot back into it if something goes wrong with yours (and it will).
Note that this command runs a make clean beforehand and does a full kernel build. This takes a long time. If you are just playing with your code and want to make sure it compiles, just use make or make -j 41. This only builds whatever has changed since the last time you compiled.
Installing the Kernel
Now that your kernel is built, you can install it. The generated .deb will be in linux-dev, not in kbuild. You will want to install both the kernel and the kernel headers.
cd linux-dev
sudo dpkg -i linux-image-4.15.0-my-k_4.4.0-my-k-257_amd64.deb \
    linux-headers-4.4.0-my-k_4.4.0-my-k-257_amd64.deb
Notice that the LOCALVERSION and kernel version are in the names of the files. Also, notice the "257" in the file name. This is the build counter (in this case, it happens to be the 257-th time I built the kernel on this machine).
Booting the Kernel on CloudLab
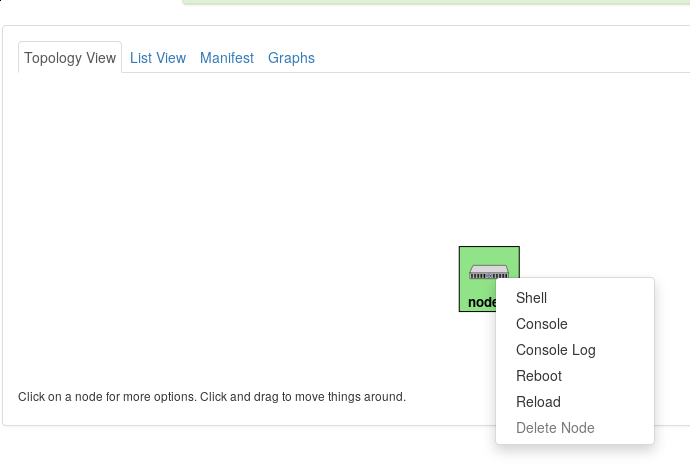
On CloudLab you can get an interactive console, which allows you to interact with the BIOS and the bootloader. It also allows you to see the serial console, which is useful for debugging.
At the experiment screen, go to the "Topology View" and click on the node you want a console for. Then, select "Console".
Once the kernel is installed, you can boot into it. First, you need to reboot:
sudo reboot
Wait for the GRUB2 bootloader screen to show up on the console. This might take a few minutes and you will see a whole bunch of other stuff show up. Be patient; otherwise, you will miss it (and if you're like me, you will keep doing that :P)
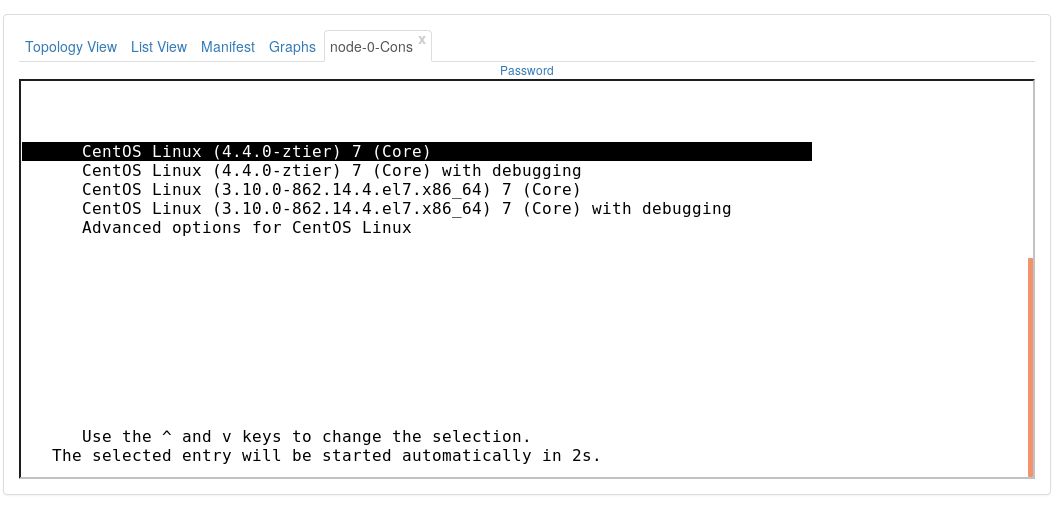
In this screenshot, I happen to be using Centos, but the same screen shows up with Ubuntu. Notice that there are two kernels installed: 4.4.0-ztier and 3.10.0-862.14.4.el7.x86_64. The former is my custom kernel (-ztier was my LOCALVERSION) and the latter is the stock Centos 7 kernel.
This sceen is interactive (Note: you may need to click on the screen for it to start capturing keyboard input). Use the arrow keys on the keyboard to select the kernel you want to boot into. Note that there is a countdown timer; if you don't do anything in 5 seconds, the default will boot automatically.
Voilà! You are now booted into your kernel! You can verify this in two ways. First, you can use uname. For example,
$ uname -a
Linux node-0.elapsed4.superpages-pg0.wisc.cloudlab.us 4.4.0-ztier #7
SMP Tue Nov 6 15:59:33 CST 2018 x86_64 x86_64 x86_64 GNU/Linux
This tells us a few things:
- node-0.elapsed4.superpages-pg0.wisc.cloudlab.us: This is the node that I built the kernel on.
- 4.4.0-ztier #7 This is the kernel name and build counter. This is useful for making sure you booted into the most recent version of your kernel.
- Tue Nov 6 15:59:33 CST 2018 This is the time/date I built the kernel.
Another option is dmesg. This is where all printk statements show up. The kernel also prints so version info there at boot time. For example, (I've wrapped some lines so they fit):
$ dmesg | head -n20
[    0.000000] Initializing cgroup subsys cpuset
[    0.000000] Initializing cgroup subsys cpu
[    0.000000] Initializing cgroup subsys cpuacct
[    0.000000] Linux version 4.4.0-ztier (markm@node-0.elapsed4.superpages-pg0
                .wisc.cloudlab.us) (gcc version 4.8.5 20150623
                (Red Hat 4.8.5-28) (GCC) ) #7 SMP Tue Nov 6 15:59:33 CST 2018
[    0.000000] Command line: BOOT_IMAGE=/boot/vmlinuz-4.4.0-ztier
                root=UUID=9ea38a7d-2dfb-4ce4-b003-0ce320312285 ro
                console=ttyS0,115200 LANG=en_US.UTF-8
[    0.000000] x86/fpu: xstate_offset[2]:  576, xstate_sizes[2]:  256
[    0.000000] x86/fpu: Supporting XSAVE feature 0x01: 'x87 floating point registers'
[    0.000000] x86/fpu: Supporting XSAVE feature 0x02: 'SSE registers'
[    0.000000] x86/fpu: Supporting XSAVE feature 0x04: 'AVX registers'
[    0.000000] x86/fpu: Enabled xstate features 0x7, context size is 832 bytes,
                using 'standard' format.
[    0.000000] x86/fpu: Using 'eager' FPU context switches.
[    0.000000] e820: BIOS-provided physical RAM map:
[    0.000000] BIOS-e820: [mem 0x0000000000000000-0x00000000000987ff] usable
[    0.000000] BIOS-e820: [mem 0x0000000000098800-0x000000000009ffff] reserved
[    0.000000] BIOS-e820: [mem 0x00000000000e0000-0x00000000000fffff] reserved
[    0.000000] BIOS-e820: [mem 0x0000000000100000-0x00000000791d2fff] usable
[    0.000000] BIOS-e820: [mem 0x00000000791d3000-0x00000000799ccfff] reserved
[    0.000000] BIOS-e820: [mem 0x00000000799cd000-0x0000000079a32fff] ACPI data
[    0.000000] BIOS-e820: [mem 0x0000000079a33000-0x0000000079fa1fff] ACPI NVS
[    0.000000] BIOS-e820: [mem 0x0000000079fa2000-0x000000008fffffff] reserved
Notice that in addition to the information provided by uname, we also have the compiler name and version, kernel boot command line, and of course, all of the printks from boot time (I've only printed the first 20 lines here, but there is a lot more).