CS744 Assignment 1
Due: Feb 4, 2025, 10pm Central Time
Overview
This assignment is designed to support your in-class understanding of how data analytics stacks work and get some hands-on experience in using them. You will need to deploy Apache Hadoop as the underlying file system and Apache Spark as the execution engine. You will be doing this using Docker Swarm and an overlay network for container deployment and communication. You will then develop several small applications based on them. You will produce a short report detailing your observations and takeaways.
Learning Outcomes
After completing this programming assignment, you should be able to:
- Understand and utilize Docker Swarm and Overlay networks for deploying distributed systems.
- Deploy and configure Apache Spark and HDFS.
- Write simple Spark applications and launch them in a cluster.
- Describe how Apache Spark and HDFS work and interact with each other.
Part 0: Environment Setup
CloudLab Experiment
You will complete your assignment in CloudLab. You can refer to Assignment 0 to learn how to use CloudLab. We suggest you create one experiment per group and work together. An experiment lasts 16 hours, which is very short. So, set a time frame where all your group members can sit together and focus on the project, or make sure to extend the experiment when it is necessary.
In this assignment, we provide you with a CloudLab profile called “cs744-sp25-a1” under the “UWMadison744-S25” project for you to start your experiment. The profile is a simple 3-VM cluster on a single physical machine with Ubuntu 22.04 installed on each VM. While launching the experiment, make sure to name it appropriately and use the correct group. Each group is allowed to have a single experiment running under “UWMadison744-S25” project.
You get full control of the VMs once the experiment is created, so feel free to download any missing packages you need in the assignment. You can find the ssh commands to log into each VM in the CloudLab experiment list view. It should look something like this:
ssh -p <port0> user@c220g2-000000.wisc.cloudlab.us # node0
ssh -p <port1> user@c220g2-000000.wisc.cloudlab.us # node1
ssh -p <port2> user@c220g2-000000.wisc.cloudlab.us # node2
Execute Commands on Multiple VMs
To set up the cluster, you will need to execute similar commands in all VMs. We recommend using either a parallel SSH tool (e.g. parallel-ssh) or a terminal multiplexer (e.g. tmux or zellij) to streamline the process.
For both approaches, one way would be to SSH into node0 and have all the files there. And then, you can run commands or send files to across three VMs from node0. For that:
- Create an SSH key in
node0withssh-keygencommand. - Retrieve the public key using
cat ~/.ssh/id_rsa.pub. Copy the entire output of this command. - Append the generated pubic key (
~/.ssh/id_rsa.pubatnode0) to~/.ssh/authorized_keysof all 3 VMs (includingnode0). Ensure no additional newlines are appended. (NOTE: CloudLab may periodically overwrite the~/.ssh/authorized_keysfile. Be prepared to reapply the public key if needed.)
Parallel SSH: If you choose to use parallel-ssh, you will need to create a file with the hostnames of all the machines. The file with the hostnames can be created by running hostname on each VM and using the output as a line in the hostnames file. More generally, lines in the host file are of the form [user@]host[:port]. You can test your parallel-ssh with a command like:
# node 0
parallel-ssh -i -h <host_file_name> -O StrictHostKeyChecking=no <command>
which will run <command> on each host. For example, you can use ifconfig.
Terminal Multiplexer: If you prefer a terminal multiplexer, you can use tmux or zellij in node0. Start a multiplexer session and split the windows to create three panes. Then, SSH into node1 and node2 using two panes. Then, you can enable synchronized input, which lets to type and execute the same command in all the panes synchronously. More on this here: tmux |
zellij |
Additional Storage
Your home directory in the CloudLab machine is relatively small in storage and may not be sufficient for storing HDFS and Spark related files. We added another mount point /data with roughly 90GB storage. Run this to verify:
# all nodes
df -h | grep "/data"

# output should be similar to this
# /dev/mapper/emulab--c220g2--000000vm--1-node0--bs   92G  107M   87G   1% /data
Now you can use /data to store files in HDFS or to store shuffle data in Spark (see below). It helps to change the ownership of this directory so that sudo is not required for all future commands.
# all nodes
sudo chown -R $USER /data	# take ownership
mkdir -p /data/tmp	# SPARK_LOCAL_DIR
mkdir -p /data/namenode	# dfs.namenode.name.dir
mkdir -p /data/datanode 	# dfs.datanode.data.dir
To start fresh, you may need to clear the files in these folders.
Starter Files
Clone the GitHub repo tareqmahmood/cs744-sp25-a1 in all VMs. It contains the files to get your cluster started. Feel free to modify the files to your needs. It has scripts and files to build and launch Docker images and containers.
# all nodes
git clone https://github.com/tareqmahmood/cs744-sp25-a1.git
cd cs744-sp25-a1
Docker Swarm
Docker Swarm is Docker’s native container orchestration tool, designed to help you deploy, manage, and scale containerized applications across a cluster of machines seamlessly. It transforms a group of Docker hosts into a single virtual server, enabling distributed workloads and simplifying container management.
First, install Docker at all nodes and build the relevant docker images.
# all nodes
./install-docker.sh
./docker-build.sh
Initialize a swarm at node0 which makes node0 the manager. Note that, you must use the private IP address of node0 (10.10.1.1).
# node 0
docker swarm init --advertise-addr 10.10.1.1
This outputs a command for the other nodes to join the swarm. Copy the command and run at node1 and node2:
# node 1 and 2
docker swarm join --token <token> 10.10.1.1:2377
Now, create an overlay network named spark_net. An overlay network in Docker allows containers running on different nodes in a Swarm cluster to communicate securely and seamlessly as if they were on the same local network. It abstracts networking complexities, enabling services to scale across nodes with built-in encryption and automatic service discovery. Containers and services can communicate using their names as DNS resolves them automatically, enabling seamless connectivity across nodes in a Swarm cluster.
# node 0
docker network create -d overlay --attachable spark_net
The --attachable flag allows standalone containers to connect to an existing Docker overlay network.
Verify Overlay Network
The docker node ls command provides a list of all nodes in a Docker Swarm cluster, detailing their status, roles (manager or worker), and availability. This command should be executed on the manager node (node0).
The docker network ls command lists all Docker networks available on the host, displaying their names, IDs, drivers, and scope. When run on node0, this command should display the spark_net network that was created earlier.
To demonstrate container communication within the spark_net overlay network, you can launch two containers:
- On
node0, launch a container namedserverfrom the officialalpineimage:docker run --rm -it --name server --network spark_net alpine - On
node1, launch a container namedclient:docker run --rm -it --name client --network spark_net alpine
Both commands open an interactive shell within the respective containers. From the client container, execute the following command to verify connectivity:
ping server
The ping should succeed, demonstrating that containers within the spark_net overlay network can communicate using their assigned names.
Accessing Webapps
You will be accessing various webapps from HDFS and Spark. Since VMs do not have public IPs, you can enables dynamic port forwarding through a specified local port (8123 in this case). It essentially sets up a SOCKS proxy that routes traffic through the SSH tunnel to the remote host (node0).
# at your workstation
ssh -D 8123 -C -N -p <port0> user@c220g2-000000.wisc.cloudlab.us
After you do this, change your browser settings to use localhost:8123 as the SOCKS proxy. Then you should be able to open webapps using addresses in the form of http://10.10.1.1:PORT.
Part 1: Software Deployment
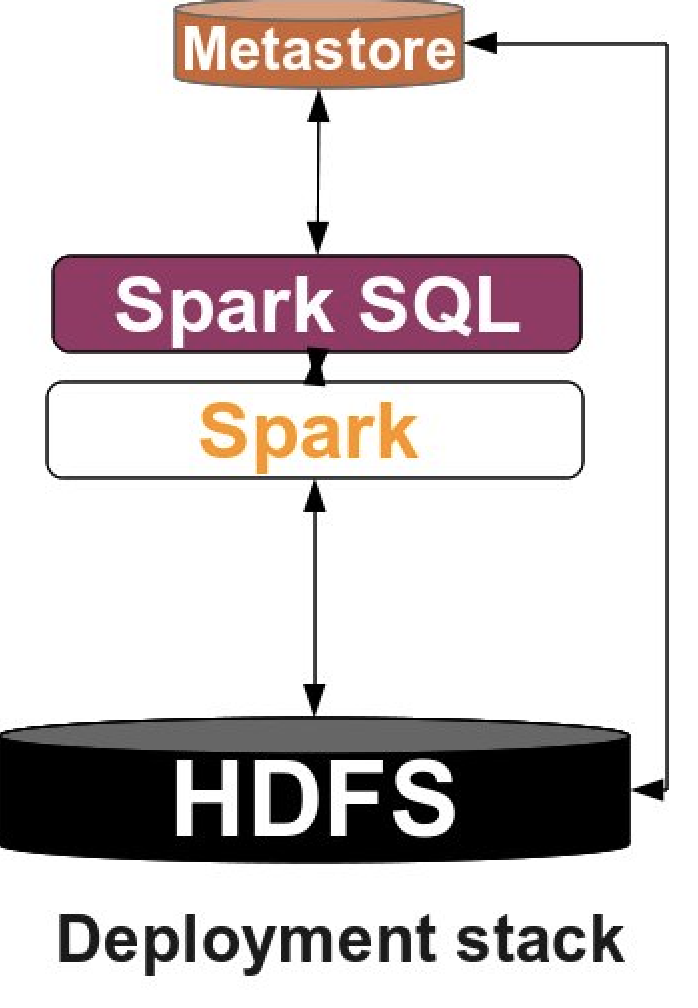
This is an overview of our deployment stack. We will be launching eight containers:
Apache Hadoop
Apache Hadoop is a collection of open-source software utilities that provide simple distributed programming models for the processing of large data sets. It mainly consists of the Hadoop Distributed File System (HDFS), Hadoop MapReduce, and Hadoop YARN. In this assignment, we will only use HDFS. HDFS consists of a NameNode process running on the leader instance and a set of DataNode processes running on follower instances. The NameNode records metadata and handles requests. The DataNode stores actual data.
Build Docker Images
We already built the relevant Docker images using ./docker-build.sh script. We recommend going through the three Dockerfiles:
hdfs-base.Dockefilehdfs-namenode.Dockerfilehdfs-datanode.Dockerfile
Notice that we are updating two configuration files: core-site.xml and hdfs-site.xml:
core-site.xmlspecifies the hostname (nn) and port9000of the NameNode:hdfs://nn:9000. This allows Hadoop to interact with the HDFS cluster via the NameNode. Since we are using Docker overlay network, we should launch NameNode container by the namennand other containers in the network can communicate to NameNode usingnnas the address.hdfs-site.xmlspecifies the local directories for HDFS:dfs.namenode.name.dirsets the path for storing the NameNode metadata, anddfs.datanode.data.dirsets the path for storing the datanode’s block data. Note that we should bind the VMs/data/directory to containers/dataso that the extra storage can be used by HDFS containers.
In default commands:
hdfs-namenode.Dockerfileinitializes the HDFS NameNode by formatting it (hdfs namenode -format -force) and then starts the NameNode service to manage the filesystem athdfs://nn:9000.hdfs namenode -format -force && hdfs namenode -fs hdfs://nn:9000hdfs-datanode.Dockerfilestarts the HDFS DataNode service and connects it to the NameNode athdfs://nn:9000.hdfs datanode -fs hdfs://nn:9000
Launch NameNode
# inside cs744-sp25-a1 directory
# at node 0
docker run -d \
	--name nn \
	--network spark_net \
	-p 9870:9870 \
	-v /data:/data \
	-v ./src:/src \
	-v /proj/uwmadison744-s25-PG0/wikidata/enwiki-pages-articles:/enwiki-pages-articles \
	hdfs-namenode
The name of the container is nn and it is attached to spark_net network. We forward the 9870 port to host (which is mapped to our workstation) to access HDFS namenode UI. We mount three host directory, /data (as explained above), /src (access to your programs, scripts and files, more on this later) and enwiki-pages-articles (a dataset used for Spark, more on this later).
Launch DataNode:
# inside cs744-sp25-a1 directory
# at node 0
docker service create \
	--name dn \
	--network spark_net \
	--replicas 3 \
	--mount type=bind,source=/data,target=/data \
	hdfs-datanode
This command creates a Docker service named dn for the hdfs-datanode image, using the spark_net overlay network, deploying three containers (--replicas 3), and binding the host’s /data directory to the container’s /data directory.
Check HDFS Deployment
If you run docker ps on all nodes, you should see a DataNode container running on all nodes and a NameNode container running only on node0. You can also run docker service ps dn on node0; it shows the DataNode instances and their assigned nodes. Swarm’s default scheduler should assign one DataNode per node, otherwise kill and re-create DataNode service.
To check the HDFS status, go to http://10.10.1.1:9870 on your browser (provided the SOCKS proxy is enabled).
Apache Spark
Apache Spark is a powerful open-source unified analytics engine for big data processing, which is built upon its core idea of Resilient Distributed Datasets (RDDs). Spark standalone consists of a set of daemons: a Master daemon, and a set of Worker daemons. Spark applications are coordinated by a SparkContext object which will connect to the Master, responsible for allocating resources across applications. Once connected, Spark acquires Executors on every Worker node in the cluster, which are processes that run computations and store data for your applications. Finally, the application’s tasks are handed to Executors for execution. We will use Spark in standalone mode, which means it does not need to rely on resource management systems like YARN.
Build Docker Images
We already built the necessary Docker images using ./docker-build.sh script. We recommend going through the three Dockerfiles:
spark-base.Dockefilespark-master.Dockerfilespark-worker.Dockerfile
Note that we are updating two configuration files: spark-defaults.conf and spark-env.sh:
spark-defaults.confenables event logging and history server functionality.spark.eventLog.dirspecifies the HDFS directory (hdfs://nn:9000/spark-logs) for storing Spark event logs,spark.eventLog.enabledenables event logging, andspark.history.fs.logDirectorypoints the history server to the same directory to access past application logs for monitoring.spark-env.shspecifies three environment variables. These configure Spark’s runtime environment:PYSPARK_PYTHONandPYSPARK_DRIVER_PYTHONspecify Python 3 as the interpreter for both PySpark executors and drivers, whileSPARK_LOCAL_DIRsets the directory (/data/tmp) for temporary storage during Spark execution.
Take note of the default commands:
spark-master.Dockerfilestarts the Spark master using thestart-master.shscript and keeps the container running indefinitely withsleep infinity./spark-3.3.4-bin-hadoop3/sbin/start-master.sh && sleep infinityspark-worker.Dockerfilestarts a Spark worker and connects it to the master atspark://master:7077, keeping the container running indefinitely withsleep infinity./spark-3.3.4-bin-hadoop3/sbin/start-worker.sh spark://master:7077 && sleep infinity
Launch Spark Master
# inside cs744-sp25-a1 directory
# at node 0
docker run -d \
	--name master \
	--network spark_net \
	-p 8080:8080 \
	-p 4040:4040 \
	-p 18080:18080 \
	-v /data:/data \
	-v ./src:/src \
	spark-master
This runs a container named master in detached mode (-d) using the spark-master image. It connects the container to the spark_net network and maps ports 8080, 4040, and 18080 to the host (node0) for accessing the Spark master UI, application UI, and history server, respectively. Additionally, it mounts the host directories /data and ./src into the container for using extra storage of host and for accessing source files respectively.
Launch Spark Worker:
# inside cs744-sp25-a1 directory
# at node 0
docker service create \
	--name worker \
	--network spark_net \
	--replicas 3 \
	--mount type=bind,source=/data,target=/data \
	spark-worker
Similar to HDFS datanodes, this command creates a Docker service named worker using the spark-worker image deploying three containers (--replicas 3) connected to the spark_net overlay network. It also binds the /data directory on each host to the container’s /data directory, to store temporary files in the extra storage of hosts.
Check Spark Deployment
Similar to HDFS, verify that a Spark worker is running on every node and a Spark master is on node0. You can go to http://10.10.1.1:8080 of your browser to check the status of the Spark cluster. (provided the SOCKS proxy is enabled).
Spark Properties
Next, set up the properties for the memory and CPU used by Spark applications. Set Spark driver memory to 30GB and executor memory to 30GB. Set executor cores to be 5 and number of cpus per task to be 1. Relevant information can be found here. Overall, you can:
- Update
spark-defaults.conforspark_env.sh. Note that you may have to modify certain Dockerfiles, rebuild the relevant images on each node and relaunch the containers. - Pass the properties directly in
spark-submitcommand or inSparkSession.builderof yourScala/Pythoncode.
Spark History Server
The Spark History Server is a web interface that displays information about completed Spark applications by reading event logs from a specified directory (e.g., HDFS or local storage). It allows users to analyze past jobs, view stages, tasks, and resource usage metrics for performance optimization and debugging. You can use the following commands to set up a history server.
# at node 0

# create directory in hdfs for spark logs
docker exec nn hdfs dfs -mkdir -p hdfs://nn:9000/spark-logs

# start history server in spark
docker exec master /spark-3.3.4-bin-hadoop3/sbin/start-history-server.sh
Browse to http://10.10.1.1:18080 to view the Spark History Server UI.
Part 2: A simple Spark application
In this part, you will implement a simple Spark application. We have provided some sample data collected by IOT devices as export.csv file. You need to sort the data first by the country code alphabetically (the third column) and then by the timestamp (the last column). Note that if two data tuples have the same country code and timestamp, the order of them does not matter. Here is an example:
Input:
| ... | cca2 | ... | device_id | ... | timestamp |
|-----|------|-----|-----------|-----|-----------|
| ... | US   | ... | 1         | ... | 1         |
| ... | IN   | ... | 2         | ... | 2         |
| ... | US   | ... | 3         | ... | 2         |
| ... | CN   | ... | 4         | ... | 4         |
| ... | US   | ... | 5         | ... | 3         |
| ... | IN   | ... | 6         | ... | 1         |
Output:
| ... | cca2 | ... | device_id | ... | timestamp |
|-----|------|-----|-----------|-----|-----------|
| ... | CN   | ... | 4         | ... | 4         |
| ... | IN   | ... | 6         | ... | 1         |
| ... | IN   | ... | 2         | ... | 2         |
| ... | US   | ... | 1         | ... | 1         |
| ... | US   | ... | 3         | ... | 2         |
| ... | US   | ... | 5         | ... | 3         |
You should first load the data into HDFS. You can execute the following command in an HDFS container using docker exec:
hdfs dfs -put <path to source file/folder> <destination in HDFS>
Then, write a Spark program in Java/Python/Scala to sort the data. Examples of self-contained applications in all of those languages are given here.
We suggest you also go through the Spark SQL Guide and the APIs (e.g. Python API Docs). The Spark Dockerfiles (see spark-base.Dockerfile) have PySpark Python package included. You can modify the Dockerfiles and use any language API of your choice.
Spark enhances data analytics performance using two storage strategies: Resilient Distributed Datasets (RDDs) and DataFrames. RDDs organize data as distributed collections across multiple nodes, while DataFrames store data in a columnar format, similar to relational database tables. In our case, you will create DataFrames from the data that you load into HDFS. For this assignment, you will only use Spark Dataframes. Users may also ask Spark to persist a DataFrame in memory, allowing it to be reused efficiently in subsequent actions (not necessary to do for this part of the assignment, but will need to do it in part 3).
An example of PySpark that should be handy.
from pyspark.sql import SparkSession

# The entry point into all functionality in Spark is the SparkSession class.
spark = (SparkSession
	.builder
	.appName(appName)
	.master(master_url)	# e.g. spark://master:7077
	.config("some.config.option", "some-value")	# e.g. spark properties
	.getOrCreate())

# You can read the data from a file into DataFrames
df = spark.read.csv("/path/to/a/csv/file")	# e.g. hdfs//nn:9000/export.csv
After loading data you can apply DataFrame operations on it.
df.select("name").show()
df.filter(df['age'] > 21).show()
In order to run your Spark application, you need to submit it using spark-submit script from Spark’s bin directory. More details on submitting applications can be found here.
For PySpark, you can also execute Python scripts as follows.
# at node 0
docker exec <container_name> python3 /path/to/python/file.py
Verify that the Spark application is running in a distributed manner, not locally in a single node. You can use Spark Master UI (on port 8080) or Application UI (on port 4040) or History Server (on port 18080) to check the IP addresses of executors and the number of tasks completed by each executor. You can also check for resource utilizations in all nodes during an execution.
Finally, your application should output the results into HDFS in the form of CSV. It should take in two arguments, the first a path to the input file and the second a path to the output file.
Part 3: PageRank
In this part, you will need to implement the PageRank algorithm, which is an algorithm used by search engines like Google to evaluate the quality of links to a webpage. The algorithm can be summarized as follows:
- Set the initial rank of each page to be
1. - On each iteration, each page
pcontributes to its outgoing neighbors a value ofrank(p) / (# of outgoing neighbors of p). - Update each page’s rank to be
0.15 + 0.85 * (sum of contributions). - Go to the next iteration.
In this assignment, we will run the algorithm on two data sets. Berkeley-Stanford web graph is a smaller data set to help you test your algorithm. And enwiki-pages-articles (we have already put it to path /proj/uwmadison744-s25-PG0/wikidata/enwiki-pages-articles/) is a larger one to help you better understand the performance of Spark. Each line in the data set consists of a page and one of its neighbors (seperated by a tab). You need to copy the files to HDFS first. In this assignment, always run the algorithm for a total of 10 iterations.
- Task 1. Write a Scala/Python/Java Spark application that implements the PageRank algorithm.
- Task 2. Spark divides data into smaller chunks called partitions, which are distributed across different nodes in the cluster to enable parallel processing. The number and organization of these partitions can be changed using operations such as
repartition()andcoalesce(). Additionally, you can adjust default configurations likespark.sql.files.maxPartitionBytesandspark.sql.shuffle.partitions(and many more) usingspark.conf.set. When writing DataFrames back to disk, you can also decide how to repartition data to optimize performance and file sizes. For this task:- Experiment with different partitioning strategies by varying the number of partitions.
- Use
.explain()method to analyze the physical and logical plans if necessary. - Compare the performance of your strategies in terms of execution time, shuffle size, and the number of partitions created.
- Document your findings with explanations for the observed behavior and provide a reasoned conclusion.
-
Task 3. Persist the appropriate DataFrame(s) as in-memory objects and see what changes.
- Task 4. Kill a Worker process and see the changes. To simulate worker container failures, you can scale down the worker service and manually trigger the failure. Specifically:
  # at node 0
  docker service scale service_name=2
You should trigger the failure to a worker container when the application reaches 25% and 75% of its lifetime.
With respect to Task 1-4, in your report you should report the application completion time. Present/reason about the difference in performance or your own findings, if any. Take a look at the lineage graphs of applications from Spark UI, or investigate the log to find the amount of network/storage read/write bandwidth and the number of tasks for every execution to help you better understand the performance issues. You may also wish to look at CPU usage, memory usage, disk IO, network IO, etc.
Deliverables
You should submit a tar.gz file to Canvas, which consists of a brief report (filename: groupx.pdf) and the code of each task (you will be put into your groups on canvas so only 1 person should need to submit it).
- Include your responses for Tasks 1-4 in the report. This should include details of what you found, the reasons behind your findings and corresponding evidence in terms of screenshots or graphs etc. NOTE: Please create a subsection for each task and clearly indicate your response to each task.
- In the report, add a section detailing the specific contributions of each group member.
- Put the code of each part and each task into separate folders and give them meaningful names. Code should be commented well (that will be worth some percentage of your grade for the assignment; grader will be looking at your code). Also create a README file for each task and provide instructions about how to run your code.
- Include a
run.shscript and aREADME.mdfor each part of the assignment that can re-execute your code on a similar CloudLab cluster.
FAQ’s
These are based on the questions which students who previously took the course asked.
Regarding Experiments on Cloudlab The default length of experiments on cloudlab is 16hrs. You can extend a running experiment by another 16hrs if you need more time. Extensions longer than 7 days require approval by cloudlab staff are not recommended. Make sure you create one experiment per group so all groups have access to compute clusters.
Acknowledgements
This assignment uses insights from Professor Aditya Akella’s assignment 1 of CS744 Fall 2017 fall and Professor Mosharaf Chowdhury’s assignment 1 of ECE598 Fall 2017. Thanks to Yushan and Yiwei for their repository on Dockerizing the assignment.