Step 3: How to edit a project

Launch Create Edit Run previous

step next step

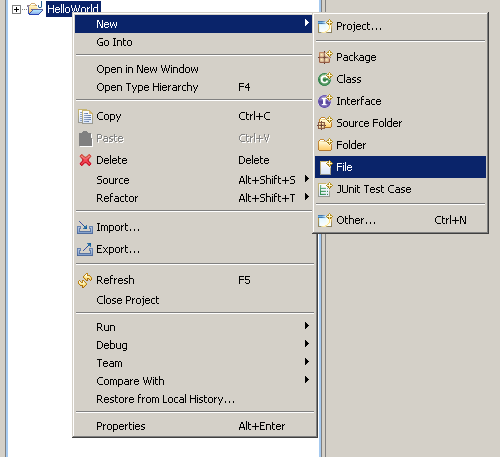
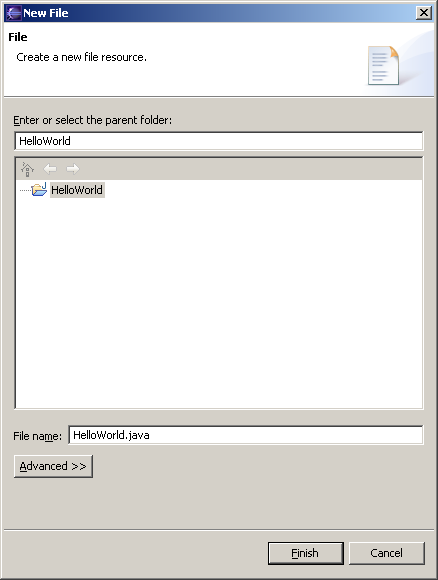
This step will show you how to edit a source file in Eclipse.

  1. Launch the Eclipse IDE if it is not currently running. Return to Step 1 of this tutorial if you need help completing this step.

  2. We need to create a source file where we will write our program. Right-click on the "HelloWorld" project in the Package Explorer tabbed pane on the left side of the screen and navigate to New → File, as in the following example:
    New File

  3. Another window will be displayed. Click on the HelloWorld folder if it is not highlighted. Then click in the text box labeled "File name:" and type in HelloWorld.java, as in the following example:
    New File Wizard
    Click Finish. This will create a new tabbed window where you can edit the HelloWorld.java source file. The single step creates the empty file and adds it to the project for you.

  4. Now that we've completed the setup we can write the program. Enter the following text into the HelloWorld.java window.
    Hello World source code
    As you edit the file, you may notice red underlines appearing. This is Eclipse's attempt to correct you, the same way a word processor attempts to correct spelling. If you follow the above, the red lines will eventually disappear, though it is normal for some to appear as you are writing programs. If there are still some left, compare the above image with the file you wrote until you find the difference. Issuing the "Build All" command may also clear up problems occasionally.

    Also, note that even if the red lines disappear, this doesn't mean that your program will work correctly! Just as your word processor only knows how to spell and the rudiments of grammar but not how to write an essay, Eclipse knows what a valid Java program looks like, but doesn't understand whether or not the program you wrote does what you want it to. For a simple program like the above, it may very well work as soon as it is recognized as a valid Java program, but for more complicated programs, validity is only the tip of the iceberg.

    It's also worth mentioning that Eclipse will fill things in for you. For example, if you put a left parenthesis (, it will follow it up with a right parenthesis ). You can keep on typing and fill in the space between the parentheses. When you're done, you can either manually type the end parenthesis ), which will type over the old one, or you can press the right arrow key to skip past the old one.

  5. Finally, personalize the file by adding the following header to the top of the file and fill in the fields appropriately. The Title is the name of the overall program (HelloWorld in this case) and Files is the list of source files you created (just HelloWorld.java in this case). This header should be included with all of the files you hand in. Instead of typing the header yourself you can select (click and drag over the text) the text below and choose "Copy" from the "Edit" menu, or hold Ctrl and press C on your keyboard. Then put the insertion point at the top of your HelloWorld.java file and choose "Paste" from the "Edit" menu, or hold Ctrl and press V on your keyboard.
  6. ///////////////////////////////////////////////////////////////////////////////
    //                   ALL STUDENTS COMPLETE THESE SECTIONS
    // Title:            (program's title)
    // Files:            (list of source files)
    // Semester:         Spring 2007
    //
    // Author:           (your name and email address)
    // CS Login:         (your login name)
    // Lecturer's Name:  (name of your lecturer)
    // Lab Section:      (your lab section number)
    //
    //                   PAIR PROGRAMMERS COMPLETE THIS SECTION
    // Pair Partner:     (name of your pair programming partner)
    // CS Login:         (partner's login name)
    // Lecturer's Name:  (name of your partner's lecturer)
    // Lab Section:      (your partner's lab section number)
    //
    //                   STUDENTS WHO GET HELP FROM ANYONE OTHER THAN THEIR PARTNER
    // Credits:          (list anyone who helped you write your program)
    //////////////////////////// 80 columns wide //////////////////////////////////
    
    
  7. While you are editing the source code, it is a good idea to save your work frequently. The more often you save your work, the less work you will have to recreate in the event of a system crash or other interruption in your work.
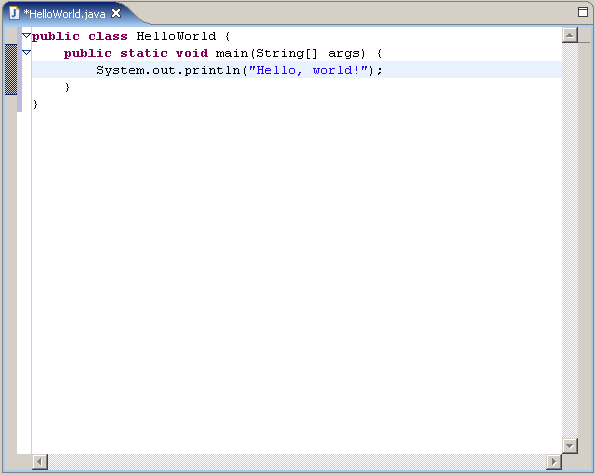
  8. You save the file by clicking on the disk icon. Files that have been modified since last save will have an asterisk before the file name, as in the above image.

You're almost there! The next step will be to run the program.
Launch Create Edit Run previous step next step

Last modified September 6, 2005
Original version created by Sue Hazlett
Updated for Eclipse by Martin Hock
Updated for lab section use by Beck Hasti