Page 6: Convenient Coordinate Systems
Spring 2026 Sample Solution
A Key Idea of Computer Graphics: Work in Convenient Coordinate Systems
Transformations give us the ability to control what coordinate system we work in. We have no excuse not to use them to work in one that is convenient for us.
I want to get this point across early. Even though we only have translate and scale, we can still see some useful examples. As the transformations become more complex, we will see even more possibilities.
Example 1: Do a Flip
With Canvas, the “given” coordinate system has its origin in the top left, with Y going downwards and the X axis going to the right.
In math classes, we usually put the origin in the lower left corner and have y going upwards. Y-up is easier for me to think about (perhaps because I am used to it).
We can flip the Y axis so that it goes upwards by scaling it by -1. This is a non-uniform scale (we still want the X axis to go to the right). The center of the coordinate system is still at the top of the canvas, so if we have positive Y values, it will be above the top. This is easy to fix by shifting the whole thing downward. Since down is negative (because of the scale), we can do:
1// assumes the canvas is canvas, and the context is ctx
2ctx.scale(1,-1);                    // flip Y
3ctx.translate(0,-canvas.height);    // move downwards
Of course, we could have done the scale and translate in a different order. What would that look like?
Translate by:
,
Scale by:
,
If you want to see this on a real example, I will draw the same picture three ways. The first with the regular canvas coordinate system, the second scaling and translating, and the third translating and scaling. Read the code 02-06-01.js ) and notice how the values for the translation change depending on the order. If you want, you can make a more interesting picture.
view - look at the box and experiment with it
examine - look at the code for the box
edit - change the box's content
rubric - several steps are suggested in the rubric page - form elements on page in rubric
02-06-01.html 02-06-01.js
Example 2: Fill the Box 1
If we want to make something in the canvas, we need to know how big the canvas is. Sometimes we just want to fill the canvas. Rather than measuring in pixels, we measure in “percentage of the canvas” so that 50% (.5) is halfway.
We can scale the coordinate system to use “percentage coordinates.” We can even combine this with a flip.
view - look at the box and experiment with it
examine - look at the code for the box
edit - change the box's content
rubric - several steps are suggested in the rubric page - form elements on page in rubric
02-06-02.html 02-06-02.js
You should have guessed these lines:
|
|
Example 3: Fill the Box 2: Your Turn
In computer graphics, we often like to have a coordinate system with the origin in the center of the “window” (in our case, the Canvas we’re working in), and the x and y coordinates ranging from -1 to 1. That way, we can draw things with the same coordinates no matter how big the window is. These are sometimes known as “normalized coordinates.”
For pedagogical reasons, in class we prefer -100 to 100 (integers are easier to type and read). In the old days, some web browsers had problems with floating point numbers in their Canvas engines.
You can create the coordinate system for canvas using a translation and a scale (in either order). In 02-06-03.js , replace the “Student will replace this line” lines to set the coordinate system so it goes from -100 to 100 in x and y. The picture is a diamond shape that touches the edges, a plus at the center, and a T near the top left. You should only add translate and scale commands to set the coordinate system. If you do it correctly, you will fill each of the boxes below in a similar way.
view - look at the box and experiment with it
examine - look at the code for the box
edit - change the box's content
rubric - several steps are suggested in the rubric page - form elements on page in rubric
02-06-03.html 02-06-03.js
| Kind
Kind of rubric items: standard - expected from all students advanced - used to get a better grade creative - an opportunity to do something creative levels - rubric item graded by selected achievement level optional - not required, but encouraged |
Description | |
| standard |
When you’re done, it should look like
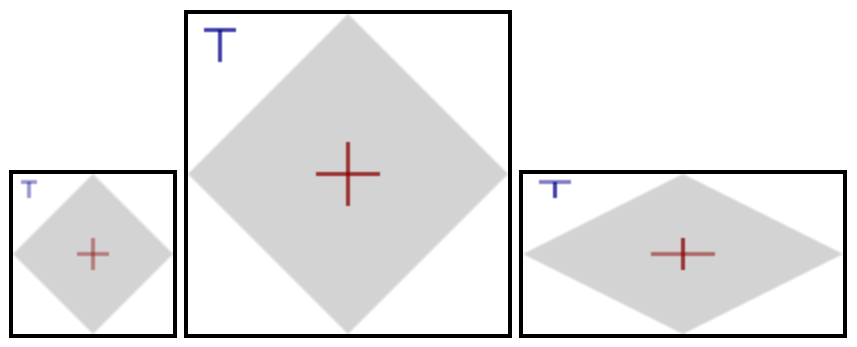
HINTS: you can access canvas.width and canvas.height. You only need to add two lines of code to the picture function within part5. The picture has a T in the top left corner, and a red plus in the middle; you cannot see the T and can see only part of the plus in the initial code.
Example 4: Design in Place
If I want to make an object that is made up of different objects, it can be convenient to define the coordinate system in terms of the “whole” and have the parts be positioned relative to that.
For example, consider making a face. I could put the face where it is supposed to go, and then put the eyes where they need to go. Or, I could make a coordinate system for the face, place the eyes in that coordinate system
|
|
Was this easier? It’s clear that left (-10) and right (10) are relative to the center of the face. And that the mouth is part of a circle that is centered in X, and close to the center in Y. For this simple case, we probably could have used the numbers directly.
A big advantage is that we can define the face (in a way that’s convenient), and then figure out where it goes later. In this example we can adjust that initial translate.
The concept here is that we’ve defined a coordinate system for the face. We create the object in this coordinate system. And then we place this coordinate system in the world (that first translate in the program). This will have many advantages as we’ll see later in the workbook.
To give you a preview…
- We can define an object once in its own coordinate system. And then make multiple copies, using transformations to move these copies to different places. We call these copies instances.
- We can place objects relative to their “parent”. For example, we can design a wheel in “wheel” coordinates. Then we place the wheel into “car” coordinates (positioning it relative to the body). As the car moves, the wheel stays attached. Of course, we could place the car on the road, the road in the city, the city on the planet, the planet in the solar system, and so on. This idea of building things by putting child pieces relative to their parents (recursively) is called hierarchical modeling.
| Kind
Kind of rubric items: standard - expected from all students advanced - used to get a better grade creative - an opportunity to do something creative levels - rubric item graded by selected achievement level optional - not required, but encouraged |
Description | |
| standard | Convenient Coordinate System Type-ins |