Page 11: Rotations and Articulation
Spring 2026 Sample Solution
The old lectures mix the topics on this page in with other topics. Some relevant pieces are:
Part of 2023 Lecture 6 | Slides
Rotation
Time for the next transformation: Rotation. Spinning things around.
Rotation will turn out to have all sorts of complexity to it - especially when we get to 3D. We’ll talk about the math more later in the workbook (in Linear Transformations (rotation)) and when we get to 3D.
But the basic idea is simple: we spin an object around some point.
Rotations are a rigid transformation: they do not change the distances between points. Translation is also a kind of rigid transformation. Rigid transformations are important: many objects in the real world do not change shape as they move.
If translation is sliding the paper you’re drawing on in some direction, scaling is stretching it, then rotation is turning it by some amount.
Rotation
When you rotate, there is always one point that you spin around: the center of rotation. By convention, this is the center of the coordinate system.
With Canvas, the rotation command measures the amount of rotation in radians, measured clockwise. Actually, it is better to say “from the X axis towards the Y axis” in case the axes change.
|
|
Because the center of rotation is at zero (the top left corner), things quickly move out of the screen.
Of course, we can change coordinate systems to move the origin to the center of the window so we can see what is going on. Here, we are drawing the coordinate axes (x=0 and y=0) before we do the rotation. Make sure to look at the code to understand the change of coordinate system!
|
|
In TransformToy, the center of the initial coordinate system is already in the center of the canvas. It uses degrees, since these are a little more “human readable.”
Properties of Rotations
Rotations preserve distances. That means that the distance between any two points before the transformation will be the same afterwards.
This applies to the center as well: the distance from a point to the center will be the same after the transformation. Therefore, the set of places a transformation can “take” a point to is a circle.
Rotations also preserve angles. This is implied by preserving distances. The angle between 3 points will remain the same after transformation.
The trickier one to understand: rotations preserve handedness. The reason for calling it “handedness” will be easier to explain when we get to 3D. However, for now, handedness means that if 3 points are oriented clockwise before transformation, they will be clockwise in the transformed coordinate system as well.
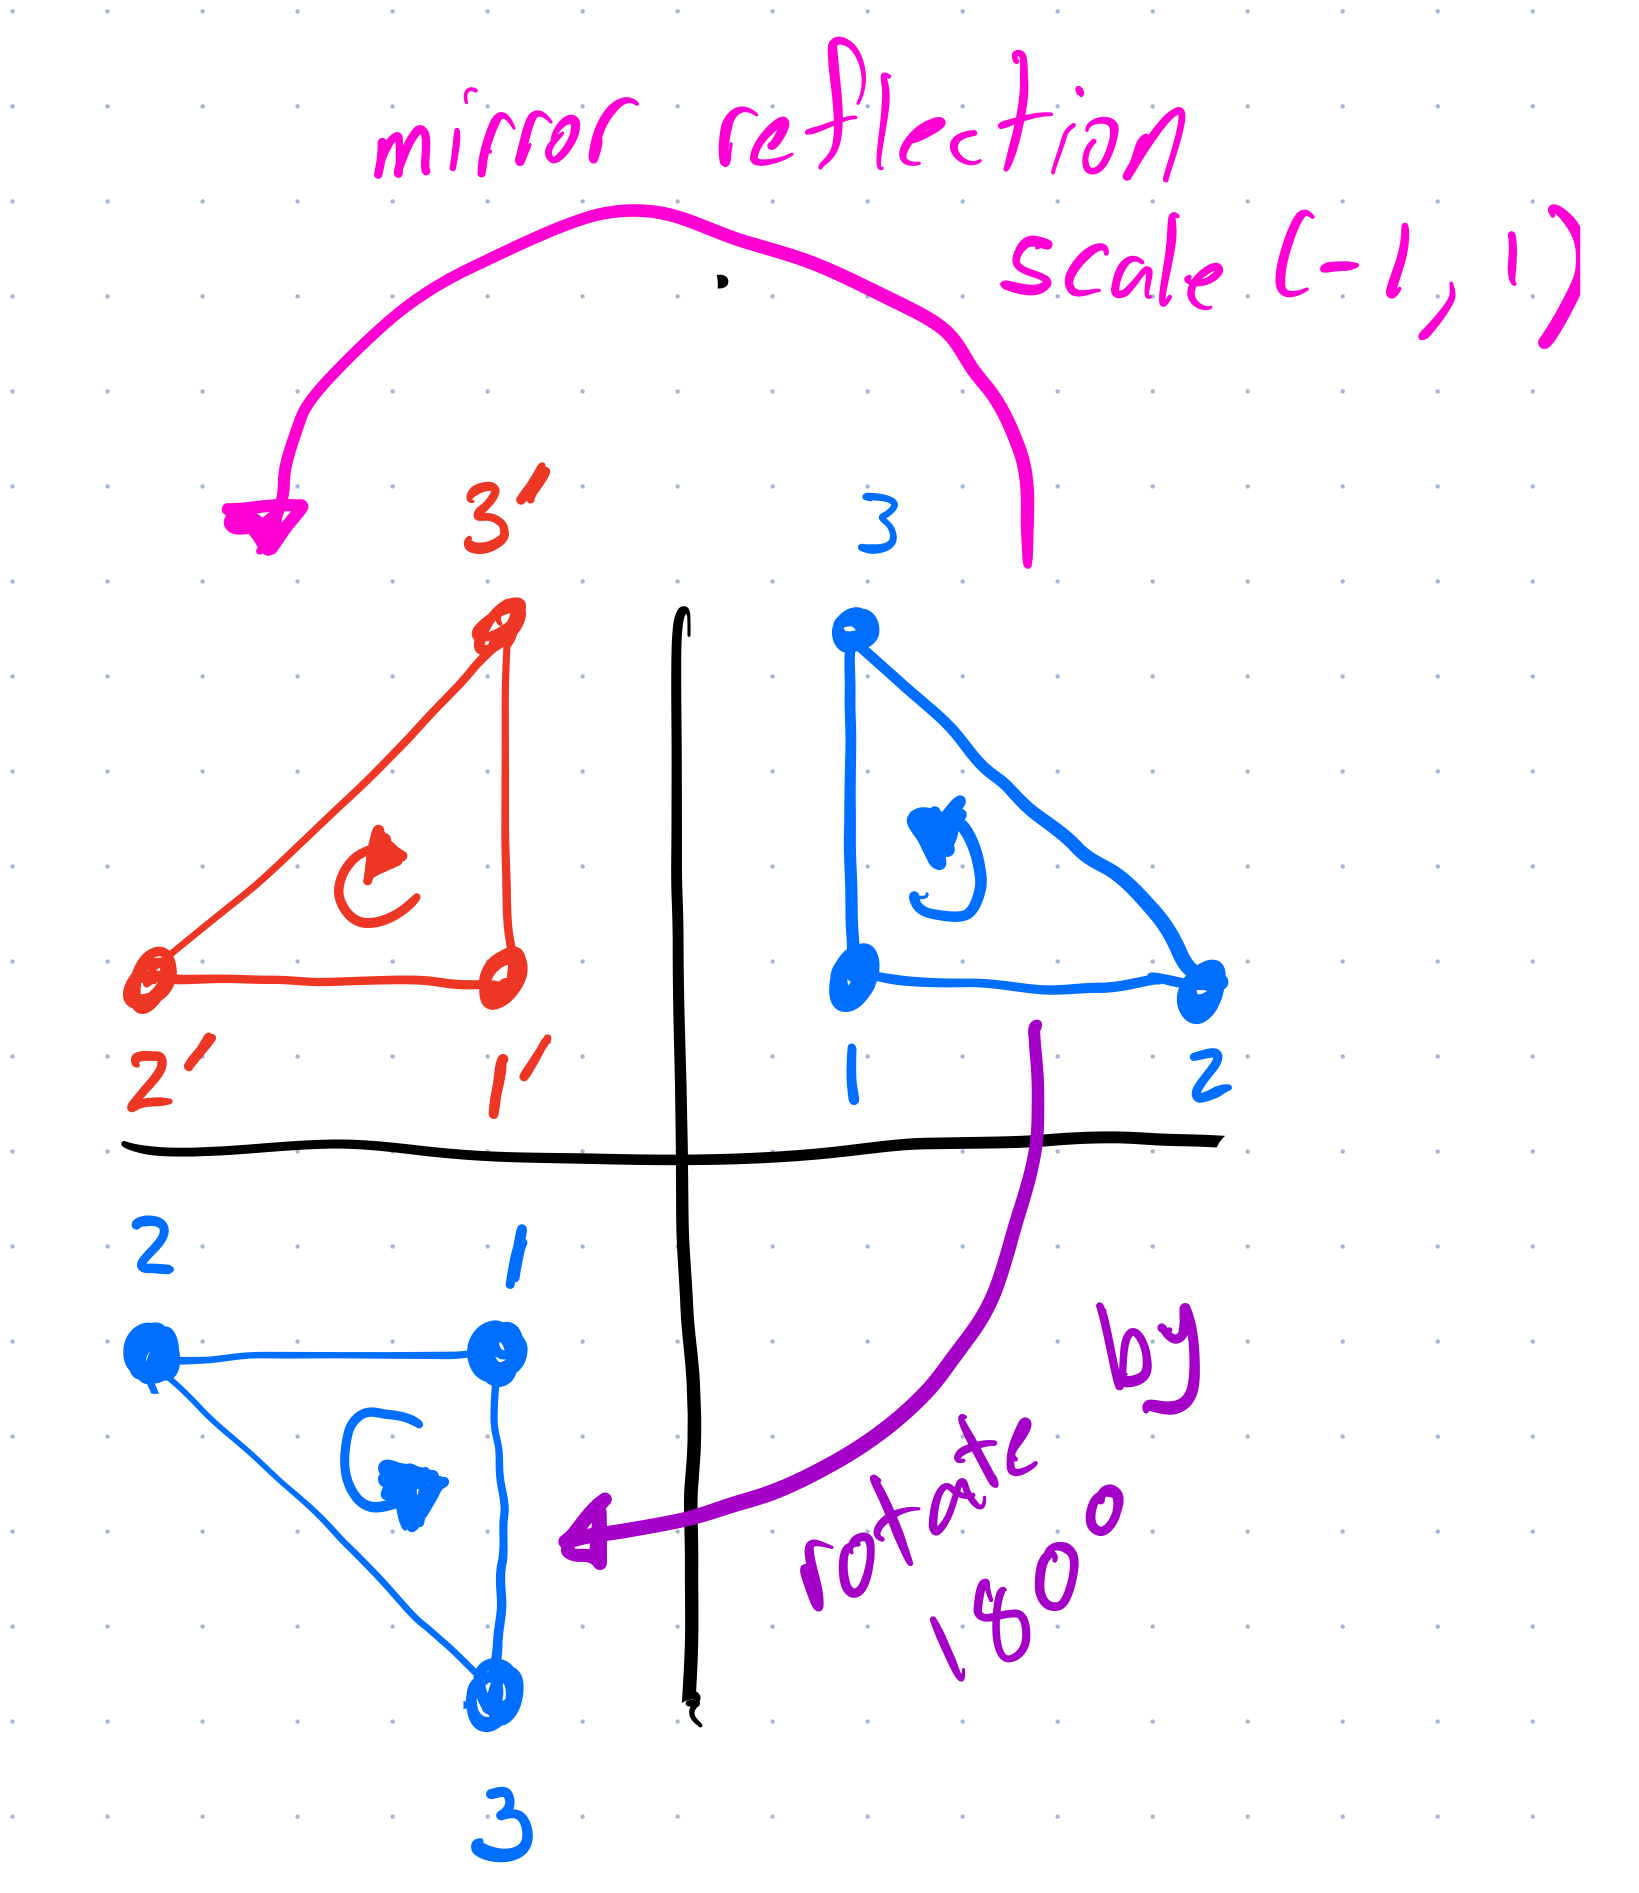
Notice that in the original triangle (points 1,2,3, upper right), the points go counter-clockwise. After a 180 degree rotation the points are still counter-clockwise. A mirror reflection (scale by -1,1) changes the handedness: the red triangle is clockwise.
Mirror reflection is not a rotation, because it changes handedness.
Center of Rotation
Just like with scaling, the center of rotation (the point that does not move) is at the center of the coordinate system.
We often like to rotate about the center of an object - which means we need to change coordinate systems! We move the object so that the center (the point we want to rotate around) is at the origin of the coordinate system; we rotate; then we move the object back. We can view this as: move the coordinate system to the object’s center, rotate the coordinate system, move the coordinate system back to where it came from. The latter may still feel weird to you, but since the commands operate on coordinate systems, the code will read in the correct direction.
Here are a bunch of squares in different places, rotating around different centers. You should be able to guess what the code looks like, but you should read it anyway 02-11-01.js }.
view - look at the box and experiment with it
examine - look at the code for the box
edit - change the box's content
rubric - several steps are suggested in the rubric page - form elements on page in rubric
02-11-01.html 02-11-01.js
Make sure you understand this! There is a “Rotate around object center” example in the 2D Transform Toy (default demos).
Making good use of center of rotation is an important tool in making objects that move correctly. It’s also useful in positioning things.
An Actual Picture
This time, we’ll make something that you might actually want to make rotate: a simple windmill.
view - look at the box and experiment with it
examine - look at the code for the box
edit - change the box's content
rubric - several steps are suggested in the rubric page - form elements on page in rubric
02-11-02.html 02-11-02.js
The code for this example is in 02-11-02.js . It isn’t great landscape art, but it makes a few points.
Most obviously, it uses rotation to make the mills spin. But it also uses rotate to build the fans: we have code that makes one blade, and then we rotate that blade into 3 other places to make the 4 bladed fan. We talked about instancing on a prior page, but this is an example.
Notice how the picture is built up from parts. The scene is made from windmills. The windmills are made from a body and a propeller. A propeller is made from four blades. Each blade has two pieces.
The idea of building up objects from parts is called hierarchical modeling. Any object is made up of other objects, until at some point we get to primitives.
Coordinate systems and transforms are critical for hierarchical modeling. Each object has its own coordinate system. When a part is placed inside of a containing object, a transformation is used to rotate, translate, and/or scale things into place. In the future, we will use other transformations, too.
Hierarchical modeling makes it easier to build objects. It also makes it easier to change or animate objects - for example, by having the windmill fan as a separate piece, we can rotate it.
Notice how the composition of transformations means that changes we make to a part get properly placed in the whole. The windmill fan rotates about its center. But that gets moved to the correct place on the windmill. And the windmill gets moved to the right place in the scene.
The arm bone is connected to…
Here’s another example of hierarchical modeling: a stick figure arm. Each piece will be simple, but once we put them together, we can always improve how they look. This idea of having a chain of rigid pieces connected by angles is very common. We’ll start with a simple 2 link chain.
Here is a simple example. I am making an arm with two segments. You can imagine the first (blue) rectangle being connected to the shoulder. I am just going to move it to some place away from the origin. I will also draw axes so you can see the “centers of the pieces”.
Warning… Sometimes the browser scrolls the first time you try to click a slider. I haven’t been able to figure this out. If you scroll back, things are usually OK.
The code gets a little bloated drawing the axes. Let me get rid of the axes so we can focus on the important pieces of the code.
|
|
On line 1, we move to the “shoulder” - the position that the arm will start.
The rotation of the arm around this joint happens on line 49. It will affect everything that comes after it (unless we do a save/restore). We draw the upper arm on lines 150-151. Notice that we center the arm in the Y direction.
Line 152 moves the coordinate system to the end of upper arm - where the “elbow” joint will be. We can then rotate around the elbow joint on line 153. The lower arm is drawn in this coordinate system (lines 154-155).
Here is an extended example.
view - look at the box and experiment with it
examine - look at the code for the box
edit - change the box's content
rubric - several steps are suggested in the rubric page - form elements on page in rubric
02-11-03.html 02-11-03.js
The code for this example is in 02-11-03.js and 02-11-03.html. You can read the code to see how it works and how I made the demo showing different views of the same objects. It is important to understand these ideas of hierarchical modeling in the simple cases, before we move on to complex ones.
A hierarchical model that consists of rigid pieces that rotate relative to each other (such as this arm, or even the windmill) is referred to as an articulated object. Sometimes the term is used more generally for an object that has a set of pieces that move relative to each other. This concept is relevant outside of graphics - articulated robots, such as robot arms, can be represented in much the same way (in three dimensions).
Summary
We’ve seen rotations, and how we use transformations to build hierarchical models.
These are both important concepts that will not go away.
We’ll look at a slightly more complex example on the Next: Page 12 - Hierarchy.
Next: Page 12 - Hierarchy